How to forward email in Gmail

Want to send messages automatically from your Gmail account? Here’s what you need to do
Although Gmail’s a brilliant free email service, there are times where you may want to forward messages from it to another account. For example, if you decide that you want your own email domain, you may want to forward all messages from your Gmail account to your new email address automatically. You may even want to send just certain, important messages from one account to another. The good news is that all of this is easy with Gmail. Here’s how you do everything
Forward all email from Gmail
If you want to blanket forward all email from Gmail, these are the steps that you need to follow. Note that Gmail will not automatically forward messages that it believes are spam, so you may still need to check your account from time-to-time, in case there are some important messages that are not being sent to your new email address.
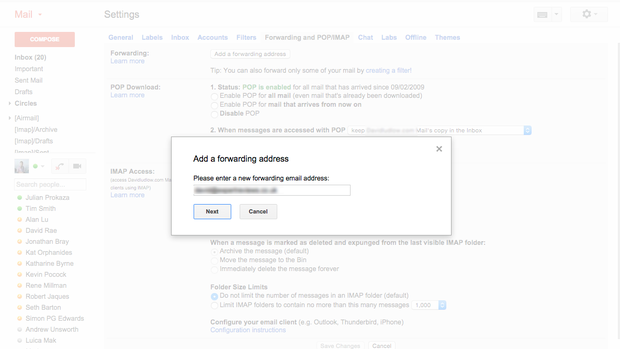
STEP 1 Enter forwarding email address
If you just want to send all of your messages from Gmail to another email account, you can do this easily. Go to your Gmail Inbox using a web browser and click the Cog icon at the top-right of the page, then click Settings. Click the Forwarding and POP/IMAP tab and click Add a forwarding email address. Enter the address that you want to send all email to and click Proceed, then click Proceed again.
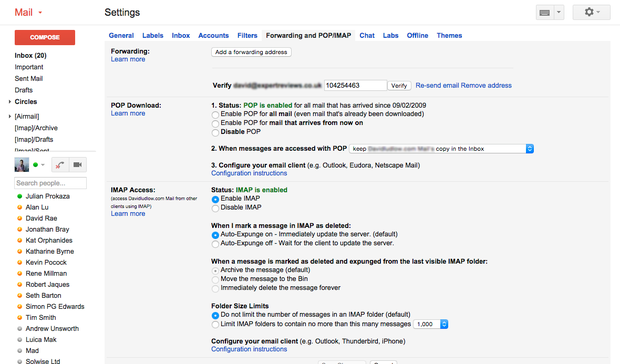
STEP 2 Enter verification code
Gmail will send a confirmation email to the forwarding email address that you specified, so you’ll need to check this address for your message. When you’ve got it, you can either click the link in the email to automatically verify your email, or you can copy the code and paste it into the box in the Gmail, Settings, Forwarding and POP/IMAP page. Once you’ve verified your account, you’re ready to configure forwarding.
STEP 3 Configure forwarding
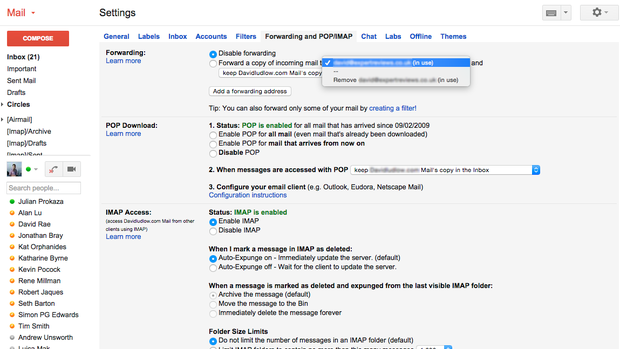
Once you’ve verified your account, Gmail doesn’t start automatically forwarding email; instead, you need to tell it how forwarding should work. Go to your Gmail account’s settings page and go back to the Forwarding and POP/IMAP tab. You can now choose the option to ‘Forward a copy of incoming email to <your verified email address>’. You also need to work out what to do with the email that came into your Gmail account. The default is to keep the message, but you can choose to delete, archive or mark it as read. Click Save changes at the bottom of the page when you’re done and your email will start being forwarded.

STEP 4 Disable forwarding
If you no longer want to forward your emails, go back to the settings page and select Disable forwarding. Click Save Changes to confirm the change. You can also remove your verified forwarding email address. Use the drop-down menu after ‘Forward a copy of incoming mail to’ to select the Remove option for your email. Click OK to confirm the change.
Forward specific email from Gmail
If you only want to send specific emails from your Gmail account to another email address, these are the instructions that you need to follow. All email that doesn’t match the rule you configure will be left in your Gmail inbox. You’ll need to have created a forwarding email address, by following Steps 1 and 2 under Forward all email in Gmail.
STEP 1 Create a filter
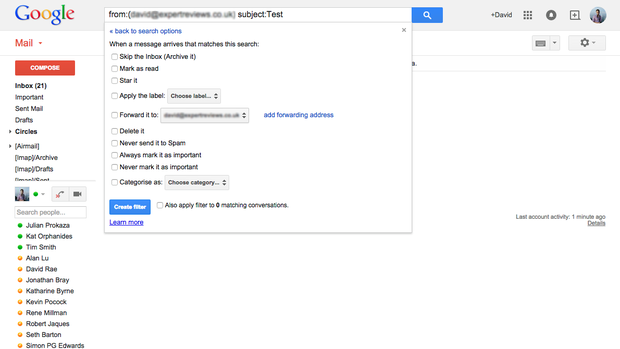
Once you’ve verified an email address (as above), you can go to Settings (click the Cog icon), Forwarding and POP/IMAP. Click on the creating a filter link under Forwarding and you’ll get a dialog box to fill out, which will look for emails matching your criteria. These can include who the message is from, who it’s to, the subject, words in the body copy, plus whether there are attachments and the size of the message. Once you’ve filled in the data, you can click the Search button to verify the list of emails that you’d be forwarding. Click More, Create Filter and you can modify the search results, or you can click Create filter with this search to sort out forwarding.

STEP 2 Select forwarding address
In the Create Filter dialog box, put a tick in the Forward it to box and, from the drop-down menu, select the verified address that you want to send matching messages to. Click Create Filter and the new rule will be created: when you get an email that matches your search criteria, they’ll be sent automatically to the email address that you selected.
STEP 3 Disable filter
If you no longer need your rule, or you need to edit it, go to Settings and click on the Filters tab. This will display a list of all of your filters. To make a change click Edit, and you can change the search criteria and, after you click Continue, what to do when the rules are matched, such as changing who the messages are sent to. If you’d rather delete the filter, just click the Delete link and click OK in the next dialog box.
