To help us provide you with free impartial advice, we may earn a commission if you buy through links on our site. Learn more
- How to fix a Windows corrupt user profile: Before you begin
- 1. Restart your computer
- 2. System restore
- 3. Backup the registry
- How to fix a Windows corrupt user profile on Windows 10
- How to fix a Windows corrupt user profile on Windows 8 or 7: Create a new account
- 1. Enable hidden administrator account
- 2. Log in to the Administrator account
- 3. Create a new account
- 4. Copy old data
- How to fix a Windows corrupt user profile on Windows 8 or 7: Registry edit
- 1. Launch RegEdit
- 2. Change RefCount
There are many annoying things that can happen to your Windows installation, but one of the most irritating faults is a corrupt user profile.
Although all of your precious data like images, video and documents remain safe on your hard disk or SSD, this particularly nasty problem prevents you from gaining access to it.
It’s signified by the rather worrying message: “The User Profile Service failed the logon,” and this can occur across all the versions of Windows, from Windows 10 through to 8, 7 and even as far back as Vista. There’s no need to panic, however. The error is fairly easy to fix, and we’ll show you exactly how to do it in this article.
READ NEXT: The best Windows antivirus software
Before you progress, though, it’s worth taking precautions. When repairing any computer there’s always a chance that you could cause further problems, so make sure you carry out regular backups. If you haven’t got into the habit yet, and you can’t get into your computer, it might be an idea to remove the hard disk and save the files to another laptop or PC. USB disk caddies can be a lifesaver in this situation, letting you plug your hard disk with the damaged user profile in it, into another computer via USB.
How to fix a Windows corrupt user profile: Before you begin
1. Restart your computer
This might sound obvious, but try restarting the system as the first port of call. Windows can occasionally run into problems reading your user profile if you happen to have an antivirus scan running at the time. Reset your computer and attempt to log in again and you might be able to successfully get in this time. Otherwise, continue below.
2. System restore
There’s a chance that you can fix your computer by using System Restore. To do this, restart your computer and hit F8 to bring up Windows’ boot menu. Choose Safe Mode and boot into Windows. When you’re at the desktop get up a Command Prompt and type in rstrui to load System Restore. Click Next and then choose the restore point by date: pick a date where you know that your computer worked properly. Click Next and Finish to restore your computer. That may fix the issue but if not, you’ll need to begin preparations for further, slightly tricker, methods.
3. Backup the registry
Your first job is to backup the Registry, protecting your computer should the steps fail below. Fortunately, this is an easy job and you don’t need to be able to boot into the full OS to do it. Restart your computer and tap F8 after the BIOS POST screen to bring up the boot menu. Select Safe mode from the list.
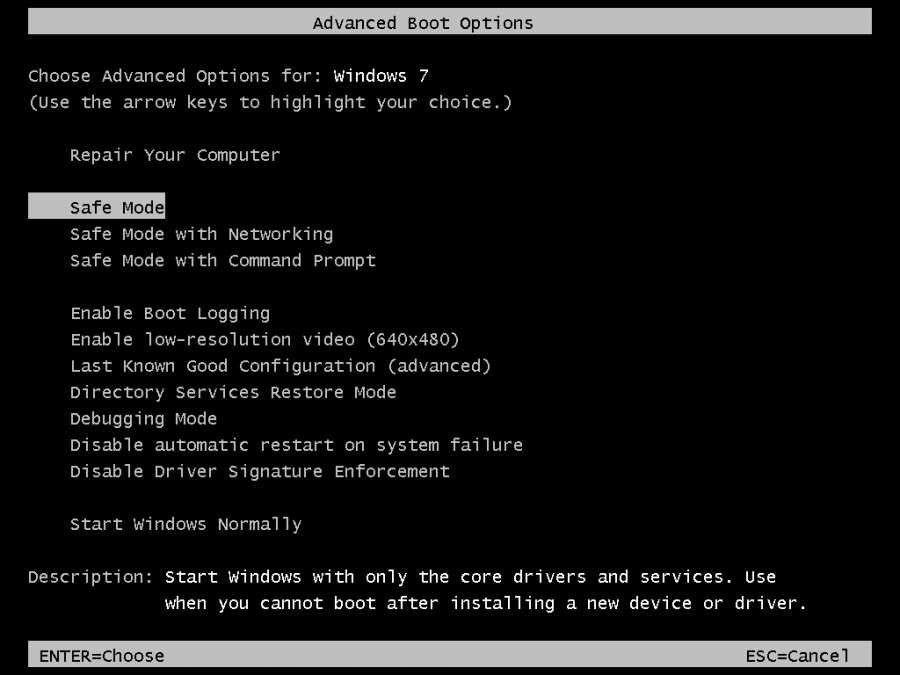
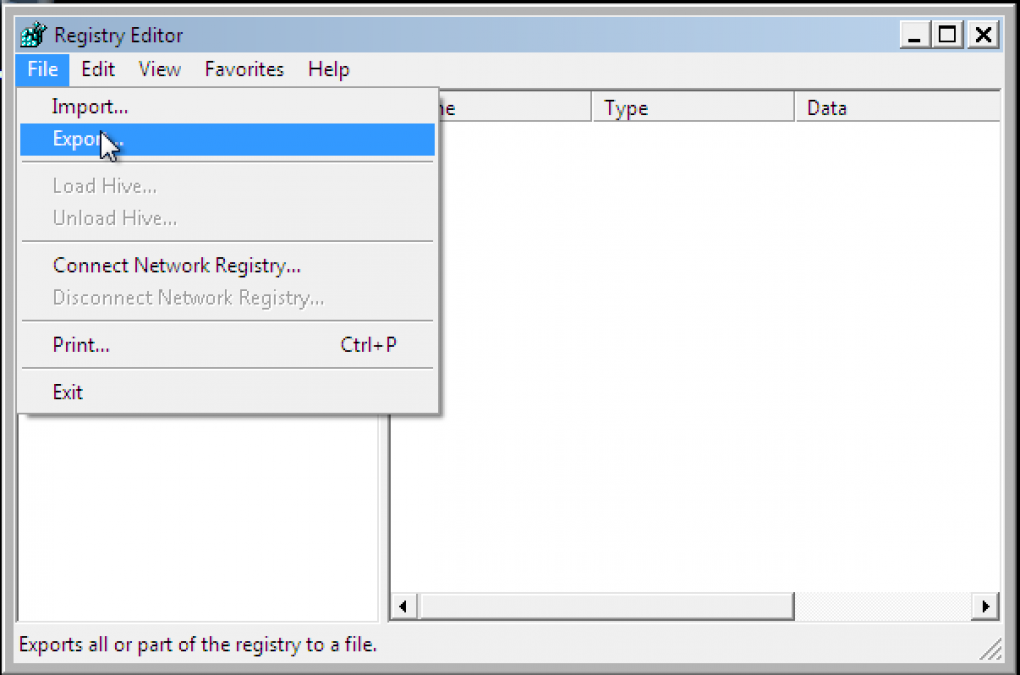
Let your computer boot up. You may need to enter your username and password to log in to the Safe Mode Desktop. Normally, you’d be able to backup the Registry by creating a System Restore point, but you can’t do this in Safe Mode. Instead click on Start, type Regedit and hit Enter. In the Registry Editor hit File, Export, browse to where you want to save backup, enter a name and click Save.
If your computer has a second Administrator account that you can access, you can backup the Registry simply by booting into Windows and creating a new System Restore Point. Click Start, right-click Computer and select Properties. Click System Protection in the left-hand pane, then click the System Protection tab and click Create. Your computer will take a backup of key files and the Registry.
How to fix a Windows corrupt user profile on Windows 10
If you’ve encountered the ‘User Profile Service failed the logon’ error in Windows 10, then there’s a slightly different fix than before, but it requires you to have access to another Windows 10 system.
All you need to do is copy the ‘C:\Users\Default’ folder from a second, non-problematic PC over to your problem PC and pasting it in the same location. Rename the existing folder on your problem PC to something else, just in case you ever need to revert back for any reason.
To access the ‘Default’ folder on your second PC you’ll need to turn on hidden files by clicking ‘View’ in the folder toolbar and selecting ‘Hidden items’.
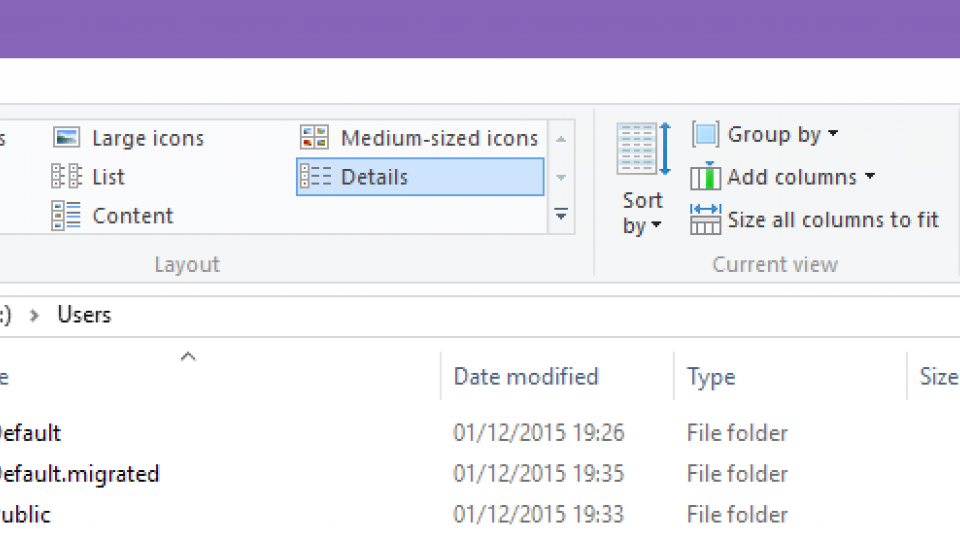
If you’re using an older version of Windows, such as Windows 8 or 7, then this method won’t work. Instead, you’ll have to follow either one of the two methods below to successfully access your desktop.
How to fix a Windows corrupt user profile on Windows 8 or 7: Create a new account
Creating a new account means that you don’t have to edit the Registry and can avoid more potential damage. It’s not such a clean fix, though, so if you’re more confident with using Windows, then the second method below may be more useful.
READ NEXT: Windows 10 review
1. Enable hidden administrator account
The easiest and safest way to fix the problem is to create a brand new account and copy over your old files and settings. However, you can only do this if you’ve got another user account on the computer with Administrator settings. If you have, just boot your computer as normal and skip to Step 2. If you haven’t got another account, you need to enable the hidden Administrator account.
Boot into safe mode as above. Click Start, type ‘cmd’, then right-click Command Prompt and select Run as Administrator. In the command prompt type:
Net user administrator /active:yes
Hit Enter and you should see a message that says, “The command completed successfully”.
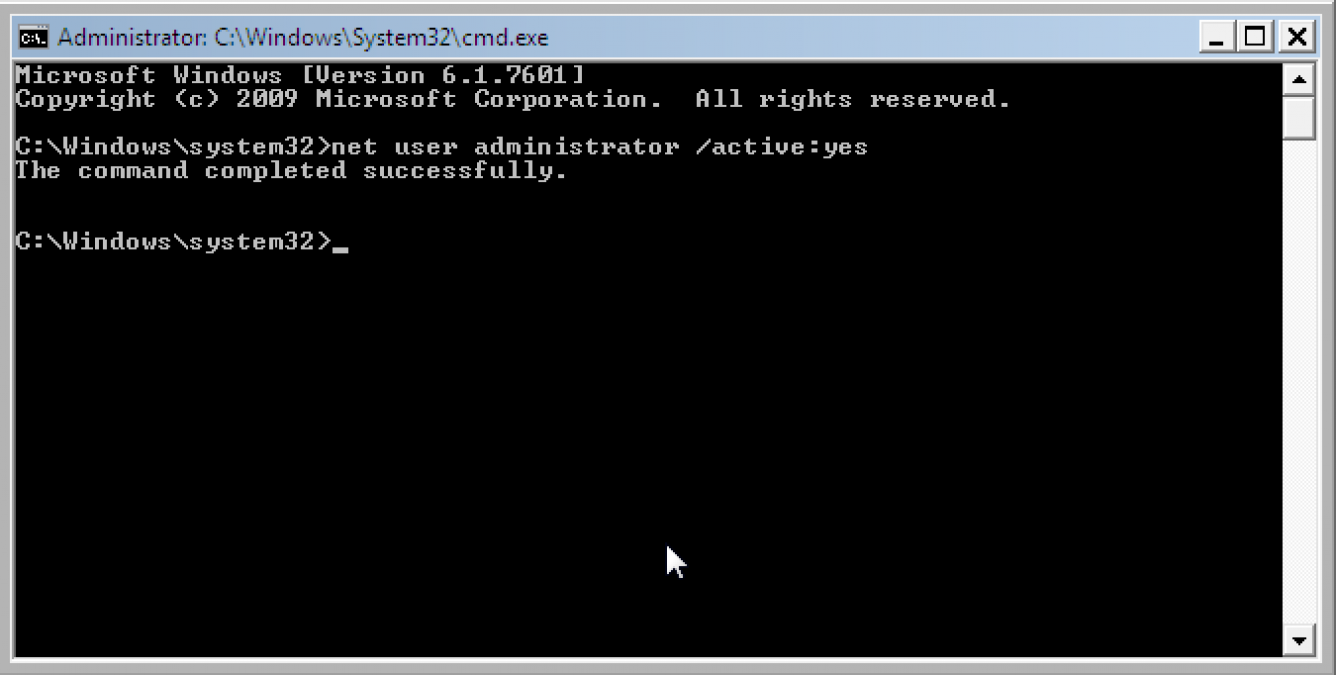
2. Log in to the Administrator account
Start your computer as normal, but when you get to the login screen, don’t log in with your normal user account. Instead, select either the hidden Administrator account, as enabled in Step 1, or another account on your computer that has admin access.

3. Create a new account
Open Control Panel from the Start Menu and select User Account and Family Safety, then click User Accounts. Click Manage another account, then click Create another account. Enter a name for your new user (it must be different to the old one, although you can rename later). Make your new account an Administrator, and click Create Account.
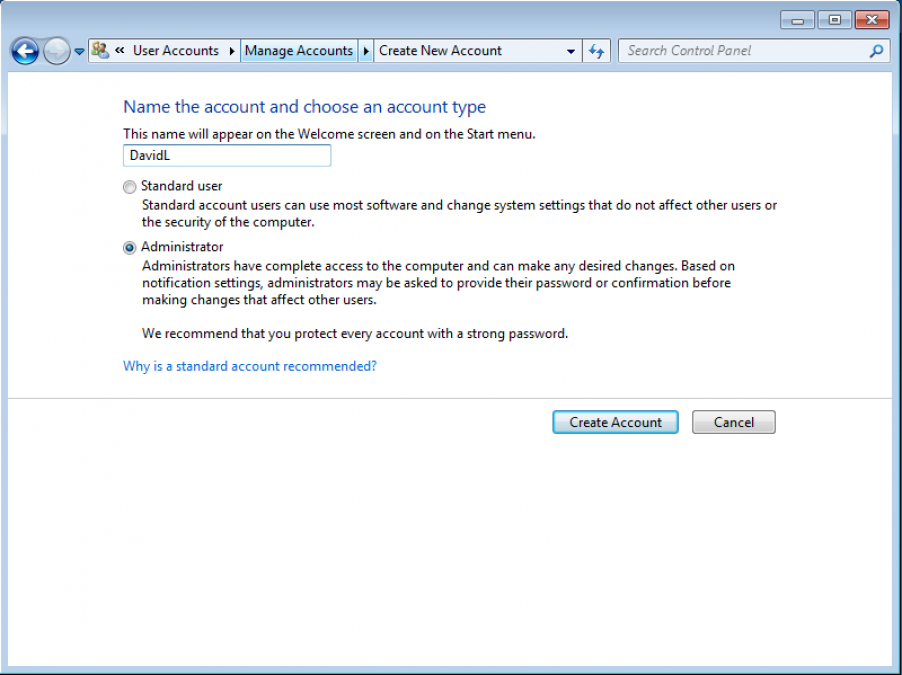
4. Copy old data
You now need to copy all of your old data to your new account. First, click Start and choose Switch account. On the Login screen, click your new account to log in to it for the first time (if you don’t do this, the user folder won’t be created). When you’re at the Desktop, log off and log into the Administrator account you used in Step 2.
Use Windows Explorer to go to your old user’s folder, which is most likely: C:Users
Press Alt, click Tools and select Folder Options. Click View and make sure you’ve selected ‘Show hidden files, folders, and drives’. Deselect ‘Hide protected operating system files (Recommended). Click OK.
Select all files in this folder, except the ones that start Ntuser.dat, Ntuser.dat.log, Ntuser.ini. Press Control-C or select Copy from the Edit menu (if you don’t see the menu press Alt first).
Browse to your new user’s folder (most likely c:Users). Press Control-V, select Paste, or select Paste from the Edit menu (press Alt if you don’t see this menu).
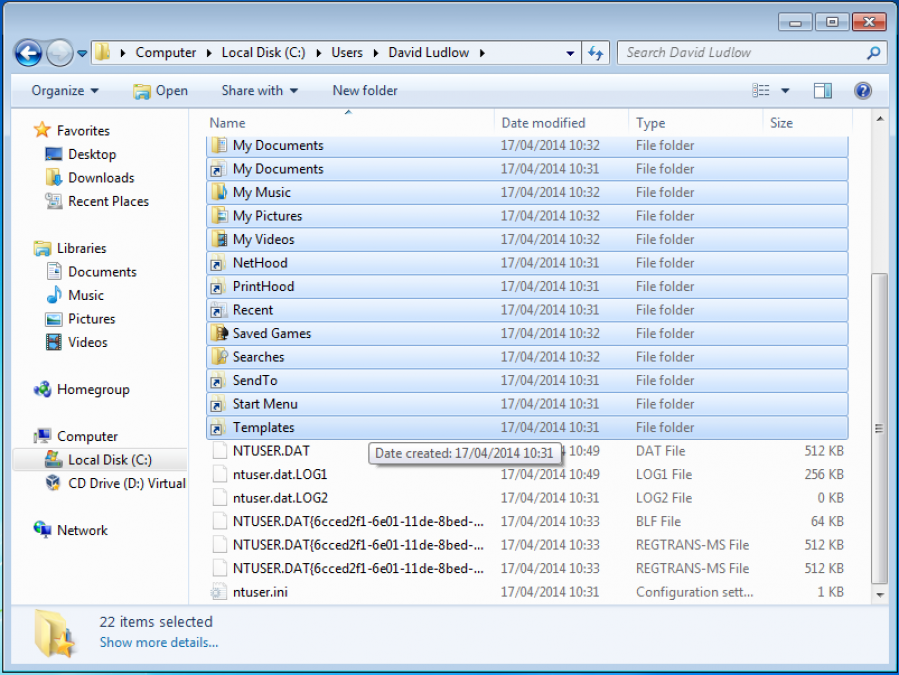
Log off and then back on as your new user. All of your files and application settings should have transferred, although some email applications may have to have messages re-downloaded or their data exported separately (see the manufacturer’s help). When you’re sure that you’ve got everything, you can delete your old user and their files, and rename your new user account. Don’t forget to go back into Safe mode and disable the Administrator account, using the following command:
Net user administrator /active:no
How to fix a Windows corrupt user profile on Windows 8 or 7: Registry edit
This method has the potential to cause more harm, so it’s best followed only by more advanced users. Remember to backup your Registry following the instructions at the start of this article.
1. Launch RegEdit
Restart your computer and boot into Safe Mode, following the instructions at the start of the article. Click on the Start menu, type Regedit and hit Enter to start the Registry Editor.
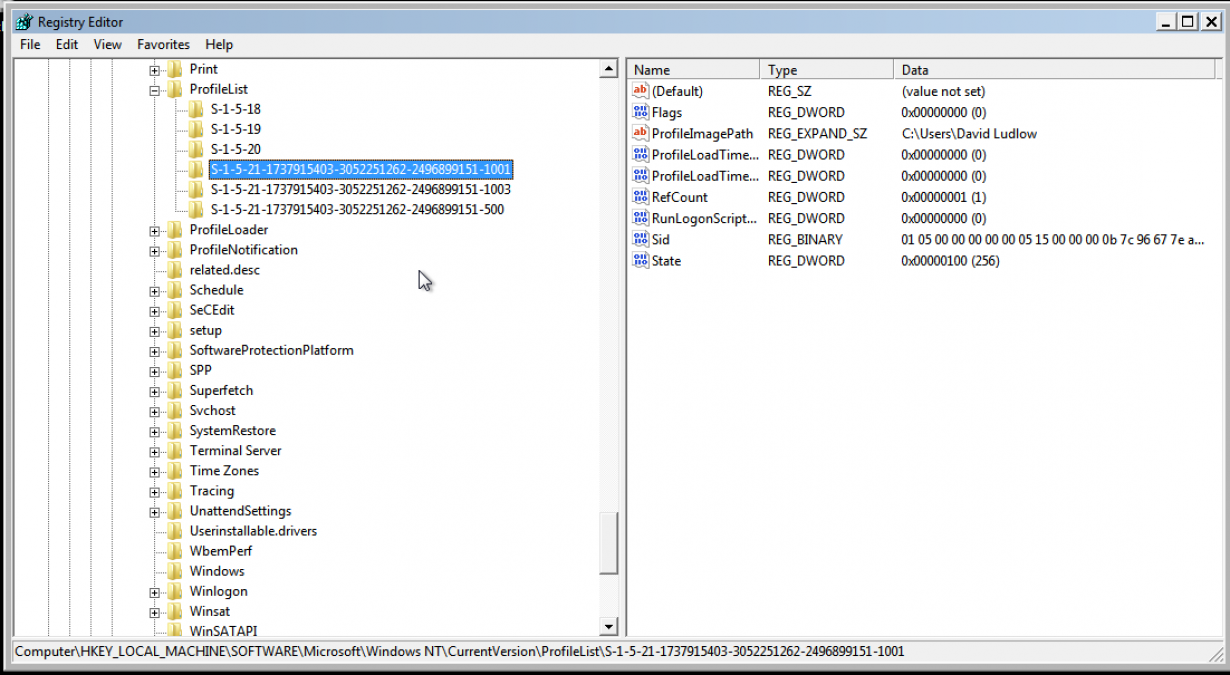
Using the left-hand panel, browse to HKEY_LOCAL_MACHINE/SOFTWARE/Microsoft/Windows NT/CurrentVersion/ProfileList. You’ll see some folders with the name starting S-1-5 followed by a long number. Click on each one in turn, then in the Main Window look at the ProfileImagePath and make sure it’s the account with the problem. This is the name of the user folder and contains the name of the username it relates to.
If you have two folders for your username, and one ends in .bak, you need to right-click the folder that doesn’t have .bak in it, select rename and add ‘.ba’ to the end of the name. Rename the folder with .bak in it, deleting the .bak part of the name. If you have one folder with a .bak at the end, rename to remove the .bak part.
2. Change RefCount
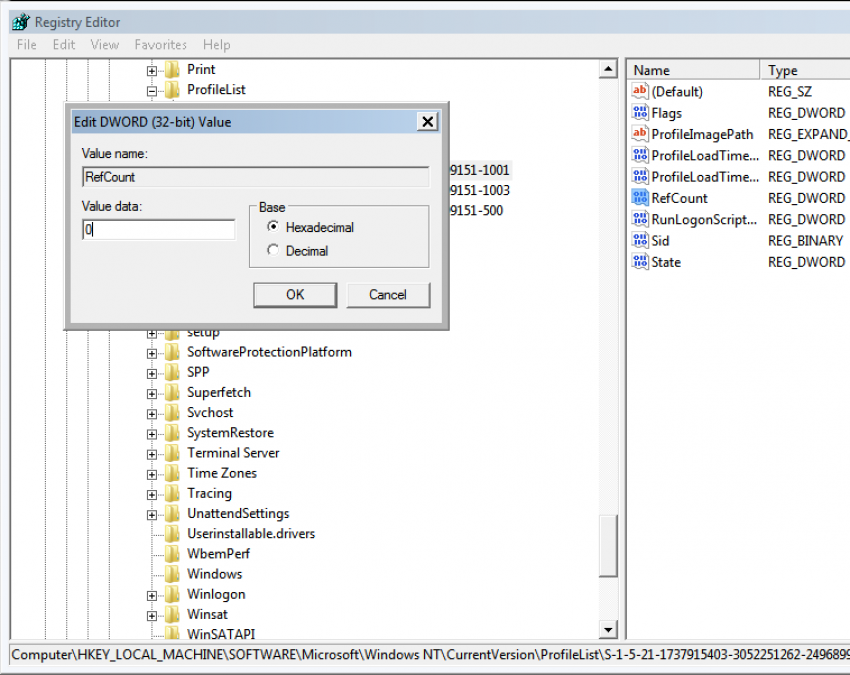
Select the folder with the .bak in the name, then in the main Window double-click RefCount. Change the Value data to 0, then click OK. Close the Registry Editor and restart your computer, and you can now login to your existing account. If you have further problems, you can restore your original Registry settings following the instructions at the start of this article, then follow Method 1 to repair your corrupted user profile.
