To help us provide you with free impartial advice, we may earn a commission if you buy through links on our site. Learn more
Video is one of the most exciting ways to capture a moment, made all the more easy by the fact that we all carry around devices that are capable of shooting in high resolution: our smartphones and tablets.
The downside is that video can be tricky to get right. Here, we’re looking at the top tips and tricks for shooting better video on your iPad, so that you can get the results that you need. We’ve been using the iPad Air and iPad Mini with Retina Display, although the they also apply to any other tablet or smartphone running iOS 7.1, such as the iPhone 5S. The reason we’ve picked the iPad is because its high-resolution screen makes framing and editing footage that much easier, while its larger size means you can hold it steady easily.
Set the exposure
Although the iPad’s auto exposure is pretty good, places with both highlights, such as light streaming through a window, and lowlights, such as areas in shade, can confuse things. If you find that what you see in the preview isn’t quite what you want, you can compensate simply by tapping where you want the camera to focus.
Tapping on a dark part of the image will lighten the entire frame; tapping on a light part of the image will darken the entire frame. Use this technique to get the exposure that you want. As you can see from these two examples, the top shot has the cat properly exposed; the bottom shot has everything outside properly exposed.


Focus on what you want
The iPad is pretty good at working out what you want to video. It has built-in face detection, drawing yellow boxes around people in the frame, focussing on them automatically. It will also identify areas of interest, by drawing a yellow box around them and focussing automatically.
If you want a bit more control, then just tap the area you want to focus on and you override the default settings. This can be used to accentuate depth-of-field, where you defocus one area of the frame to focus on another. It works best with an object close-up and one far-away, but play around to find what works for you. The video below shows how the focussing works. Because this can change the exposure, too, it’s best to focus before you start recording.
Video of NZByMgggd4A
Pinch to zoom
The familiar pinch-to-zoom technique can be used in the video mode to zoom in, up to a maximum of 3x. It’s a digital zoom – that is the iPad digitally enlarges the image reducing quality slightly – but if you can’t physically get closer to your object it’s still a useful feature. You can use the zoom before or during recording, although it’s best to set up the zoom first and use that for an entire clip, as it’s less distracting and looks more professional. You can see the zoom in action in the clip below.
Video of -lwLVWtLMHY
Use the AE/AF lock
As we said above, the iPad will automatically judge the exposure to best capture the detail in the scene and focus on objects that it highlights as important, such as faces.
While this is brilliant in most circumstances, it takes control out of your hands and can lead to problems. For example, if you pan past a window or move from outside to inside, the exposure will try and compensate. The result, on the iPad and any camera set to automatic mode, is exposure hunting, where the scene gets brighter and darker, as the camera tries to find the right level.
Likewise, as you move the iPad you may suffer from focus hunting. This is where the camera focuses on different objects as you move, adjusting the focus, throwing the subject you’re filming out of focus.
Both problems end up with distracting video. The solution is to use the Auto Exposure (AE) / Auto Focus (AF) lock. This fixes exposure and focus based on the current settings, so you can move the iPad freely without worrying how it will react. To do this tap and hold anywhere on screen in Video mode and you’ll see AE /AF LOCK appear in yellow at the top of the screen. Tap anywhere on screen to turn it off again.
To see the difference this makes, check out the two videos below, which pan past a window. Even on a fairly overcast day, you can see the difference: the first video moves from light to dark; the second video has the same exposure the entire way down.
Video of 3BVfMBHHPucVideo of ZmpTE-hxIKw
Shoot in landscape with Horizon
Video is designed to be watched in landscape mode, but that’s easy enough to forget when holding an iPad. The resulting video ends up having vertical black bars next to it, which is annoying and means that you’re only using a fraction of the available resolution. If you remember to correct and rotate after you’ve started filming, the video just tilts on its side and looks wrong, as below.
Video of uUZWQF0aXDA
Fortunately, there’s a rather clever app called Horizon (£1.49). This forces your iPad to record horizontal videos always, regardless of which way you hold the tablet.
It works by using the iPad’s gyroscope to work out how the tablet’s being held, auto-levelling videos so they’re always horizontal. To do this, it uses a small portion of the available resolution for the video window, which is the highlighted rectangle on the screen; the dark border is removed from the final video. Technically, this means that your videos can end up with less resolution that if you shot them with the regular app, but for the stability it gives, plus some cool zooming effects, we think it’s worth it. Besides, using Horizon means that you can manoeuvre your iPad as necessary to get the right shot, without worrying if the video will be ruined.

Horizon has three modes, which you cycle between by tapping the video icon (it looks like a target in a rectangle). Rotate & scale expands the size of the window as you rotate the iPad: it starts off narrow in portrait mode and gets bigger as you move to landscape. As you can see from the example below, moving to landscape mode causes the image to zoom out, as it captures more detail; going to portrait zooms in, as just the middle part of the image is captured.
Video of f_GGoBS8tUQ
The second mode is called Just Rotate. This uses the smallest window size possible, but means video stays completely level with no zooming as you rotate. This is the best mode if you just want to move your iPad as you like to get the best shot possible. As you can see from the video below, which we took while rotating the iPad, the footage stays rock solid.
Video of 4KlzRKh0VA8
The final mode just disables the rotation detection, so Horizon acts like the normal video app. For all modes you can tap the filter button (three circles laid on top of each other) to choose from eight different colour filters.

When you’ve finished shooting video, you can tap the Playback button (a triangle in a rectangle) to view your library of shot content. These videos don’t appear in Videos in the photo app unless you save them. To do this tap Select, select the videos you want to keep, click the Share button at the bottom left of the screen and select Save X Videos. These will then appear in Videos, so you can edit or use them in other apps. The Photos app also has better sharing options, with Horizon only offering AirDrop, Message and Mail.

Trim your videos
Always start recording before you think you need to and end recording after you think you need to. That might seem like madness, but this technique will mean that you never miss something important.
Fortunately, iOS has a brilliant built-in trimming tool, so you can cut out the bits you don’t need. In the Photos app select a video to bring it full-screen. Tap the top of the screen to bring up the status bar. Grab the arrow in a black box on the left and drag to the right to trim the start of a video; grab the arrow at the other end and drag to the left to trim the end. Using the on-screen preview you’ll quickly be able to judge how much you need to cut.
When you’re ready tap Trim and choose to either save the edited version as a new clip or to overwrite the old one. For more in-depth editing you’ll need to use a different app, such as iMovie, but this built in tool is great for some quick fixes.

Use slow motion
You can use iMovie to slow down any video, but for the best results, you can shoot using the slo mo mode on the iPhone 5S. This shoots at 120fps (four times real speed), letting you slow down practically any event. It’s great for fast-paced action, so you can see exactly what’s going on. Don’t over-do the technique, though. Slo-mo’s useful for highlighting one thing, but make a video full of the effect and it soon becomes old-hat.
Video of 6cDuLWmsZg0
Take establishing shots and use short clips
If you’re planning on combining multiple clips into one video, make sure you shoot lots of establishing shots, as they can be good for filling in gaps. These videos don’t need to be very long, but you’ll be surprised at how much you’ll use them, inbetween everything else you’ve shot. Stationary shots can work, but you might find moving the camera towards the object you’re shooting can help bring everything to life. In short, experiment and shoot way more than you’ll need, as you can always delete when you’re done.

Integrate and edit
Shot lots of videos across your iPhone and iPad, or even on other devices? No worries, you can save videos and photos to your iPad camera roll. Once you’ve done this, you can edit them on your iPad, combining all of your clips from all of the different sources. This is particularly useful if you’ve got an iPhone 5S, as you can shoot in slow motion (see above) and then put the clips on your iPad, where the larger screen makes editing easier.
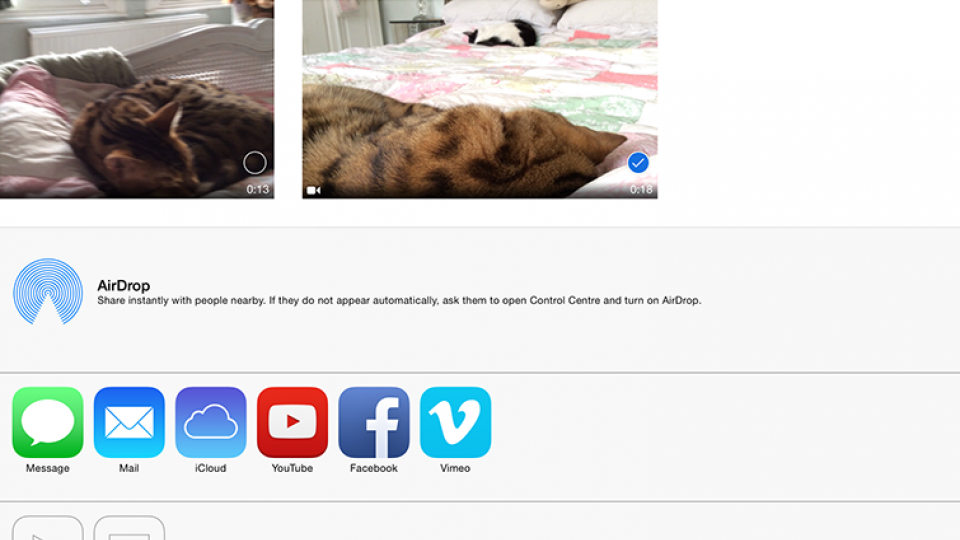
Share your video
When you’re happy with your video, the best thing you can do is share it. Just open the video you want to share in the Photos app and tap the sharing button at the bottom-left of the screen. From here you can share your video as a message, via an email, as well as uploading it to iCloud, YouTube, Facebook or Vimeo. The first time you use some of these services, you have to enter your login details, but they’re remembered for future use.
If you’ve got an Apple TV, you can use the AirPlay button. From the menu that appears select your Apple TV to wirelessly send the video to your TV, so you watch it on the big screen in its Full HD glory. See, how to use AirPlay to stream content from your iPad to Apple TV