To help us provide you with free impartial advice, we may earn a commission if you buy through links on our site. Learn more
Question: I manage an Excel Workbook that several people use. To see what each person has done, track changes is enabled. The only effect this has is to show a small triangle in the top left hand corner of the cell. Depending on which user makes the changes, the colour of this differs making it sometimes very hard to see – particularly for blind old beggars like me! Can you change the way track changes are displayed and use a different background colour for the cells?
Brian Thwaites
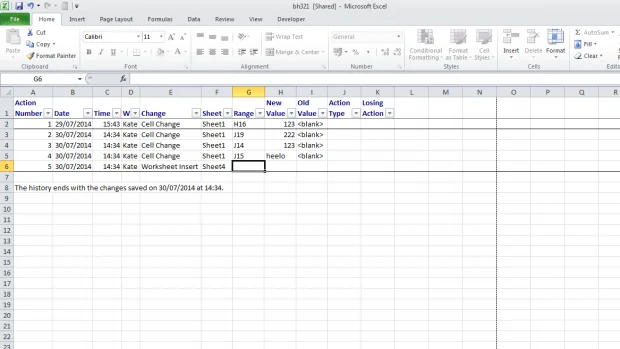
Answer: The first option (if you’re mainly interested in knowing exactly which cells have been changed) is to use Excel’s History Worksheet feature. This lets you see who made the changes, when they were made, and where they were made. You can filter the list to see a subset of the changes including only those made by a particular person, in a particular time period, or in a specific area of the workbook. To see a history worksheet, click on the Review tab of the Office ribbon. In the Changes group, click Track Changes, and then click Highlight Changes. You’ll see a dialog box appear where you can set the filters for which changes you’re interested in. You can choose to have the changes highlighted on the current sheet, or listed individually on a new sheet.
Automatically changing the background colour of changed cells turns out to be very tricky as Excel does its best to hide the cell property from you. The only way we’ve been able to find of doing what you want is to use the information on the History sheet as described above. Added to the difficulty is the fact that you can’t edit macros in shared workbooks, and as you want to work on a shared workbook, you’ll need to have a separate workbook open in which you create and edit the macro below. Once you’ve entered it and saved that workbook, go back to your original workbook with the History sheet. Make sure you’re on Sheet1, and run the macro. You should find that all the cells with track changes are changed to have a cyan background. You can then go and check the changes and change them all back to white background again. The macro you need is:
Sub ShowChanges()
Dim x, addr As String
Worksheets(“History”).Activate
Range(“G2”).Select
While ActiveCell.Value <> “”
x = ActiveCell.Offset(0, -1).Value
addr = ActiveCell.Value
Worksheets(x).Activate
Range(addr).Select
ActiveCell.Interior.ColorIndex = 28
Worksheets(“History”).Activate
ActiveCell.Offset(1, 0).Select
Wend
Worksheets(“Sheet1”).Activate
What this does is to open the History sheet, and select cell G2. If you look on the History sheet, you’ll see that this is the first cell containing details of a track change, and the cell contains the address of the cell that has been changed. The cell immediately to the left (given by ActiveCell.Offset(0,1).Value) contains the name of the sheet on which the cell marked as changed was located. Worksheets(x).Activate is used to change the focus to that cell, then Range(addr).Select selects the cell in question.
The line, ActiveCell.Interior.ColorIndex = 28, sets the colour of the cell to cyan – you can change the colour to be any of the 56 preset colours in Excel, so yellow would be 6, for example. The History worksheet is then reactivated, and the next cell down chosen using, ActiveCell.Offset(1, 0).Select. This is all done in a loop, While ActiveCell.Value <> “”, which means the loop runs round until the cell being selected is blank.


