To help us provide you with free impartial advice, we may earn a commission if you buy through links on our site. Learn more
There are so many useful Windows freeware applications that should be installed on any new PC, but installing any of it manually often leaves you with a computer that’s full of toolbars, adware, spyware and other utilities that you really don’t want. Fortunately, there’s a better way using Ninite.
This clever web-based utility creates you a custom, unattended installer for all of the applications you want on your new computer. Cleverly, it selects the correct version for your computer (32-bit or 64-bit) and deselects any options to install additional software or toolbars. In other words, Ninite is the hassle-free and safe way to install free software on your computer. If these aren’t reasons enough to use it, if you run the installer again at a later date, it will check for updates and automatically install them.
Step 1 – Download your custom installer
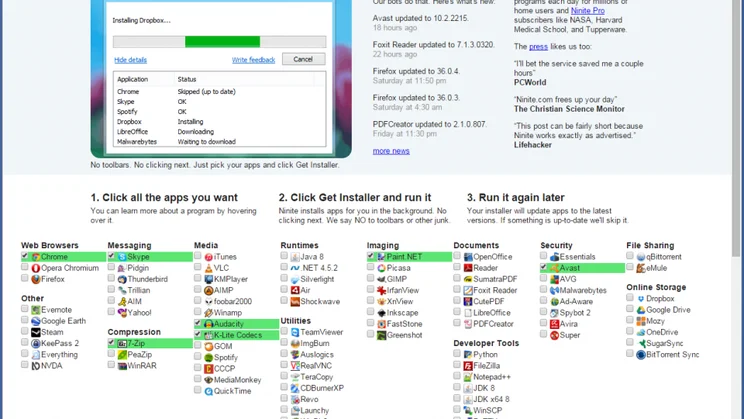
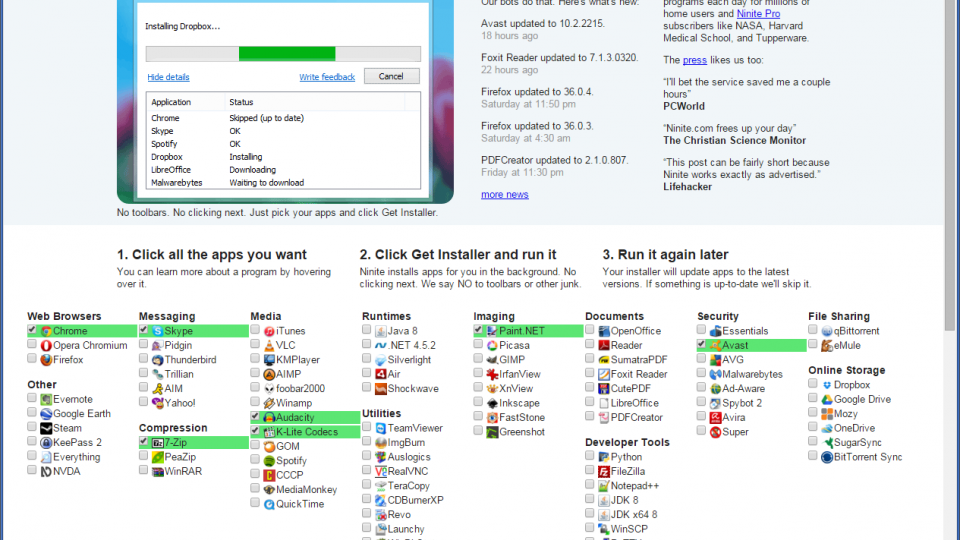
Go to the Ninite site and you’ll see a list of applications, organised by category, such as Web browsers, Messaging, Documents and Security. All you have to do is tick the boxes next to the applications that you want and then click the Get Installer button. This will download a small executable file to your computer.
Step 2 – Install your software
You can run the file you downloaded to install the software. If you want to run it on a different computer, you can put the Ninite installer onto a USB flash drive or email it to yourself: the file’s not locked to any particular computer. For this reason, it’s good to make a backup of the file, so that you can use it as and when you need.
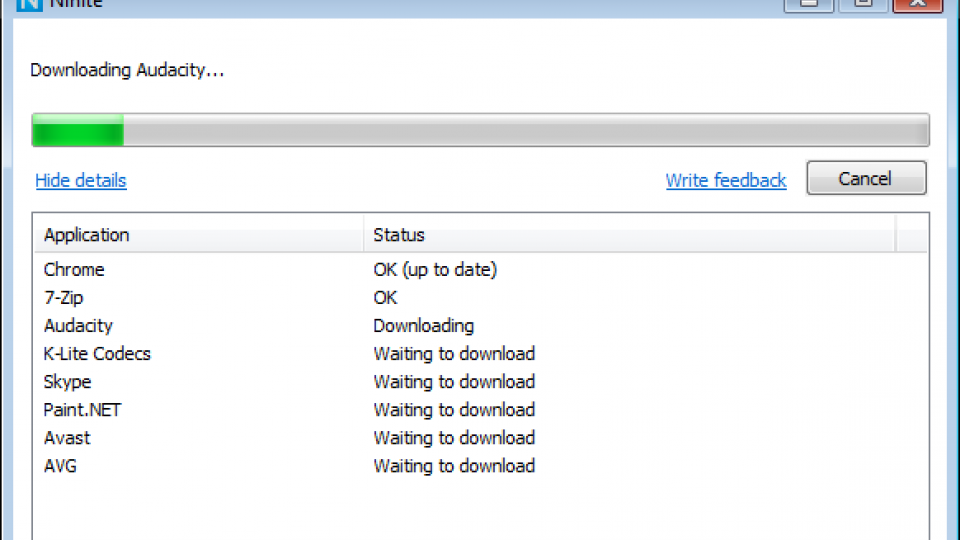
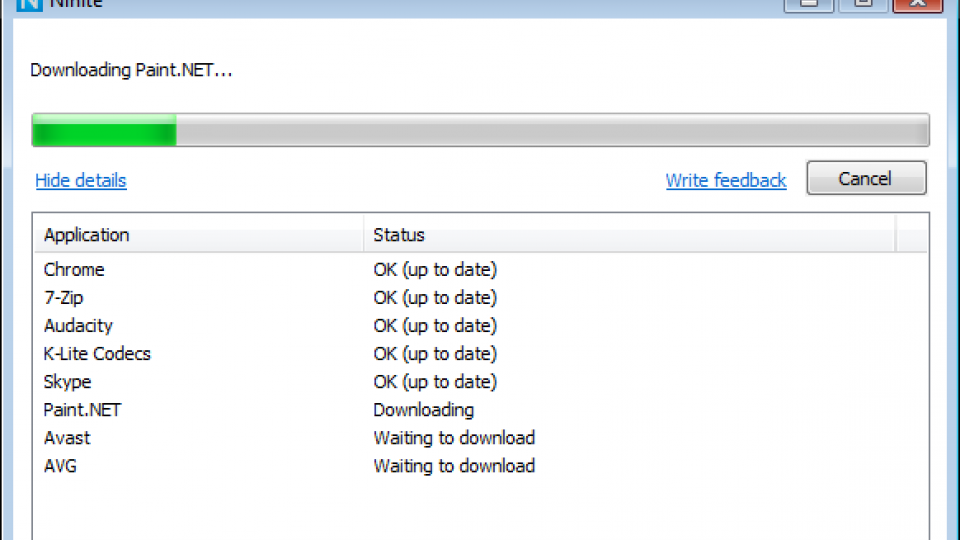
When you run the installer click OK on any security prompts to give Ninite the permissions it needs. Ninite will then download and install all of the software you selected, and you can leave it running. You’ll see a progress bar, showing you the current status, and you can click Show details to view the overall progress and see what has already been installed.
Step 3 – Use Ninite to update software
You can run the Ninite installer at any point in the future. It will check for updates to the software it installed and download and install the latest versions. This means that Ninite is a quick, one-stop shop for also keeping your software completely up-to-date. As with the main install, the Ninite updates will not install any toolbars or additional software.
Step 4 – Schedule updates
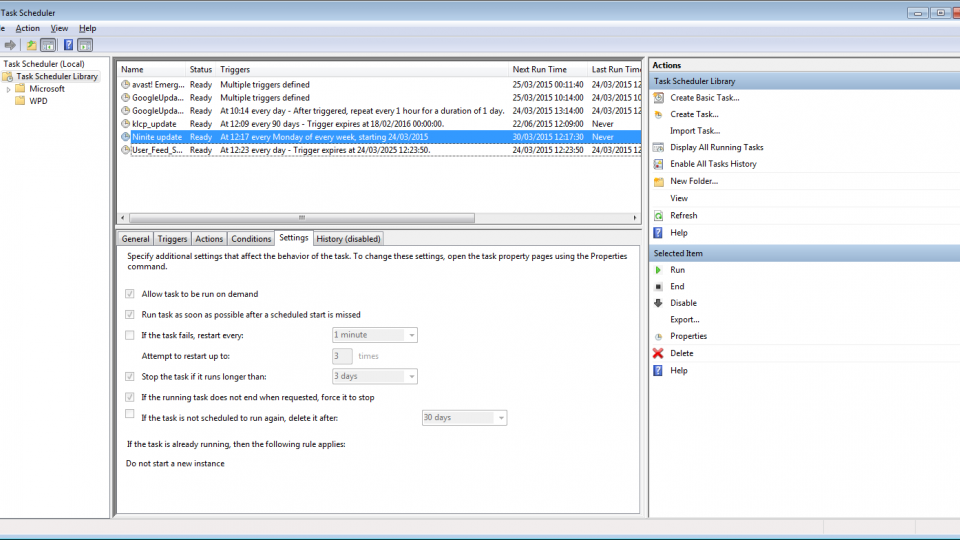
While you can run Ninite manually, a better option is to schedule your file to run. A weekly or monthly basis makes sense. To do this, we recommend copying your installer file to a folder on your hard disk, such as c:\ninite. Next run Task Scheduler from the Windows Start Menu. Select Create Basic Task from the Start Menu and you’ll get a new wizard. Enter a name for your task (Ninite update, for example) and click Next. You can now choose the frequency of the task (Weekly’s good, but Monthly is fine), and click Next when you’re done. Choose the start time and days that you want to the task to run on and click Next. Choose ‘Start a program’ and click Next, then click Browse and navigate to your Ninite installer and select it. Click Next and then Finish to create the task. Finally, click on Task Scheduler Library in the left-hand pane, then click your task in the middle pane. Right-click it and select Properties, then click the Settings tab and select ‘Run task as soon as possible after a scheduled start is missed’. This will ensure that your update process will run if your computer wasn’t turned on at the right time.
<
Best Ninite applications
Ninite has more than 80 applications available, but you’ll only need a fraction of these for your PC. Below we’ve hand-picked our favourite free software so you won’t have to spend a penny.
Web browsers
The first program you’ll want when you get your new PC is a web browser to replace Internet Explorer. Ninite gives you the choice between Google Chrome, Opera and Mozilla Firefox. Chrome has its quirks, but its integration with Google’s products and services makes it hard to resist. Mozilla Firefox has improved a lot in recent years and is very speedy, and you get peace of mind that this not-for-profit foundation isn’t trying to sell you anything. If you don’t see what you want on the list, or want to try something different, check out our list of alternative browsers.
Documents
LibreOffice is an easy-to-use, open-source productivity suite. If you’re not an advanced user you’ll find all the features you could want from its Writer, Calc, Impress, Draw, Math and Base applications. Even better, it supports the latest Microsoft Office formats so you won’t have to convert any files before you open them.

If you want to take quick notes or dabble in a bit of programming, Notepad++ is a sound addition to your list of Ninite downloads. It supports programming languages from C to HTML and pretty much everything in between, and you can easily test your creations by launching them straight from Notepad++ in a couple of clicks.
Adobe Reader has improved hugely in recent years and is now the best way to open, fill in and digitally sign PDF files without the need to print them. The only thing it now lacks is a conversion tool; but isn’t a huge problem because you can also install CutePDF, which installs itself as a printer on your system so you can can “print to PDF”, turning any of your documents into PDF files in a couple of clicks.
Security
Avast Anti Virus has long been our favourite free security suite. This is thanks to its simple design, unintrusive behaviour and small system footprint. Even better, it mixes it with the best of the premium anti-virus suites in our quarterly security tests, making it the best way to secure your system on the cheap. Ninite doesn’t support paid-for security apps, but our best internet security software round-up will show you what’s best.

Cloud storage
You get a choice of six Cloud storage services on Ninite. Google Drive and OneDrive came out on top in our most recent Cloud storage group test (Shopper 319, September 2014) thanks to generous free storage options and their ease of use. You should also consider SugarSync, which is a paid-for service costing from £7 a month that lets you keep multiple folders across all your PCs in sync. Of course, there’s also the most popular service, Dropbox.
Photos and multimedia
VLC is great if you have an extensive collection of video files in all sorts of wacky formats, VLC is the one piece of software you need. With built-in codecs for many of the video files Windows Media Player can’t handle, it’s a must-have. To make sure you can play any file in any other app, we recommend the K-Lite Codecs.


