To help us provide you with free impartial advice, we may earn a commission if you buy through links on our site. Learn more
- Windows 10 cost: Is Windows 10 free?
- A note for people with Windows 10 installed
- A note for laptop owners
- How to create a Windows 10 installation disc or drive
- How to create a bootable flash drive using the Windows 10 Media Creation Tool
- How to create a flash drive or DVD from the Windows 10 ISO
- How to create a Windows 10 DVD
- Step 1 - Download ImgBurn for free
- Step 2 - Write the ISO file to disc
- How to create a Windows 10 USB flash drive
- Step 1 - Download Rufus for free
- Step 2 - Write the ISO file to the flash drive
- How to install Windows 10
- Two common installation issues solved
- Step 1 - Enter your computer's BIOS
- Step 2 - Set your computer to boot from DVD or USB
- Step 3 - Choose the Windows 10 clean install option
- Step 4 - How to find your Windows 10 license key
- Step 5 - Select your hard disk or SSD
Although the procedure of installing Windows 10 from scratch isn’t that much different from installing other versions of Windows, there are a few things to go through first before you start. This is largely because most people that have Windows 10 will have upgraded from a previous installation of Windows (7 or 8) and so won’t have the boxed copy with the installation media.
As such, our guide covers everything you need to know about installing Windows 10 from scratch, including downloading the installation files, creating boot media and how to clean install if you’ve previously upgraded to the new OS from Windows 7 or Windows 8.
Please note that this article is not an upgrade guide: if you’re planning to upgrade from Windows 7 or 8, follow our Windows 10 upgrade guide.
I’ve split this guide into clear sections, so it’s easy enough to follow everything. I recommend at least skimming through each section so that you don’t miss any important information. This guide assumes you have backed up all the files you need and have made a note of any settings and licence keys for applications you want to reinstall later; you’ll need to follow the same procedure as for any operating system reinstallation, so if you’re not confident doing this, you should perform an in-place upgrade of Windows 10 instead.
Find out about all the best Windows 10 features and how to use them
Windows 10 is available as a boxed product, and also on a USB flash drive, for those who want to buy it outright. For those who are entitled to an upgrade from Windows 7 or 8, it has also been confirmed that they will be able to install Windows 10 from scratch after they have performed the initial upgrade, by creating installation discs using disc images downloaded from Microsoft. We explain all this in the following article. If you’ve already got Windows 10 installed, you may be able to make things easy for yourself by reading our first installation note.
Windows 10 cost: Is Windows 10 free?
The free upgrade to Windows 10 ended on the 29 July 2016, which means you’ll now have to pay for a copy of Windows 10. It costs £120 for Windows 10 Home and £220 for Windows 10 Pro.
If you’ve already upgraded your computer to Windows 10 prior to 29 July 2016 or your computer shipped with it, you can follow these instructions to clean install the OS at any point. Please read the note below, as it will give you a simple way to refresh your computer without having to go through the full clean install steps.
A note for people with Windows 10 installed
If you’ve got Windows 10 on your computer already, either because you upgraded or because you’ve already installed a clean copy before, and you want to perform a new clean install, you don’t necessarily have to go through the same steps as before.
Instead, Windows 10 has a built-in restore option that can wipe installed applications and files, acting like a clean install in its own right. It also has an option to uninstall all applications, but to leave your files alone, letting you refresh your OS without having to go back to stage one.
As this tool is built into Windows 10 (as it was in Windows 8) and already has a copy of all the install files it needs to do its job, it’s quicker and easier than performing a full, clean installation. For most people, then, this option is going to be the best one to start off with. It’s not difficult to use the tool, but there are a few options, so we’ve put detailed instructions in our guide on how to reset Windows 10 to factory settings.
The downside of this tool is that it leaves your computer and hard drives in their current state. If you want to repartition your hard drive or change which drive you boot from, such as if you’ve just bought an SSD, then the full clean installation instructions below are the best ones to follow, as they give you finer control over the process.
A note for laptop owners
During our tests, we found that installing Windows 10 from scratch was easier on a desktop than on a laptop computer. This is because laptops often have complicated disk drive structures with several recovery partitions, which can make installing Windows 10 difficult, as well as a fussy BIOS which makes it tricky to boot from USB.
For example, a Dell XPS 13 running Windows 8.1 which we were using for testing had no fewer than seven different partitions. It also wouldn’t boot from the Windows 10 USB flash drive we had made until we had gone into the BIOS, disabled Secure Boot and changed from UEFI boot to Legacy.
Unfortunately, as we were in Legacy boot mode, we then couldn’t install to the laptop’s disk as it was in GPT format; the only solution was to delete every partition before installing. This is not something you want to do if you’d like to keep your laptop’s system recovery partitions, in order to make it easy to go back to a factory-fresh state should you wish.
If you’d like to install Windows 10 on a modern laptop without taking the risk of destroying all your manufacturer’s system partitions, you’re best off running the installer from within your current operating system, and electing to delete all your apps and files. This will give you a near-clean install with the minimum of fuss.
How to create a Windows 10 installation disc or drive
To create installation media, you have two options. First, you can download the ISO file to a computer and then use our instructions to create boot media. Secondly, you can run the Windows 10 Media Creation Tool and get it to create the boot USB drive for you. The latter option is the easiest, so that’s the method we’ll focus on first.
How to create a bootable flash drive using the Windows 10 Media Creation Tool
These instructions show you how to create a bootable flash drive only. If you want to create a DVD, you’ll need to follow our instructions below on how to create boot media using the Windows 10 ISO. From a Windows PC download the Windows 10 Media Creation Tool. If you don’t have a Windows computer available at the moment, you’ll need to follow the instructions below on downloading the ISO file, and follow our alternative instructions.
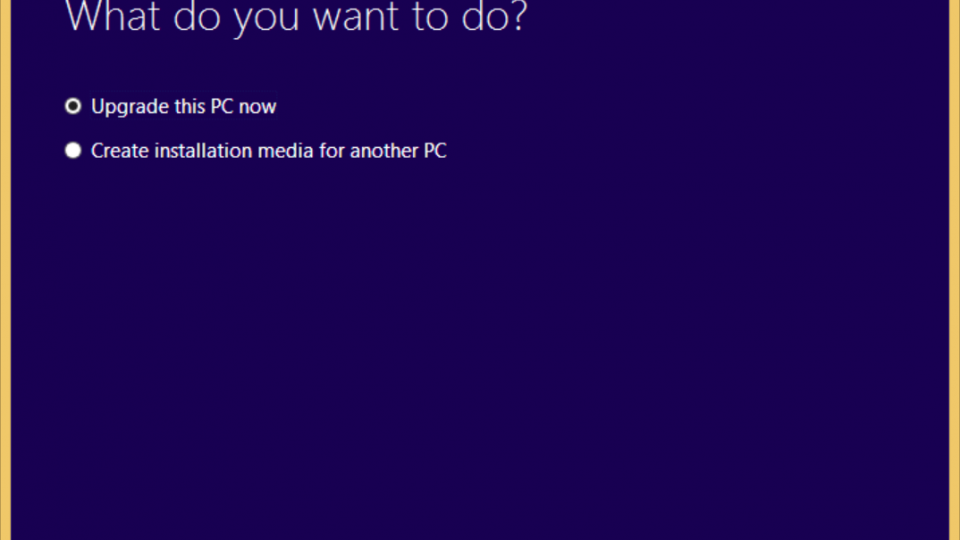
Run the Media Creation Tool and select Create installation media for another PC and click Next. On the next screen, select USB flash drive. Insert your USB drive into your computer (it needs to be at least 3GB in size, and you can buy an 8GB USB flash drive from Amazon for less than £4, so cost isn’t a huge issue). Click Next, then choose the language, version of Windows (Home or Pro – you can ignore the N versions) and whether you need the 32-bit or 64-bit version. It’s very important that you get this step correct; if you don’t, your computer will not activate, as you will not have the right licence for it.
Click Next and select your flash drive from the list (make sure you get the right one) and click Next. Your computer will download the installation files and write them to your flash drive automatically.
How to create a flash drive or DVD from the Windows 10 ISO
If you want to create a bootable DVD drive, you’ll need to download the Windows 10 ISO file. This file is also useful if you want to create boot media whenever you like. There are two ways to download the file. First, from a non-Windows PC you can just download the Windows 10 ISO from Microsoft. You’ll most likely need the standard ‘Windows 10’ ISO, which includes the installation files for the Home and Pro versions of Windows 10.
If you’re using a Windows PC, you’ll be redirected to a page that asks you to download the Microsoft Media Creation Tool. Once you’ve downloaded and installed this, you can download the ISO file from inside the software: select Create installation media and click Next, select your language, the Home or Pro version of Windows 10, 32-bit or 64-bit and click Next. On the next page select ISO file and click Next, choose where you want to put the file in the Explorer dialog box and click Save.
Once you’ve downloaded the image you’ll need to either burn it to a DVD or install it to a USB flash drive (see below). You’ll be able to install from DVD on any computer with a DVD drive, but you’ll need to have a DVD writer to create the install disc, and the installation process takes significantly longer than from a USB drive.
Most computers made in the last 10 years or so will support booting from USB flash drives. Windows 10 requires a 4GB or larger flash drive to use as the install disk, with an 8GB drive costing from as little as £4. As well as making the installation process faster, using a flash drive means you’ll be able to use the drive for other purposes after you’ve installed Windows. There are also plenty of slimline laptops out there that don’t have DVD drives.
How to create a Windows 10 DVD
The only tricky part of creating an installation DVD is making sure you burn the Windows 10 disc image to your DVD as a bootable image rather than as a file. You can use any disc-burning program you like, and the steps will be broadly similar, but we’ve used the free ImgBurn application.
Step 1 – Download ImgBurn for free
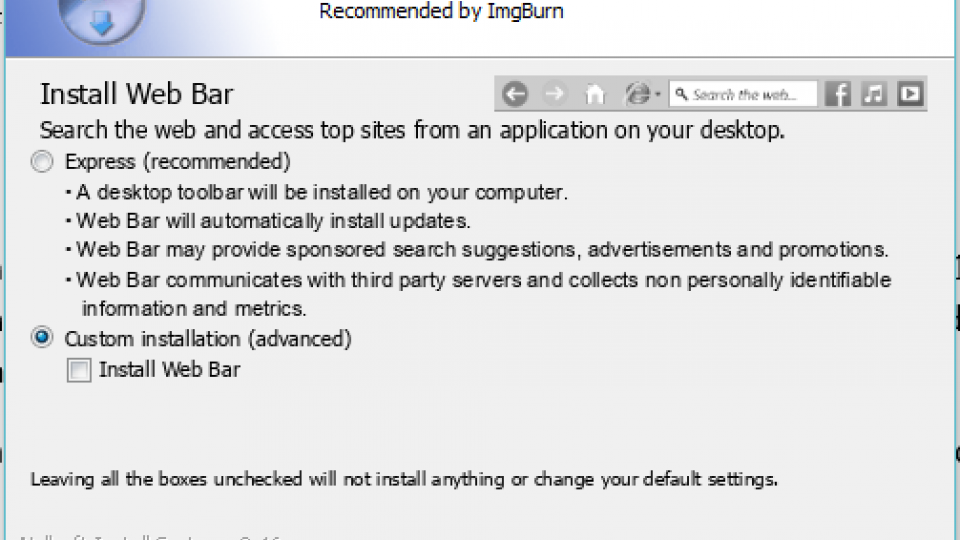
Go to ImgBurn’s website and click Download. Click the last Mirror link (Mirror 7 – Provided by ImgBurn – other download links are not safe), save the file to your hard disk and run it. Follow the steps to install the program, but make sure you deselect both the advertising add-ons the setup program tries to install (you’ll need to select ‘Custom Install (Advanced) to get rid of one of them).
Step 2 – Write the ISO file to disc
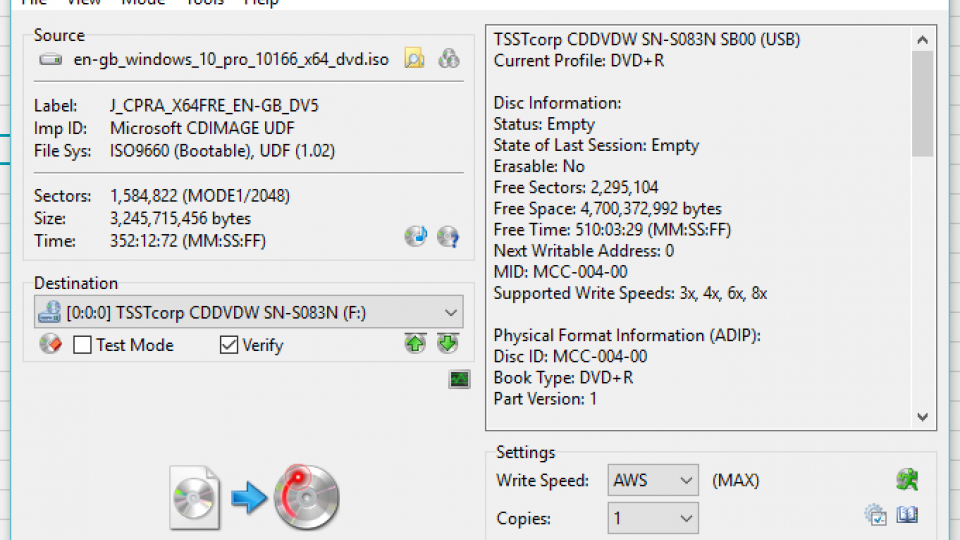
Run ImgBurn, and click ‘Write image file to disk’. Click the icon of a folder with a magnifying glass next to ‘Source’, and browse to the Windows 10 ISO you downloaded. Double-click the ISO file, put your blank DVD in the drive and click the large write icon at the bottom to make your DVD.
How to create a Windows 10 USB flash drive
This is a bit more complicated than making a DVD, but the excellent Rufus application simplifies matters somewhat. Remember that you need at least a 4GB flash drive, and that all data already on the drive will be wiped during the process.
Step 1 – Download Rufus for free
Go to rufus.akeo.ie, and download the latest version (2.12 at the time of writing). Save it to your computer and run it. Plug in your flash drive, and it will appear at the top under Device. Rufus will show the USB stick’s drive letter in brackets after the flash drive’s name. Check in Computer/This PC that this is definitely the drive you want to use for your Windows 10 installer disk as remember that it will be entirely and irretrievably wiped during the installation process.
Step 2 – Write the ISO file to the flash drive
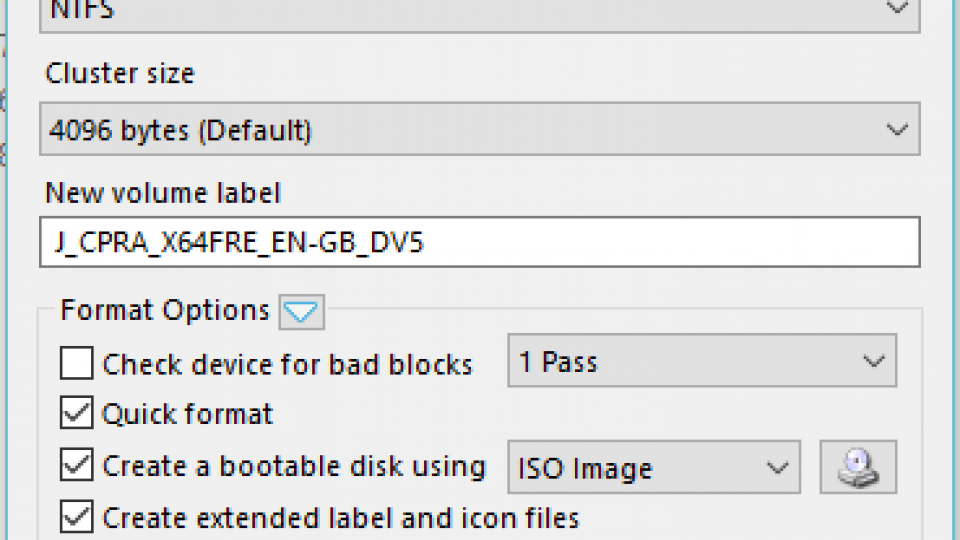
Under ‘Partition scheme and target system type’ select ‘MBR partition scheme for BIOS or UEFI’. Under ‘File system’ select ‘NTFS’. Check that ‘Quick format’, ‘Create a bootable disk using’ and ‘Create extended label and icon files’ are selected, make sure ‘ISO image’ is selected in the drop-down next to ‘Create a bootable disk using’ and click the small icon that looks like a DVD drive with a disc above it. Browse to your ISO and double-click to select it, then click Start. Read the warning about flash drive data destruction, then sit back and wait for your Windows 10 flash drive to be created, which will take around 5 minutes depending on the speed of the drive.
Browse to your ISO and double-click to select it, then click Start. Read the warning about flash drive data destruction, then sit back and wait for your Windows 10 flash drive to be created, which will take around 5 minutes depending on the speed of the drive.
How to install Windows 10
Two common installation issues solved
Before we get down the nitty-gritty of installing the OS, there are a couple of common installation errors. Here’s how to fix them.
Something happened
Microsoft has thrown out some useless error messages before, but the ‘Something happened, Something happened’ one has to be one of the worst ever, giving no clue as to what the issue is. Fortunately, the issue can be fixed in one of two ways.

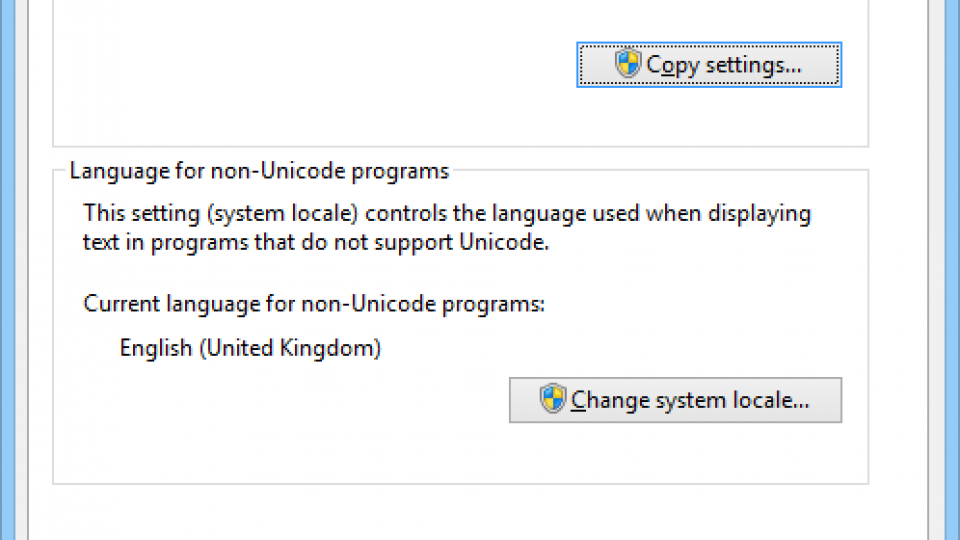
The first option is to change your computer’s Region settings and tell it that you’re in the US. To do this open up the Control Panel from your computer’s Start Menu and select Clock, Language and Region -> Region. Click the Administrative tab, click Change system locale and use the drop-down menu and choose English (United States). Click OK and then OK again to apply the settings.
The second option is that you’re trying to install Windows from a USB flash drive or DVD, but you created the installation media without the proper permissions. To change that, download the Windows 10 Media Creation Tool and locate it on your hard disk. Right-click it and select Run as Administrator. Follow the wizard through as before and re-create the installation media. You should now be able to install Windows 10.
Processor not supported
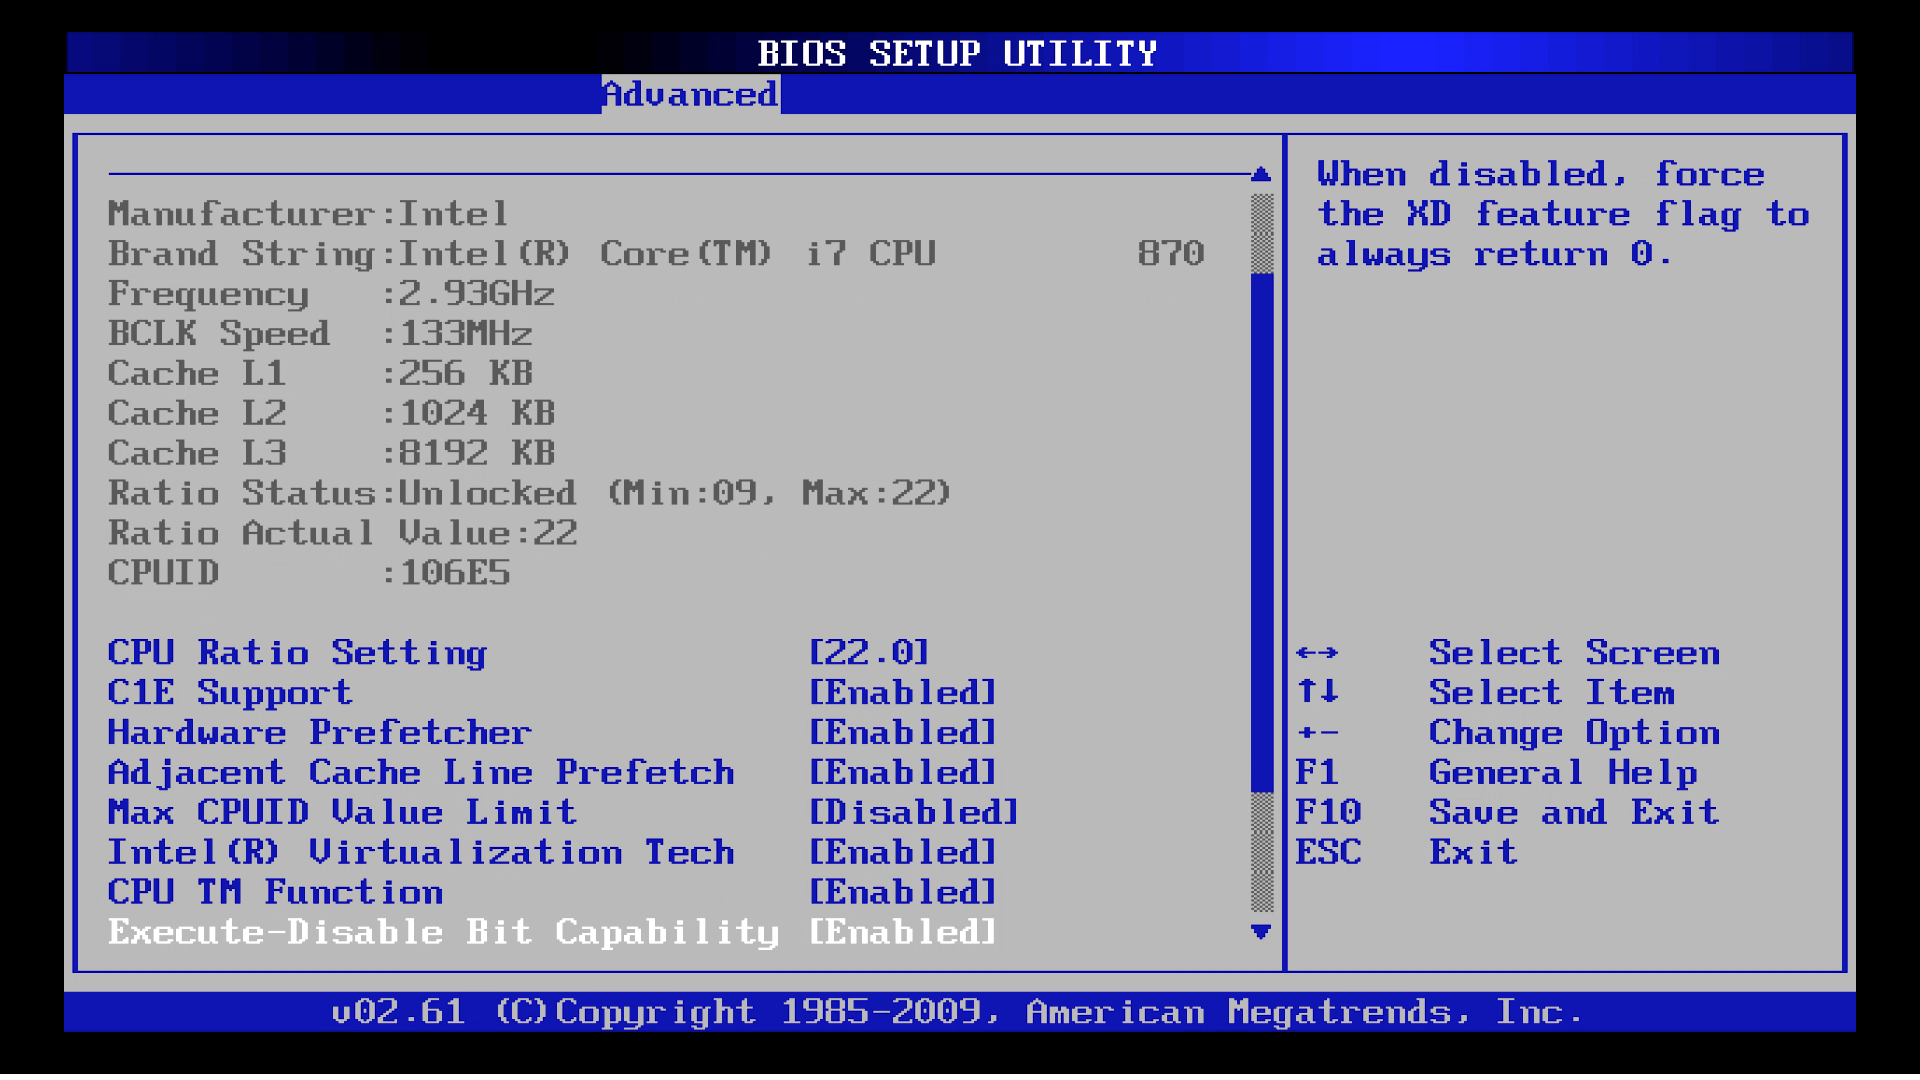
If you get the ‘Processor not supported’ message, it’s because your CPU needs to support Execute Disable Bit. This feature is designed to stop malicious code from running on your computer, by marking some bits of system memory as non-executable; it means that if a virus infects this part of RAM, your processor will refuse to run it.
Practically any processor capable of running Windows 7 or Windows 8 has this hardware feature, so that problem is likely to be that it’s been disabled in your computer’s BIOS. To re-enable this feature you need to restart your computer and go into the BIOS (Delete, F2 and F10 are common keys to enter it, but check your computer’s manual for full instructions). Every BIOS is different, so the exact instructions will differ from computer to computer.
Look for a section on your processor, such as CPU Configuration, which is likely to be in the Advanced section of the BIOS. Make sure that the Execute-Disable Bit is turned on, which may also be called XD or NX. Finally, make sure that you’ve turned on the virtualisation option. Save your settings, reboot your computer and you should now be able to install Windows 10.
Step 1 – Enter your computer’s BIOS
You first need to make sure your computer is set to boot from your DVD drive or from USB. Insert your DVD or USB installation disk and restart your PC. You may find that your PC has a special boot override menu, which you can access with a key such as F10; look out for the message while your computer starts. If this is the case, press the key as soon as the message is displayed, then select your DVD drive or USB stick to boot.
If you don’t have a boot override menu, you’ll need to go into the BIOS or UEFI Setup program, which is where you change some of your computer’s more low-level settings. The right key to enter Setup varies from PC to PC, but is usually Delete, F2 or F10, and you’ll need to press it almost immediately after you turn your PC on or restart it. If you look carefully, you may see the relevant key displayed onscreen as the computer turns on. Some more modern laptops, such as certain Lenovo models, have a special button to enter the Setup program, which you’ll most likely find next to the power switch. Setup menus vary widely in look and layout, but all follow a similar logic, so if you look carefully you’ll be able to find all the options we mention in this guide.
Can’t find the option? Follow our how to boot from USB guide for more detailed instructions
Step 2 – Set your computer to boot from DVD or USB
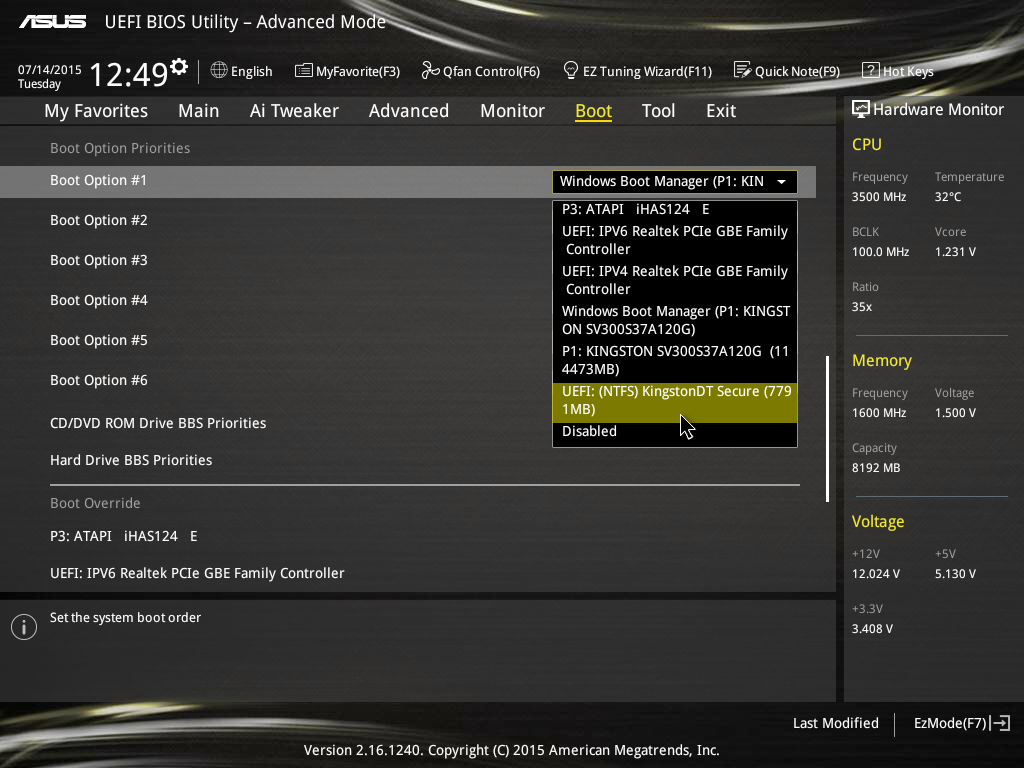
Once in Setup, find the Boot section. Now change the boot order to put the device you want to boot from first; this will be DVD or USB, depending on your installation media type. Bootable USB flash drives are sometimes listed as hard disks. If this is the case you’ll need to set ‘hard disk’ as the first boot option, then go into the hard disk boot order sub-menu and put your USB boot disk at the top of the list. Find and select the Save and Restart option or equivalent. Your PC should now boot into the Windows 10 setup program – you may see a message to ‘press any key to boot from USB’, so do so.
Step 3 – Choose the Windows 10 clean install option
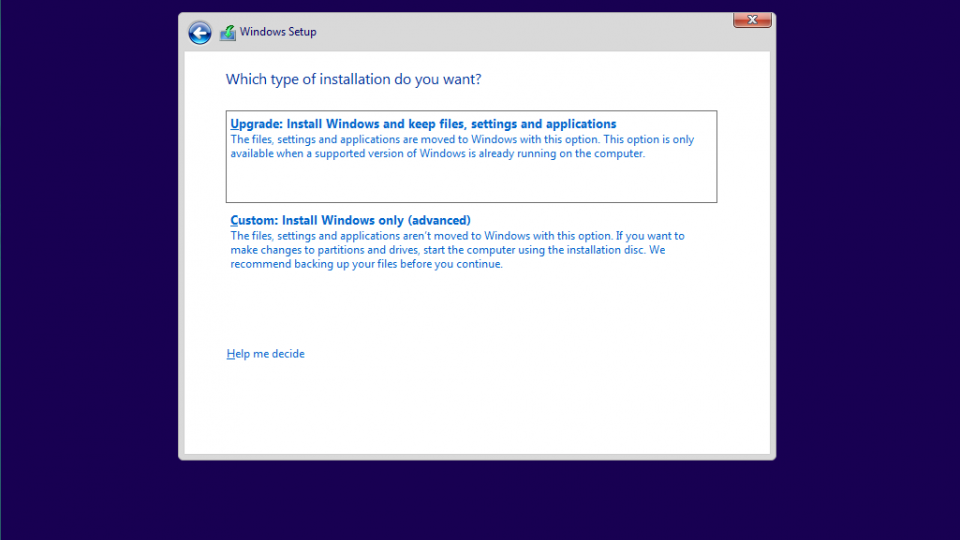
Once you’re in the Setup program, select your language, time and currency format and input method, and click Next. Click the Install Now button. Enter your Windows key if prompted, and read and accept the software licence. In the next screen, select ‘Custom: Install Windows only (advanced)’.
Step 4 – How to find your Windows 10 license key
At this point you’ll be asked for your licence key. What you put it, depends on the type of Windows 10 that you have, but we’ll explain how to deal with everything here.
If you’re already on Windows 10 and want to know your license key, you can always download ProduKey and extract your Windows 10 product key from there. Write this down on a piece of paper or save it to an external drive.
READ NEXT: Best external hard drive – The best portable and desktop drives
1. If you have bought Windows 10 from a store or as a download
If you physically purchased a copy of Windows 10, either from a store or via an online shop as a download, you will have a full and proper Windows 10 code. You should enter this at this point and you will not be asked for it again. This is the simplest way of handling the installation.
2. If you have upgraded from Windows 7 or Windows 8
Provided you created new boot media using the latest version of Windows 10 (i.e. you weren’t using an older installation disc or USB key), you can now just enter in your valid Windows 7 or Windows 8 key, and your licence will automatically be updated to a Windows 10 one with no additional hassle.
3. You bought Windows 7 or Windows 8 and want to move to a new computer
If you paid for a boxed or downloaded copy of Windows 7 or Windows 8, your licence allows you to move it to a new computer, provided you delete it from the device the OS is currently installed on. This means that, even if you upgraded your original computer to Windows 10, you can move your OS to a new computer and claim another upgrade to Windows 10. With the new system, you just need to enter your Windows 7 or Windows 8 licence key when prompted and your computer will upgrade to Windows 10.
Step 5 – Select your hard disk or SSD
What you’ll see in the next screen depends on whether you’re installing on a blank disk, or whether your disk has had an operating system installed on it previously. If it’s a blank disk, you’ll be shown a drive with ‘Unallocated Space’, so just select it and click Next. Windows will then start the installation process.
If your disk has had an operating system on it previously, or if you have more than one hard disk in your PC, you’ll be shown a screen with several disks and partitions. The disks will be called ‘Drive 0’, ‘Drive 1’ and so on, and if a disk has previously had a Windows installation it will be split into partitions with labels such as ‘Recovery’, ‘System’, ‘MSR’ and ‘Primary’.
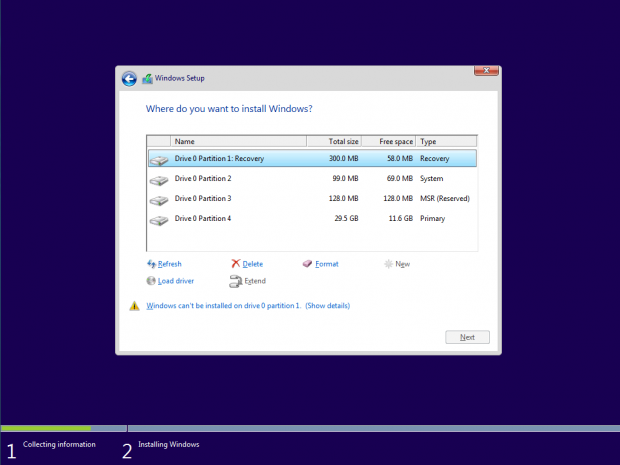
Before you install Windows 10 you’ll need to delete all these partitions, by selecting each one and clicking the Delete icon. This will erase all data on the partitions, so quadruple-check that a) you’re deleting partitions from the correct drive and b) that you’re absolutely sure you’ve already backed up everything you need.
Bear in mind that this may also delete your manufacturer’s recovery partitions, so you won’t be able to go back to your previous operating system. Once you’ve finished deleting partitions, make sure the drive you want to use for your Windows 10 installation is selected and press Next to install.


