To help us provide you with free impartial advice, we may earn a commission if you buy through links on our site. Learn more
The iPad is a great device – useful, convenient and fast. But over time all tablets and computers suffer from slowdown. The reason for this can often be narrowed down to a tablet clogged with memory- and space-hogging unwanted files.
Removing these unnecessary files will improve performance, especially on older models. Clearing out the memory lets your device focus on processes it actually needs to use, too.
But how can you do this? These cached files aren’t exactly easy to find, after all. Luckily, we’ve put together a handy guide on how to clear your iPad cache.
READ NEXT: Refurbished iPads: Everything you need to know before buying
How to clear your iPad cache
Step 1: Delete the Safari cache
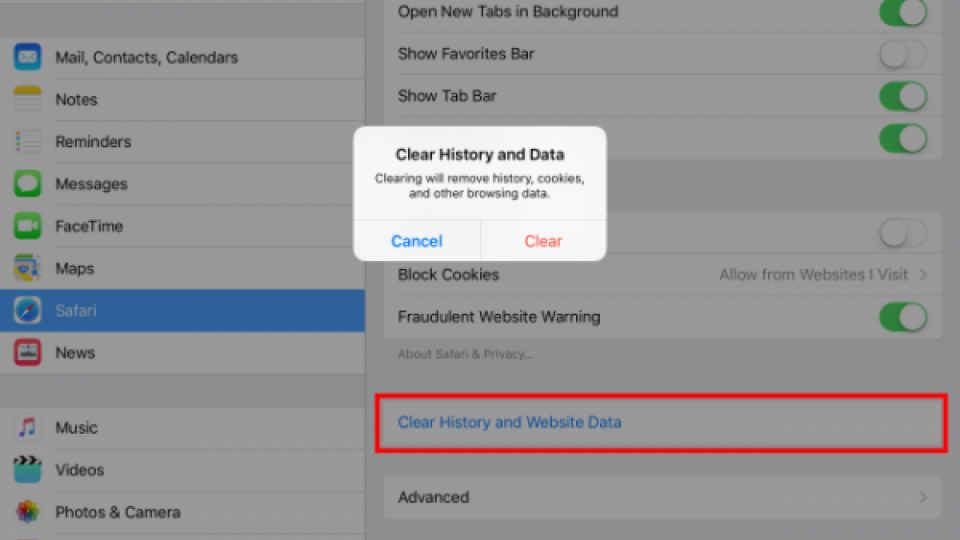
First of all, we’ll start by clearing the cache in the Safari browser. Be warned, though – this will log you out of the websites you’re signed into, so keep those passwords handy.
- Open Settings and scroll down to the fifth group of options (with mail at the top). Tap Safari.
- Scroll down to a line saying “Clear History and Website Data” and tap it.
- Tap on “Clear History and Website Data” – job done!
Step 2: Clear app data
This is where you’ll find data stored by other apps. These files can be cleaned out using the Usage option in Settings. Follow these steps to clear even more unwanted files from your iPad.
- Tap on Settings | General | iPad Storage.
- Your iPad apps will be listed at the bottom of the screen, arranged in order of the amount of space they take up.
- Select an app that is hogging a lot of your precious space.
- Check the Documents & Data section of the page. If the value is higher than 500MB, then it’s probably worth deleting and then reinstalling your app to clear the space.
- Tap on Delete App, then confirm before going to the App Store if you want to re-download it. You’ll now have a shiny new app without all that cumbersome unwanted data on your phone.
Step 3: Free up memory by restarting your iPad
Apple’s iOS operating system is, for the most part, an effective memory manager on its own. However, restarting your device after long periods of it being on can be a good way to clear the memory.
- Press and hold the Power button on the side of your iPad.
- Swipe the power off slider that appears onscreen.
- Wait until your device has powered down, and then press the Power button once again in order to turn your iPad back on.
Step 4: Download a cleaner app
A number of apps available in the App Store can help you with the process of getting rid of all those unwanted files. These can be the most efficient method for cleaning out your iPad, but they do usually cost money, so make sure you’re getting a good one.
iMobie PhoneClean is among the best of these, offering a range of cleaning services at no cost. These range from web cache and history cleaning, to voicemail and message cleaning, unwanted app files and more.
A one-year subscription will set you back $20, while a personal licence is $30 and a family licence (for up to five devices) costs $40. A free version is available but includes limited features in comparison.
Simply download the app from the App Store and then follow the onscreen instructions to get cleaning.


