To help us provide you with free impartial advice, we may earn a commission if you buy through links on our site. Learn more

Windows 10 is a great operating system and it’s a great way to breathe new life into older systems thanks to free upgrades for Windows 7 and Windows 8 users. It is, however, not without its problems, some of which will require you to boot into Safe Mode to help alleviate or fix them. The process for doing so hasn’t changed drastically from previous versions of Windows but, due to just how much faster the operating system can boot up, it might require you to try different methods depending on your system and the current state of your operating system.
At this point, you might be thinking that hitting F8 or Shift+F8 after your computer turns on, as in the past, will get you to the Safe Mode options. Windows 10, however, boots up so much faster that this is no longer a reliable method (although it might still work if you’re lucky and persistent). We go through a few different ways to access Safe Mode without breaking too much of a sweat.
Method 1 – Start Menu
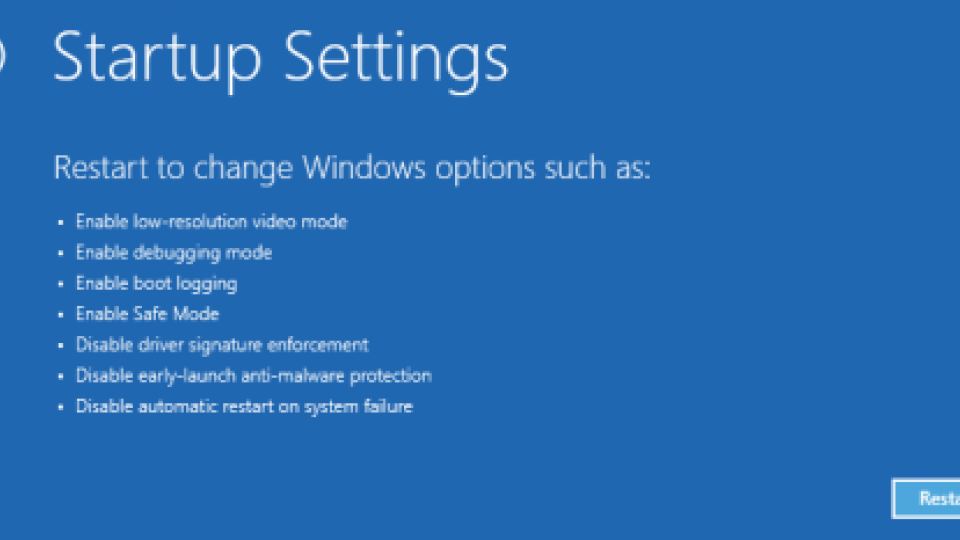
If your system is generally working fine and you are able to boot into the desktop, this will be by far the easiest way to get to Safe Mode. First bring up Windows 10’s Start Menu and click the Power option. Hold down Shift on your keyboard and select the Restart option. Your system will now reboot into the Windows 10 recovery menu. After rebooting you’ll be presented with the ‘Choose an option’ screen. Now select the Troubleshoot option at the bottom. Now from this screen select Advanced Options. Select the Startup Settings option, which should be the final option. You’ll be presented with a screen telling you what settings can be changed after a restart. Hit the Restart button to reboot your system.
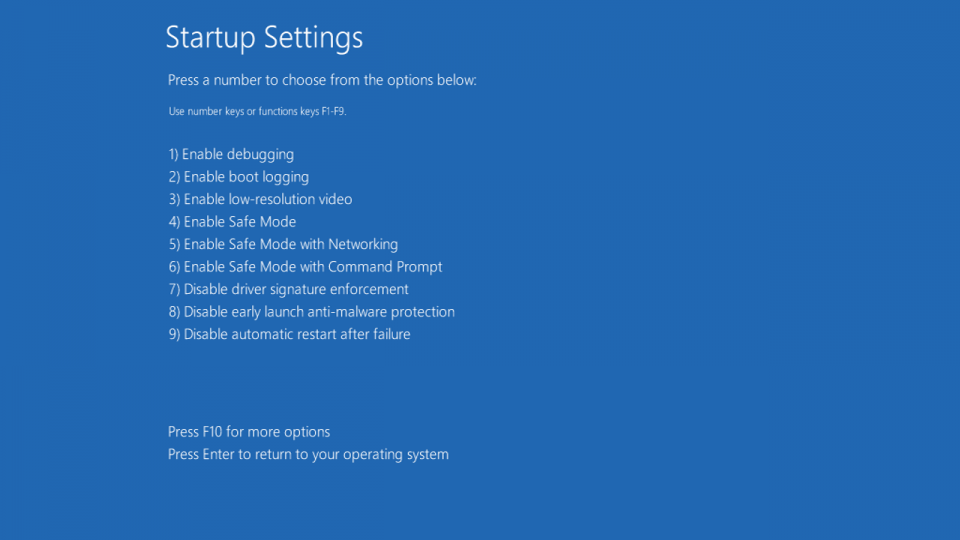
After a reboot you’ll get a list of nine options. You’ll want to use options 4-6 depending on what level of Safe Mode you require. Unless you know that you need a specific option, the first one, ‘Enable Safe Mode’, will be the right option for most people. To select your option, press the corresponding number key on your keyboard and the system will reboot in the applicable Safe Mode.
Method 2 – Use System Configuration
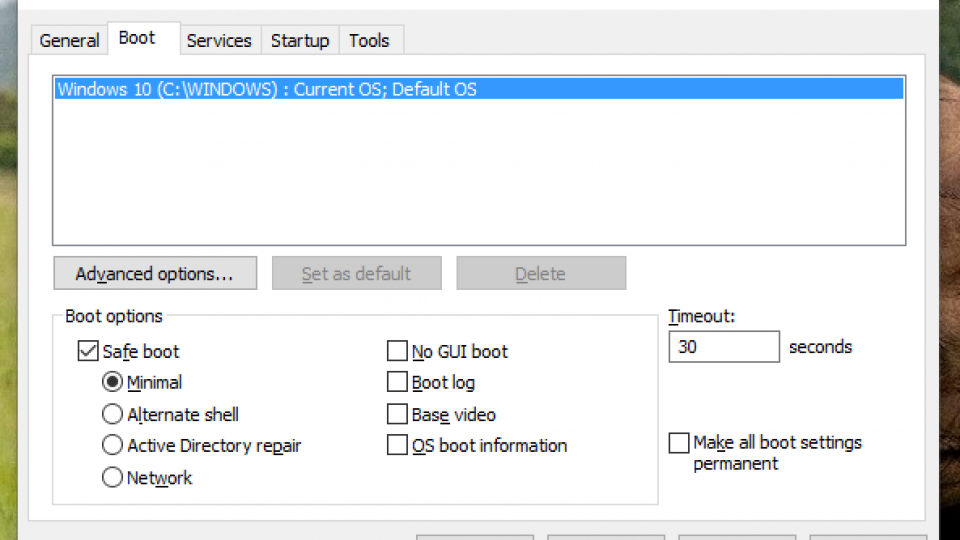
Another option is to use the System Configuration menu. To get to this from the Windows 10 desktop, hit Win+R on your keyboard to bring up the Run menu. Then type in ‘msconfig’ (without the quotes) and hit enter. Navigate to the Boot tab at the top. Now check the option that’s marked Safe boot. Select the Network radio button if you want network access while in Safe Mode. If you select Alternate Shell you’ll boot into Safe Mode with a Command Prompt running only critical system services and no networking. Active Directory Repair will boot Safe Mode with File Explorer open and critical system services. More often than not, the Minimal option will be what you want to boot into for most fixes.
Select Apply followed by OK. You’ll now be asked if you want to restart now or later. Doing so later will allow you to use your system as usual and then boot into Safe Mode the next time you restart. Note that this method will bypass the Windows 10 ‘Choose an option’ screen detailed in Method 1 and go straight to Safe Mode.
Method 3 – Windows 10 Recovery Drive
If you’re unable to even boot to the desktop to use either Method 1 or Method 2, this might be your best bet. Fortunately, if you didn’t have the foresight to create a recovery drive in advance, you’re not completely out of luck. If you have another system running the same version of Windows 10, you can use this to create a Windows 10 Recovery Drive using a USB.
On your working system, open up the Start menu and search for ‘Create a recovery drive’. It should be the first option in the results menu. On the next screen, make sure that ‘Back up system files to the drive’ is selected. Now run through the process and ensure you have a big enough USB flash drive. The wizard will let you know how much space you’ll need. Note that you’ll lose any existing data on the drive, so make sure you back up any content first.

With the flash drive inserted into your system, reboot and the system should boot from the USB flash drive. If not, you might have to enter your system’s BIOS first to tell it to boot from USB. This will differ depending on your motherboard’s manufacturer but usually requires you to hammer away at the Del or F2 keys as you turn the system on: see, how to boot from USB for more information. Once you boot from the recovery drive you’ll need to select the relevant keyboard layout for your keyboard. Now select the Troubleshoot option and follow the instructions as for Method 1 to boot into Safe Mode.
Method 4 – Create a boot config
If none of the above work, you can create your own custom boot config using BCDedit in the Command Prompt. Start by opening a Command Prompt with admin rights by typing in ‘CMD’ into the search field of Windows 10’s Start menu. Then right-click the Command Prompt and select ‘Run as administrator’.
Now, in the Command Prompt, type in: bcdedit /copy {current} / d “Windows 10 Safe mode” and hit Enter. Close the Command Prompt window.
Next, open up the System Configuration by searching for ‘MSConfig’ (without the quotes) and running the top search result. In the Boot tab, select the Windows 10 Safe mode option you created in the step above. Tick ‘Safe boot’ and ‘Minimal’ and set a long enough time out period. Make sure to check ‘Make all boot settings permanent’ and hitting Apply. You’ll get a warning that you won’t be able to undo the changes to boot up, but you can ignore this.
They can actually be removed by accessing System Configuration at a later date and deleting the newly created entry. You can also create new entries with networking or command prompt turned on with the same instructions, just be sure to give it a sensible name during the Command Prompt stage.