To help us provide you with free impartial advice, we may earn a commission if you buy through links on our site. Learn more
- How to set up a VPN on your router: Tips and caveats
- How to set up a VPN on your router
- Make sure your router is compatible
- Flashing VPN-compatible firmware
- Collect the necessary information from your VPN provider
- Set up a VPN on an Asus router with standard firmware
- Install a VPN on a router with AsusWRT-Merlin firmware
- Install a VPN on a router with DD-WRT firmware

Most VPN services come with certain limitations. For example, you might only be allowed to connect a maximum of five devices at once, so youll have to decide which devices in your home get the protection of a VPN, and which dont. Whats more, client software is often only offered for the most popular operating systems, making it tricky or impossible to set up a VPN connection on a games console or Raspberry Pi.
Theres a simple solution, though: set up a VPN on your router instead. This way, all your household traffic is tunnelled via a secure server, so every device on your network is covered. Whats more, you dont need to worry about configuring apps or keeping track of how many connections youre using at once.
How easy is it to set up a VPN on your router? That depends. With some routers, its a fairly simple process of stepping through the providers tutorial and entering a few technical details, while other setups might require you to flash new firmware and work out some of the details yourself.
READ NEXT: Best wireless routers | Best broadband networks
How to set up a VPN on your router: Tips and caveats
Before you get started, be aware that using your router as a VPN gateway is less flexible than using an app. For one thing, it means that all your traffic from all your devices will be routed through the same remote server, but this doesnt have to be a problem.
If you pick a server in a nearby country with good internet infrastructure the Netherlands is a popular choice your online activity will be effectively concealed from your ISP (and from the UK authorities), while the impact on performance should be negligible. However, if you choose to use a server in the US or further afield say, to access geo-blocked streaming services the slowdown could be quite noticeable.
One way to get around this is by installing the native VPN app on any specific devices that need a different virtual location. You can then, for example, configure your router to use a server in Amsterdam, while traffic from one particular client gets forwarded on to San Francisco. This will create an indirect double-VPN connection for that device, so performance may suffer but if you have a fibre broadband connection, you should still have enough bandwidth to enjoy streaming video in high-definition, and possibly even 4K.
Another approach is to set up a second router as a standalone VPN gateway, with its own wireless network. You can then make a given device use or bypass the VPN simply by connecting it to one network or the other. Note, though, that if you want different devices to connect to different servers, youll still have to use the double-VPN technique.

How to set up a VPN on your router
You first need to check whether your VPN provider supports router installation. Not all providers allow you to access their services directly from a router. As of early 2021, all our top-rated VPNs (namely ExpressVPN, NordVPN, CyberGhost and Sharshark) explicitly support router installation.
Our top-two VPN services ExpressVPN and NordVPN even have their own pages telling you how to set up a VPN on a router. ExpressVPNs instructions are more detailed because they first let you select your router and then give you specific installation instructions for that model, whereas NordVPN just has general instructions. Both VPN services also have 24/7 customer support, giving you some backup to help you set up the VPN on your router if youre having any problems with the instructions on the website.
READ NEXT: Set up a VPN on your router using ExpressVPN | Install NordVPN on your router
Make sure your router is compatible
If you have an Asus router (like the Asus RT-AX56U) then we have good news for you. The standard Asus router firmware (known as AsusWRT) has built-in support for outgoing VPN connections using the secure OpenVPN protocol, and all the providers listed above offer online documentation showing you how to set it up.
The catch is that the Asus firmware isnt very configurable, and theres no way to set it to automatically connect to the VPN whenever youre online so youll have to go into the administration interface and reconnect every time the router restarts. Theres a way around this, however, as well discuss below.
If your router comes from another manufacturer, it probably doesnt have integrated VPN support. Still, this doesnt necessarily mean youre out of luck. Some routers let you configure a PPTP server as your main internet gateway, and if your VPN provider supports PPTP connections then you can connect to it in that way. Note though that PPTP isnt secure: you can use it to spoof your location, but you shouldnt rely on it to protect your online privacy.
Flashing VPN-compatible firmware
If your router doesnt have satisfactory VPN support built-in, then you may be able to add it by installing smarter firmware. For an Asus router, the obvious choice is AsusWRT-Merlin, an unofficial project which looks and feels almost identical to the official firmware, but adds a VPN auto-connect option, along with numerous other useful features.
Its very easy to set up you can flash it in exactly the same way as a regular firmware update, and itll even remember your internet and home network settings. Youll find instructions and model-specific downloads at the AsusWRT-Merlin project site.
If youre using a router from another manufacturer, you may be able to install the free, open-source DD-WRT firmware on your router. Be warned, though; the installation process can be complicated, and the firmware itself is decidedly functional rather than user-friendly. Making the switch will also completely overwrite your existing router settings, so youll have to reconfigure them from scratch.
On the plus side, DD-WRT works with a wide range of routers and adds a huge range of features, including the ability to route outgoing VPN connections over OpenVPN. You can check whether your router is supported here. If it is, youll be directed to the appropriate firmware file. If youre not sure what to do with it, youll find guidance on the DD-WRT wiki.
Collect the necessary information from your VPN provider
When youre ready to set up an OpenVPN connection from your router, theres just a few things you need, starting with your VPN username and password. In addition to this, its a good idea to find out the addresses of your providers DNS servers, so you can route your address lookups through them, rather than exposing them to your ISP.
You can alternatively use free DNS services provided by Cloudflare, Google or others, but its probably smarter to use a VPN provider with a strict no-logs policy. If youre using an Asus router, youll also want to download an OVPN configuration file, which contains all the technical details of the VPN server you want to use: this should be readily available from your providers support site.
If youre given the choice between TCP and UDP versions of the file, choose UDP its faster, and just as secure. That said, TCP often gets through firewalls more easily, so its worth a try if youre having access problems. Its possible that you might also need to download a security certificate. Check your VPN providers website for this, though in some cases this information will be bundled conveniently into the OVPN file.
Set up a VPN on an Asus router with standard firmware
If youre using the standard Asus firmware, youll find the VPN settings button under Advanced Settings at the lower left of the web-based management portal. Click it and the routers VPN Server options will appear in the main pane. Click the VPN Client tab at the top.
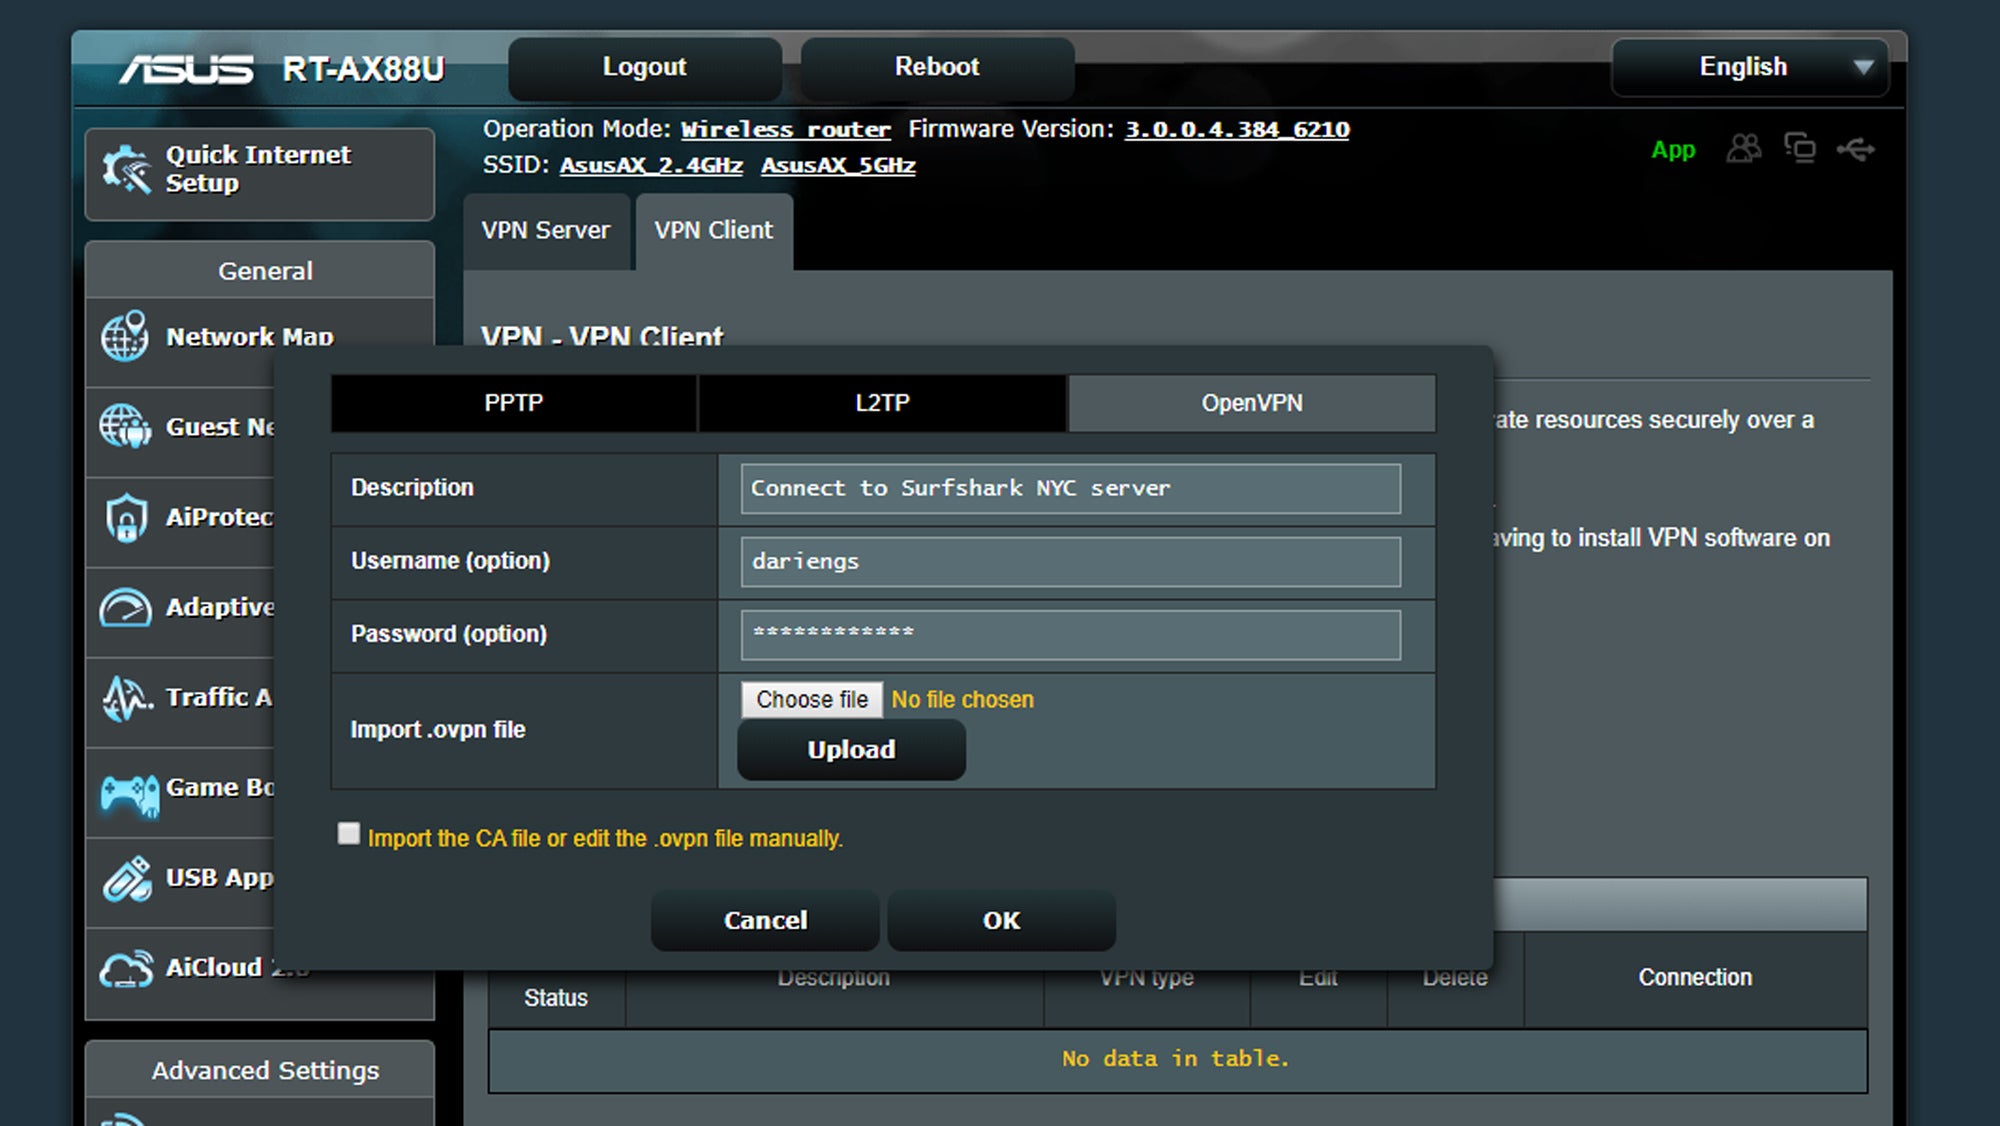
Youll now see a list of configured VPN servers, which will be empty. Click Add profile; then, in the dialogue that opens, click the OpenVPN tab at the top and enter a name for your connection, along with the username and password you use with your VPN service. Next, you need to upload the OVPN file. Note that if you see a warning about Lack of Certificate Authority, then youll need to upload a security certificate too.
Click OK to close the dialogue and your new VPN connection will be saved in the list. If you want to configure multiple virtual locations, just go through the process again and enter the same credentials with a different OVPN file and give the new connection a meaningful name while youre at it.
Finally, youll find DNS options in the WAN settings, which is again located under Advanced Settings. Set Connect to DNS server automatically to No and enter the address of your VPN providers DNS servers (which again youll find on their website). With all this done, you can go back to the VPN settings and click Activate to turn on the VPN. Just remember that the router wont automatically connect after a restart, so double-check your protection status before you do anything sensitive online.
Install a VPN on a router with AsusWRT-Merlin firmware
The AsusWRT-Merlin firmware looks an awful lot like the standard administrative portal, and youll find the VPN settings in the same place. However, with the advanced firmware youll see several additional tabs along the top of the main VPN pane. Click the OpenVPN tab to open the appropriate pane.
Towards the top, youll see the option to upload your OVPN file. After youve done this, most of the other fields on the page will automatically be filled in with the relevant information, but youll need to add your VPN username and password in the appropriate fields.
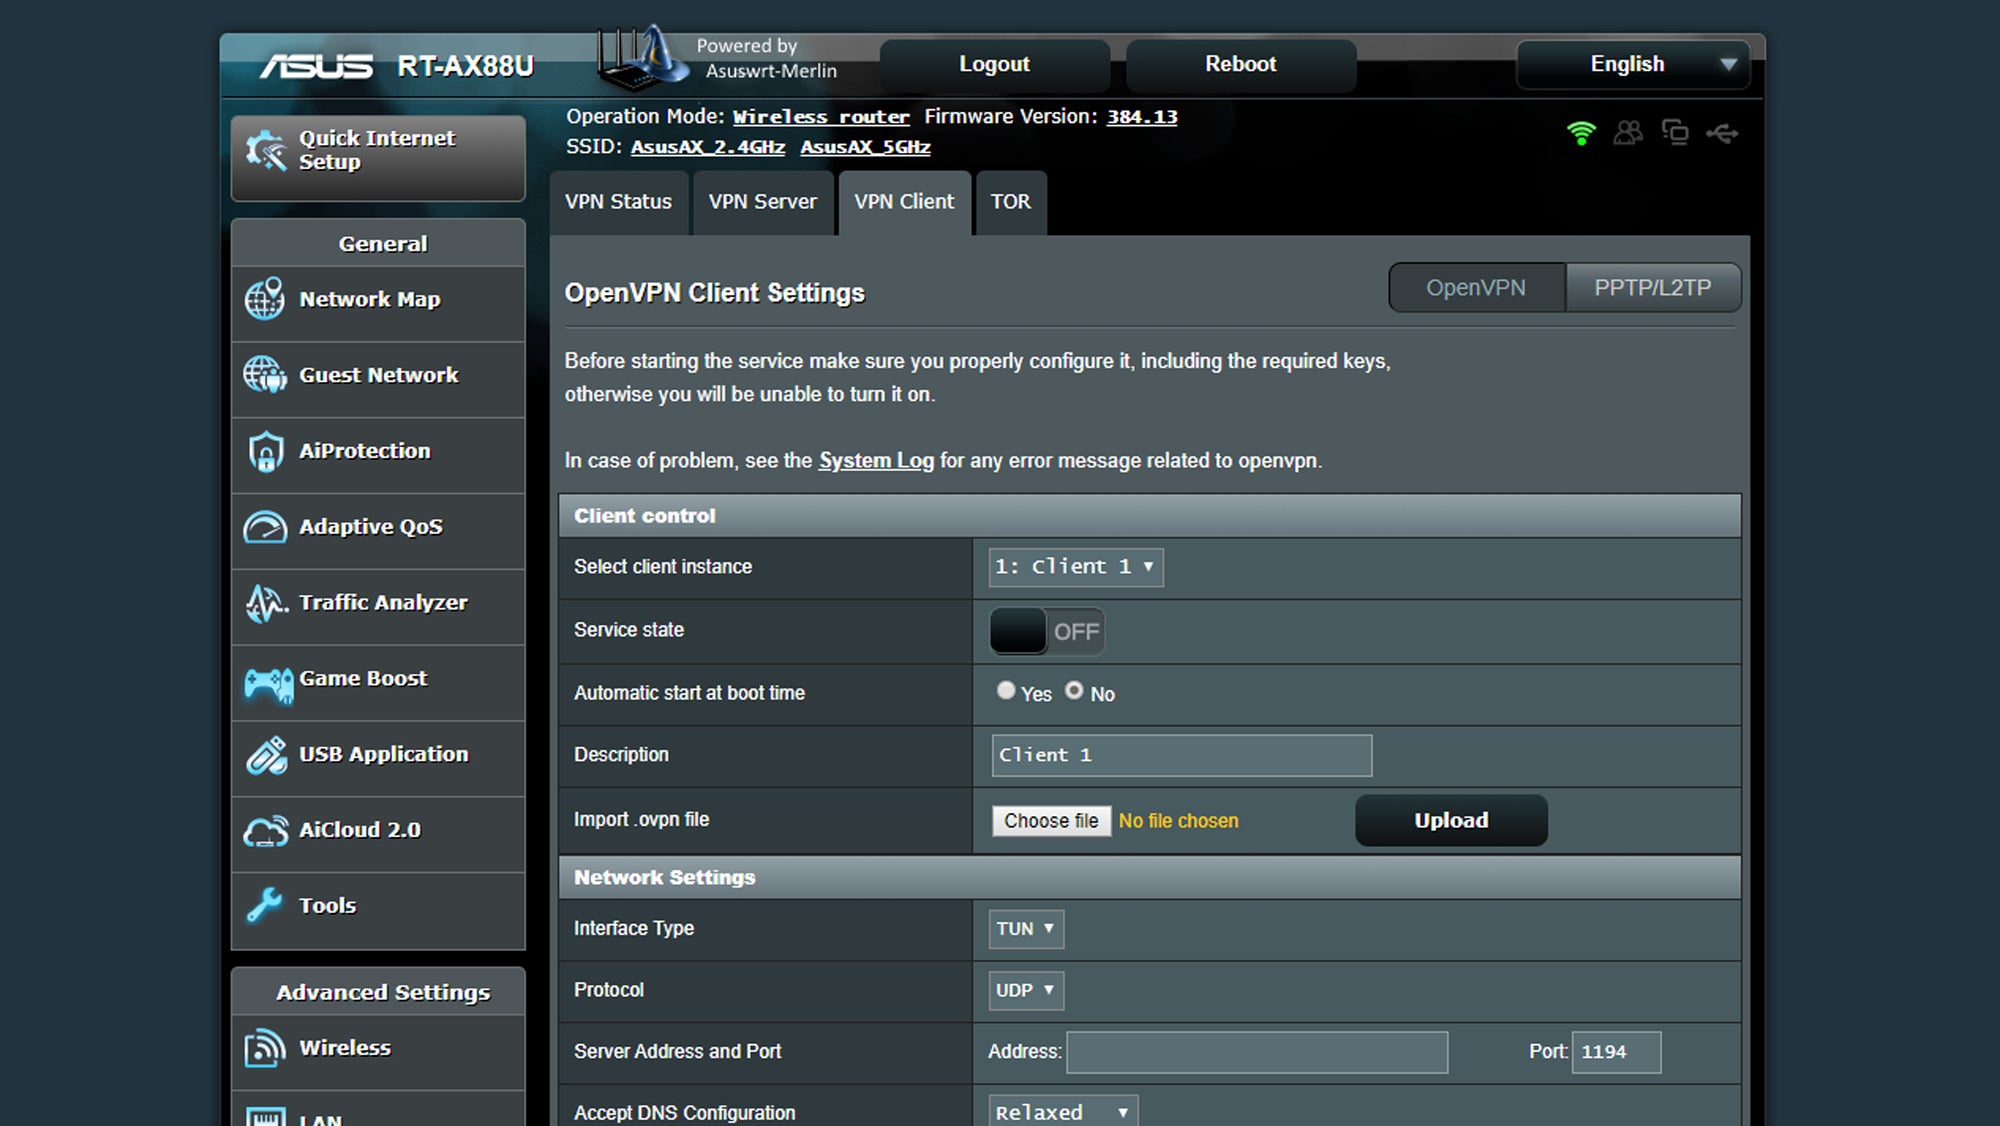
Under Basic Settings, youll see a Start with WAN option. If you want to be protected at all times, make sure this is set to Yes. Finally, its time to enter your VPN providers DNS settings. Again, youll find the relevant options on the WAN settings page.
You can now activate the VPN and surf in privacy. However, since AsusWRT-Merlin is so configurable, you might want to browse the settings or check your VPN providers support pages for any other recommendations.
Install a VPN on a router with DD-WRT firmware
Configuring DD-WRT as a VPN gateway is a slightly fiddly process, but at least you only have to do it once. Start by opening the Basic Setup tab at the top-left of the interface, and entering the addresses of your VPN providers DNS servers in the Static DNS 1 and Static DNS 2 fields. You can leave Static DNS 3 and WINS empty, but tick all three boxes below, then click Save.
Next, click on the Services tab in the top row, followed by the VPN tab in the row below. Now under OpenVPN Client click the Enable radio button. A set of obscure technical options will suddenly expand. Annoyingly, DD-WRT cant read its settings directly from an OVPN file, so youll need to get the requisite information from your VPN providers support site.
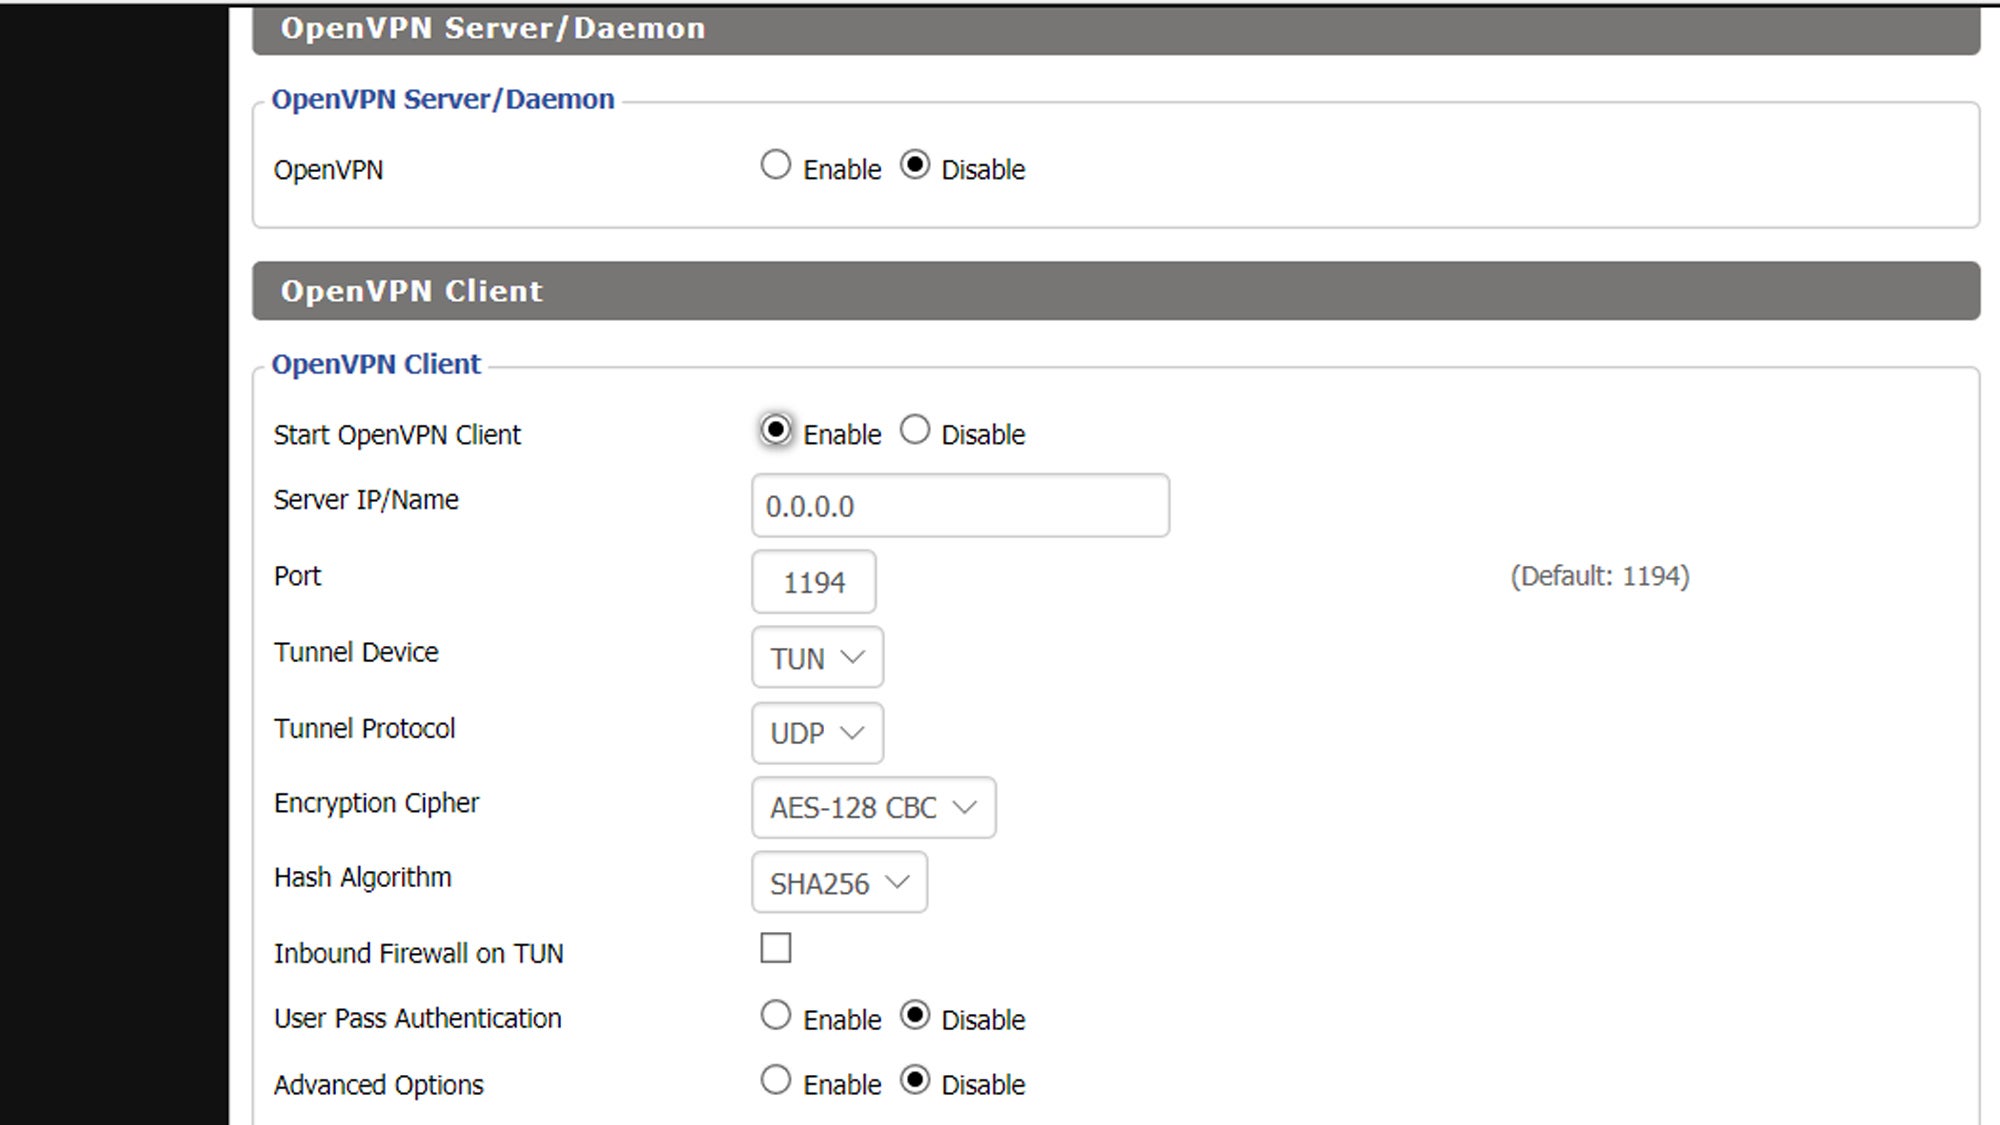
Your VPN provider will probably also need you to apply some additional configuration options: the Additional Config field is hidden by default, but you can make it appear by enabling the Advanced Options radio button. If you need to enter a security certificate, this goes in the CA Cert field, which is tucked away at the bottom of the page.
Finally, its worth checking whether your configuration sets the router to automatically connect to the VPN on startup; this is perfectly achievable in DD-WRT, but it may call for a bit of technical jiggery-pokery. Once more, we suggest you check with your VPN provider to get the right settings.