To help us provide you with free impartial advice, we may earn a commission if you buy through links on our site. Learn more

Recording your gameplay on PS4 is easy. The console automatically records the last 15 minutes of whatever game you’re currently playing, but actually selecting and editing your clip can be a little trickier. In this guide, we’ll show you exactly how to record the bits you want and how to upload them to social media to share with your friends.
Step 1: As previously mentioned, the first thing you need to do is start gaming. Then, when you come across something you want to upload, press the Share button on the DualShock 4 controller (depending on how you’ve setup the button you may need a longer press). This will bring up the Share menu, which allows you to save screenshots and videos. You can either save the video for uploading later by pressing Square, or you can upload your clip straight away by selecting Upload Video Clip.
Step 2: Once the clip has been saved, select which clip you’d like to upload (you might have several if you’ve saved lots from previous gaming sessions) and then choose where you’d like to upload it. This will depend on which apps you currently have installed on your PS4, but most users should have the option of uploading to Facebook, Twitter, YouTube and Dailymotion.
Step 3: You’ll then be taken to the Trim screen so you can edit down your clip into a bite-sized snippet of the moment you want to capture. Depending on which social network you pick, you may be restricted to a certain length. On Twitter, for example, you can only upload a video that’s ten seconds long.
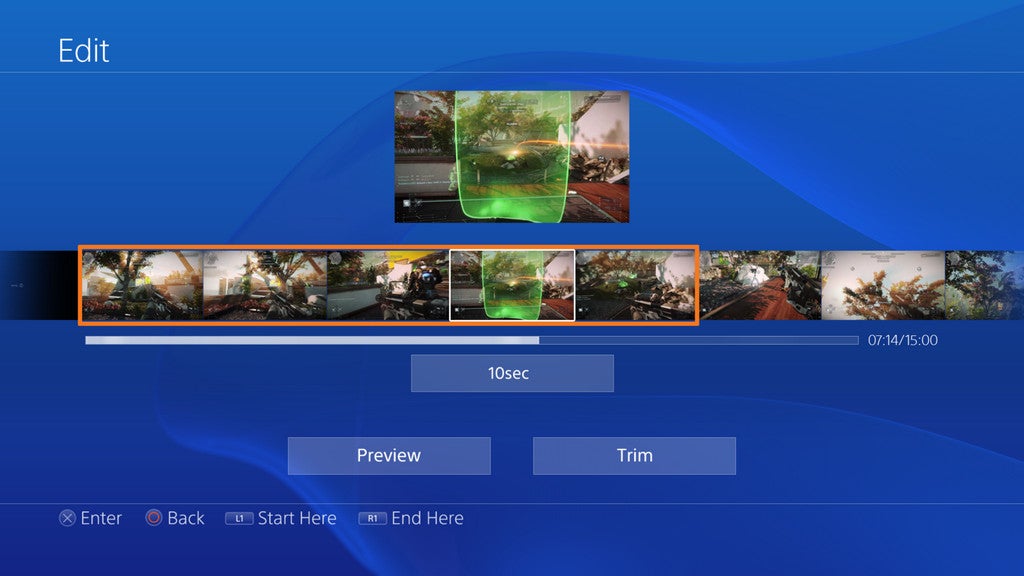
Either way, you’ll be given options to split the clip you’re editing into certain intervals, ranging from 1 second, 5 second and 10 second intervals right up to 30 second intervals or even 60 second intervals. Depending on the length of your clip, you may find it easier to break it up into smaller chunks of time to help you pinpoint the exact place of your intended clip.
Step 4: Once you’ve found the section you want to upload, press X on the frame where you’d like the video to begin, and again on the frame where you want it to end. You can then preview your clip to make sure you’ve got it absolutely right.
Step 5: When you’re happy with your clip, tap OK. This will take you to the final upload screen, which lets you add a comment to your video and tag other players who might also be in the clip. You can also play it one last time to make sure it’s right, or go back and trim it if you think it needs a little tinkering. Then all you need to do is select Share and your clip will be uploaded.