To help us provide you with free impartial advice, we may earn a commission if you buy through links on our site. Learn more

A robot vacuum cleaner can be an excellent investment, taking care of arguably one of the most tiresome household chores with very little input from you. As Reena Patel, floorcare category manager, EMEA at iRobot explains, robot vacuum cleaners are designed to be a “hands-free solution for cleaning your home, giving you back time in your life to do more important things”.
However, in order to ensure your robot vacuum cleaner does the best job possible, it too will require cleaning. Whether you have a traditional robot vacuum cleaner, or one of the newer models that not only vacuums floors but mops them as well, they all need some level of maintenance – some more than others.
Don’t worry, help is at hand: I’ve been using robot vacuum cleaners in my home for more than seven years, so I’m well versed in how to best clean them. As well as offering tips based on my own experience, I’ve also spoken to Reena Patel of iRobot and Paul Keast of Dyson to get their expert opinion on cleaning a robot vacuum cleaner.
How often should you clean a robot vacuum cleaner?
This will very much depend on how often you use your robot vacuum cleaner, as well as the features it offers. To some extent, the brand of your cleaner will also determine its cleaning routine.
So, for example, if your model of robot vacuum cleaner comes with a self-emptying base, then you won’t need to empty the dirt bin on the cleaner itself as much as a model without such a base, since that part is handled by the robot itself. However, you will need to consider the self-emptying base in your cleaning schedule.For those wondering about how to clean a Roomba or another model with a self-emptying base, again, you likely won’t need to worry about the dirt bin as much as those models that come without a base, but you will need to keep an eye on the bag within the base and change it before it becomes too full.
If you have a robot vacuum cleaner that doesn’t come with a self-emptying base, then you should clean out the dirt bin of your model after each use. Sometimes, you may find you need to do it mid-way through a cleaning cycle. In terms of the other elements that make up the cleaner, Dyson’s product manager for intelligent machines, Paul Keast, recommends “cleaning your filter at least once per month to maintain optimum suction power”.
Meanwhile, Eufy, which owns RoboVac, offers an easy to follow schedule that outlines how often various elements of a robot vacuum cleaner should be cleaned.
- After each use: Dust collector or dirt bin, washing mop or cloth if applicable, water tank and mopping modules.
- Twice a week: Filters, if you have a pet.
- Once a week: Filters, rolling brushes, rubber strips.
- Once a month: Side brush, brush guards, sensors, charging pins and swivel wheel.
READ NEXT: Best cordless vacuum cleaners
When to replace the various parts of a robot vacuum cleaner
Like cleaning, the replacement schedule for the various parts of your robot vacuum cleaner will depend to a degree on the frequency your vacuum is used. iRobot’s Reena Patel says “robot vacuums are capable of doing as good a job, if not better, than a traditional upright vacuum” with their abilities to “reach areas where an upright vacuum cannot, such as under the couch or bed”. With that in mind, there’s a good chance you’ll be using a robot vacuum fairly frequently, she says.
It will depend on the manufacturer, but many accompanying robot vacuum cleaner apps will serve up a reminder when it’s time to replace a part. As a general rule of thumb, iRobot offers a schedule of the rough times to expect to replace parts on its Roomba models, though the guidelines can be applied to robot vacuum cleaners across the board:
- Every 2 months: Filters
- Every 6-12 months: Brushes, extractors
- Every 12 months: Front wheel
READ NEXT: Best Shark vacuums
How to clean a robot vacuum cleaner in 8 easy steps
The process of cleaning a robot vacuum cleaner will vary depending on the make and model of your robot vacuum cleaner. However, as Reena Patel at iRobot highlights, there are some general guidelines to follow – whether you have a Roborock, Neato, Miele or Dyson model – to ensure your cleaner remains in tip top condition, capable of cleaning your floors for years to come.
With that in mind, read on to discover our 8 steps to clean your robot vacuum to ensure it works its best to leave you floors sparkly clean.
1. Power off your robot vacuum cleaner
An obvious first step, but a necessary one. “It’s essential that before cleaning you make sure the robot vacuum is turned off and unplugged from the power source”, Patel explains.
2. Empty the dustbin
No matter which model of robot vacuum cleaner you have, it will likely have a dirt bin into which it will collect dust, dirt and debris from your floor. Some models – self-emptying models, in particular – have such a bin in the main unit, as well as a separate bin in the base.

One of the first steps in cleaning a robot vacuum cleaner is emptying the dirt compartment on the robot itself. Depending on the make and model you have, this will involve “pressing a release button or opening a latch to access the dust bin“, Patel says.
3. Clean the filter
Most robot vacuum cleaners will have a filter of some sort and ensuring it’s cleaned regularly is essential to getting the best performance from your device. In terms of iRobot models, Patel explains: “Most of iRobot’s cleaners have a High-Efficiency Filter, which helps to capture and trap 99% of pollen, mould, dust mite and pet allergens.”
More generally, you will find step-by step instructions within the respective app of your robot vacuum cleaner on how to clean the filter for that particular model. Many apps will also send you a notification when a filter change is due.
Patel advises that you “check the instructions” on how to remove the filter, and then “clean it by tapping it gently to dislodge any trapped dirt or dust”. She adds that “you might also need to rinse it under running water; or replace it if it isn’t washable”.
4. Remove hair and debris
Hair, whether human or pet, loves a vacuum cleaner brush – and that applies to robot vacuum cleaners as much as traditional vacuum options.

Patel recommends “inspecting the brushes and wheels for any hair, string or debris wrapped around them”, and to “use any cleaning tools provided with your vacuum to remove any obstructions”. If your model doesn’t arrive with a hair-cutting tool in the box, for example, I highly recommend buying one from Amazon or elsewhere to make removing such tangles easier.
How easy it is to clean the brushes and rollers will again depend on the make and model of your robot vacuum cleaner, with some models enabling you to completely remove the units to clean them effectively.
5. Wipe the exterior
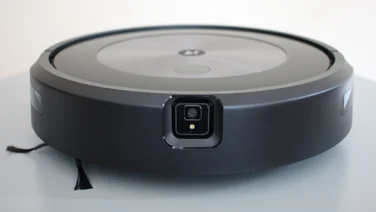
While robot vacuum cleaners might be great at cleaning dust and debris off your floors, they don’t have the ability to dust themselves off. Cleaning the exterior isn’t just about making your robot look better, however; it ensures the sensors and cameras are able to perform properly.
“Use a damp cloth to wipe down the exterior surfaces of the robot vacuum, including the sensors”, Patel says, “but avoid using harsh chemicals that may damage the plastic or electronics”.
6. Clean charging contacts
You’ll want to keep that damp cloth away from the charging contacts – electricity and water are not friends, after all – but in order for your robot vacuum cleaner to charge properly, Patel says: “Use a dry cloth to gently wipe the charging contacts on both the vacuum and the charging dock to ensure proper charging functionality.”
7. Reassemble and test
Once you’ve emptied your dirt bin, cleaned all your brushes and wiped down the exterior of your robot, you’ll need to put it back together. You needn’t worry, though: your robot vacuum cleaner has been designed to be taken apart for cleaning so putting it back together is usually a pretty standard procedure.
Patel advises that you should “reassemble the vacuum according to the manufacturer’s instructions”, and “after reassembly, test the robot vacuum to ensure that it’s working correctly”. That way, you’ll know that it’s ready well ahead of its next scheduled clean, rather than setting it off on a clean before you pop out, only to return to find it stuck with your floors still dirty.
8. Schedule regular maintenance
Depending on your model of robot vacuum cleaner, the accompanying app should provide information on when various parts need cleaning and/or replacing. Patel advises “establishing a regular cleaning schedule based on your usage frequency and the manufacturer’s recommendations” in order to keep your robot vacuum in top condition.
READ NEXT: Best vacuum cleaners
How to clean a Dyson robot vacuum cleaner
When it comes to cleaning a Dyson robot vacuum cleaner specifically, product manager of intelligent machines for Dyson, Paul Keast details a quick five-step process below to help get you started:

1. Remove the filter from the robot.
2. Tap gently against the edge of the bin to remove any excess debris.
3. Place the filter under warm running tap water. Place your hand over the open end of the filter and fill it with warm tap water; shake it firmly to remove trapped dirt and debris. Do this until the water runs clear.
4. Rinse the outside of the filter under warm running water until the water runs clear and shake out the water firmly.
5. The filter must be completely dry before you put it back into the machine. We recommend waiting at least 24 hours before the next clean, leaving your filter in a warm, well-ventilated space.