To help us provide you with free impartial advice, we may earn a commission if you buy through links on our site. Learn more
- The trouble with Wi-Fi
- Diagnosing Wi-Fi problems
- New Wi-Fi router buying guide
- How to detect and fix Wi-Fi interference
- Fixing interference
- Reposition router
- Choosing the right Wi-Fi channel
- Configure your router
- How to configure a 2.4GHz wireless router
- STEP 1 - Connect to the management page
- STEP 2 - Set the region
- STEP 3 - Set the operating mode
- STEP 4 - Disable channel bonding
- STEP 5 - Change your router's channel
- STEP 6 - Test our your settings
- How to configure a 5GHz Wi-Fi router
- STEP 1 - Check network name
- STEP 2 - Set region
- STEP 4 - Change your router's channel
- STEP 5 - Test your settings
- How to extend Wi-Fi range
- Wireless range extender
- Wireless access points
- How to use two routers to extend wireless range
- STEP 1 - Connect to your primary router
- Step 2 - Configure the new router
- STEP 3 - Connect the two routers together
- STEP 4 - Configure both routers to use the same Wi-Fi network
Wireless networks are one of the finest achievements of the 21st century, but they can be quite a hindrance from time to time. We’re now far too familiar with the phrase “has the internet gone down?” – while we can now get pretty much any device online, the connection isn’t always that reliable. If you’re struggling to connect, you’ve come to the right place.
We’re here to help give you the best tips out there for making the most out of your Wi-Fi, from extending your range to increase your speed. You’d be surprised to see how easy it is to make your wireless experience much better. There are a bunch of different ways you can go about improving wireless networks, from free options, such as simply tweaking a couple of settings, to the expensive ways of buying a fancy kit. You’ll need to think which method is best for you and work out what kind of budget you’d like to spend (if at all).
In this guide, we’ll show you the ins and outs of what’s causing the problems in the first place, so you can take the necessary steps to stop them happening in the future. To that end, we’ll show you how to detect interference and configure your way out of it, how to properly configure a wireless router (both 802.11n and 802.11ac standards and 2.4GHz and 5GHz radio bands), and how to extend your network the proper way. By the time you’re done, you’ll have a rock-solid and reliable wireless network, with coverage wherever you need it.
For ease of reading, we’ve split this article into multiple pages, so you can use the navigation at the top and bottom of this page to jump to the section that most interests, or is most relevant, to you. This page covers the issues with Wi-Fi and why it can slow down. It’s essential background reading, as understanding why Wi-Fi has problems can help you fix and eliminate them.

The trouble with Wi-Fi
Most Wi-Fi problems are caused by interference. This is because the majority of networks operate on the 2.4GHz frequency band, which is also used by a host of other devices, including baby monitors, DECT phones, Bluetooth headsets and game controllers. That’s not even counting all of the other wireless networks out there competing with your own.
Indoors, the construction of your home has an impact: wood, plaster and glass have little impact on 2.4GHz radio waves, but brick and concrete can impede them; in some cases, if your router’s mounted on a brick wall or sat on a metal shelf, simply moving it can make a difference.
Newer routers can also work on the 5GHz band. This has the advantage that there are far fewer things to interfere with the wireless signal, with the frequency reserved for networking; the downside is that range of these networks is a lot less than with 2.4GHz networks.
Whether you’ve got a 2.4GHz or 5GHz network, the key to a trouble-free life is to minimise interference where possible and use an additional kit to extend range where physical factors (range and the construction of your home) are the limiting factors.
READ NEXT: Best wireless routers 2018: Boost the range and speed of your internet connection
Diagnosing Wi-Fi problems
While it’s easy to blame everything on wireless, not all network problems are caused by the technology itself. Poor range, for example, is often just a limitation of your router and is easy to diagnose, as your devices will stop connecting the further you get from the router. While tweaking some wireless settings can help this issue a little, the best way to fix range problems is with a brand-new router, or by installing a second wireless access point in the area where you get poor reception. We’ll show you how to tackle both of these solutions later.
Speed is trickier to diagnose, as a slow internet connection may be caused by something else. For example, if your router’s a long way from the master phone socket where your broadband comes in (ADSL and BT Fibre only), poor-quality wiring in your home could mean that your internet connection is slow, making it appear as though there’s a Wi-Fi problem.
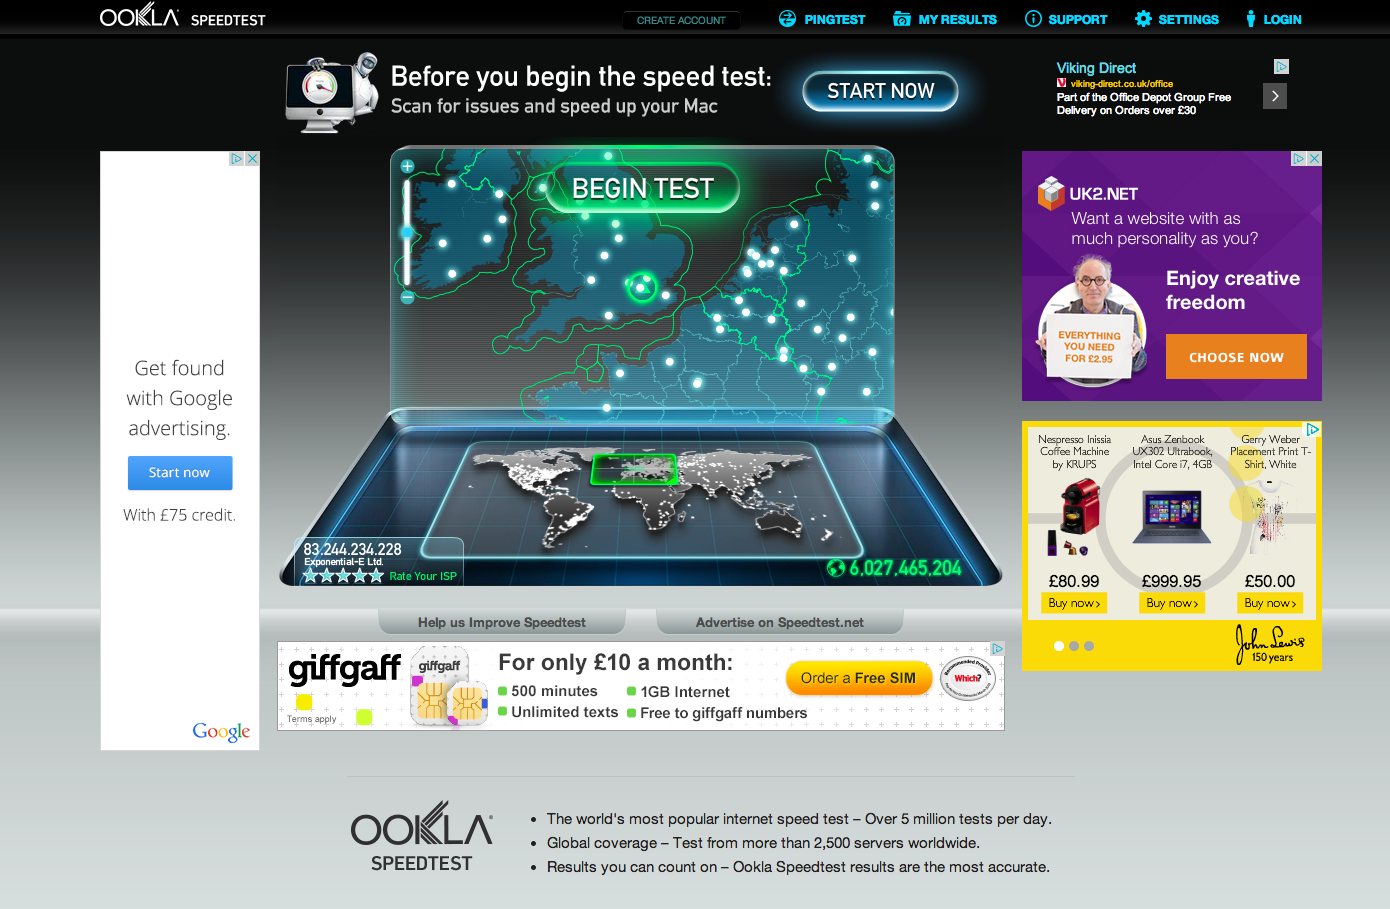
Before you do anything else, it’s worth using SpeedTest to test your internet connection speed. Run the test using a computer connected via wireless and then again via a wired computer connected via Ethernet. A discrepancy in the speeds via the two tests may indicate that there’s a wireless problem, but be careful: an old router may not provide enough Wi-Fi speed for your internet connection (read about standards below).
If your internet connection is slow via both connection types, try moving your router and plugging it into the master telephone socket (ADSL and Fibre only, Virgin Media cable connections won’t be affected by this). If you see an improvement in speed, it’s internal cabling, so you should leave the router in its new position, or replace the old cabling.
A second test can be timing how long it takes to copy a file to a shared folder or NAS over your wireless network. If it’s exceptionally slow, you’ll know it’s a wireless problem. If speeds don’t seem too bad, don’t give up reading yet, as making some tweaks to your router’s settings may increase speeds anyway.
READ NEXT: Best antivirus software 2018: Keep your PC safe without slowdowns and interruptions
New Wi-Fi router buying guide
Now that you’ve got an idea of what the problem is, it is time to fix it. One of your first thoughts may be to buy a new wireless router. Depending on the age of your router, you could be onto a good thing: modern routers are faster, more tolerant of interference and easier to configure.
Before you rush out and buy a new router, it’s worth following the advice below to see if you can eke out a bit more speed for free. If you can’t or you want a much faster network, you need to understand the current Wi-Fi standards and what they mean, before you buy.
A standard defines the maximum theoretical speed of a network, although you’re likely to get a lot less in practice. Newer standards offer faster throughputs and, generally, better range. They’re backwards compatible with older standards, so you can still use your existing wireless devices. Better range becomes evident on all devices, but you’ll only see the faster speeds if your devices also support the faster standard.
Old wireless routers will use the 802.11g standard, which has a theoretical throughput of 54Mbits/sec. Some routers can use a technique called channel bonding to increase speeds to 108Mbits/sec or 125Mbits/sec, but this also increases interference, as the router uses two wireless channels and can actually slow your network down. Nowadays 802.11g networks are very old and, with actual throughputs of around 25Mbits/sec, quite slow. We wouldn’t recommend buying an 802.11g router, but if you’ve got one in your home, it’s definitely worth upgrading from.

Still current are 802.11n wireless networks, which have a maximum throughput of 300Mbits/sec when using channel bonding, and 150Mbits/sec using a single channel. These networks can run on the 2.4GHz band and the 5GHz band. All routers offer the 2.4GHz band, some offer the 5GHz band as an alternative while fewer still let you run dual 2.4GHz and 5GHz networks. All laptops made in the last couple of years and the vast majority of smartphones support this standard. With throughputs of around 50Mbits/sec, these routers are still quite fast. If you’ve got an older 802.11g router or a slow 802.11n router, upgrading could help improve your network speeds.
The newest standard is 802.11ac. These routers use a superfast 5GHz network (it’s backwards-compatible with 5GHz 802.11n), with speeds of 867Mbits/sec and 1.3Gbits/sec available. We typically see speeds of at least 150Mbits/sec, although we’ve seen close-range speeds hit closer to 300Mbits/sec. While you can only get the best speeds using the 5GHz network, 802.11ac routers also have a 2.4GHz, 802.11n network for backwards-compatibility. In the case of these routers, the range of the 802.11n network is generally better than for a “pure” 802.11n router.
You have to have an 802.11ac wireless device to get the full throughput, with some laptops, including the MacBook Air, and some smartphones, including the Samsung Galaxy S7, have the technology built in. You can also buy USB 802.11ac wireless adapters if you want to upgrade a PC or laptop to use the new standard. These routers are the fastest and most reliable and are worth buying if you want the best performance and range, plus future compatibility with new devices.
The only other choices you have when buying a new router are the type and the number of wired ports. For type, you can buy either ADSL routers that plug into your phone line or a cable router, which plugs into a modem for a fibre connection via Ethernet. Note that Virgin Media supplies a wireless router that contains the modem inside it; if you want to replace this you need to buy a cable router and put the Super Hub into modem mode.
Given that ADSL speeds aren’t generally fast enough to warrant 802.11ac, you’ll find it hard to get an ADSL router that supports this standard, and may have to go for 802.11n.
How to detect and fix Wi-Fi interference
Fixing interference
You might not need to buy a new router if you can fix the interference problems you’re suffering. By reconfiguring your router and changing some of its more simple settings, you may find that your Wi-Fi troubles go away. We’ll show you how to set up 2.4GHz and 5GHz networks properly. If you’re still having interference or range problems, you may need some new hardware, but we’ll cover all of that in the next section.
Reposition router
As we mentioned in the intro, positioning can be one of the biggest problems with Wi-Fi speeds. If you put your router in the wrong place, you may be artificially hampering its performance.
For the sake of testing, put your router close to your master phone socket to eliminate any issue of wiring. Take it off a metal shelf, if positioned on one. If it’s wall-mounted on a brick wall, try taking it off. Finally, try repositioning the router and seeing if that improves the signal, and you may be surprised at the results.
Choosing the right Wi-Fi channel
Although your router will run on a frequency band, such as 2.4GHz, underneath it’s actually only using a 20MHz slice of the frequency, called a channel. For example, channel 1 for 2.4GHz networks uses the 20MHz slice between 2,412MHz and 2,432MHz. Unfortunately, most of the 2.4GHz channels overlap, causing interference: channel 2 uses 2,417MHz to 2,437MHz, for example.
The illustration below shows you how the channels stack up. All of the channels coloured the same colour don’t overlap. Typically, people suggest using channels 1, 6 and 11, as these are these channels work everywhere in the world (12 and 13 are restricted in some places, although not the UK) and don’t overlap.
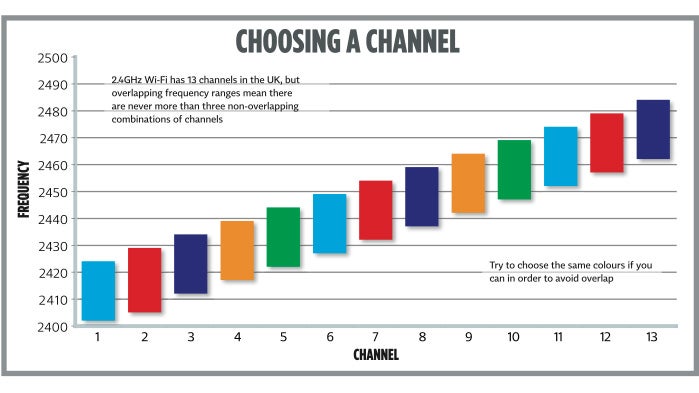
It’s not always that simple, though, as plenty of people don’t follow this simple rule; for example, you may be surrounded by people using Channel 2, which overlaps both Channel 1 and 6. Picking the right channel isn’t just about making the right decision based on technical data, but picking the right channel based on the networks around you, then.
Fortunately, this problem has been fixed with 5GHz networks, which has more channels, none of which overlaps. However, a neighbour maybe running a network on the same channel, causing interference issues. For both 2.4GHz and 5GHz networks, the trick is to set your router to use a channel different (where possible) to other wireless networks within range and one that doesn’t overlap.
This isn’t a perfect science and sometimes the interference or problems are caused by devices that you can’t detect, such as a baby monitor or wireless doorbell. As a result, you may need to change channels a couple of times to see any improvement.
The first place to start is with a Wi-Fi Scanner for your computer. These scan for wireless networks within range and tell you which channel they’re running on, and the base frequency (2.4GHz or 5GHz). WiFi Scanner for Mac (£19.99) is a brilliant and useful tool. For Windows, you can use inSSIDer Home (free). This has been replaced by a newer paid-for version, but the old version still works perfectly well.
Alternatively, Windows users can use WiFi Channel Scanner (free). This only shows you the channel of the network, not the frequency, and has an odd quirk with 5GHz networks, but it’s still possible to work out what’s going on. Channels 1 to 13 are 2.4GHz networks, while channels 36 and above are for 5GHz networks. However, WiFi Channel Scanner doubles the channel number for 5GHz networks, so channel 72 is really channel 36. There are no Wi-Fi scanners for iOS, as Apple had these removed from the App Store. Android is more permissive, so you can use Wifi Analyzer.
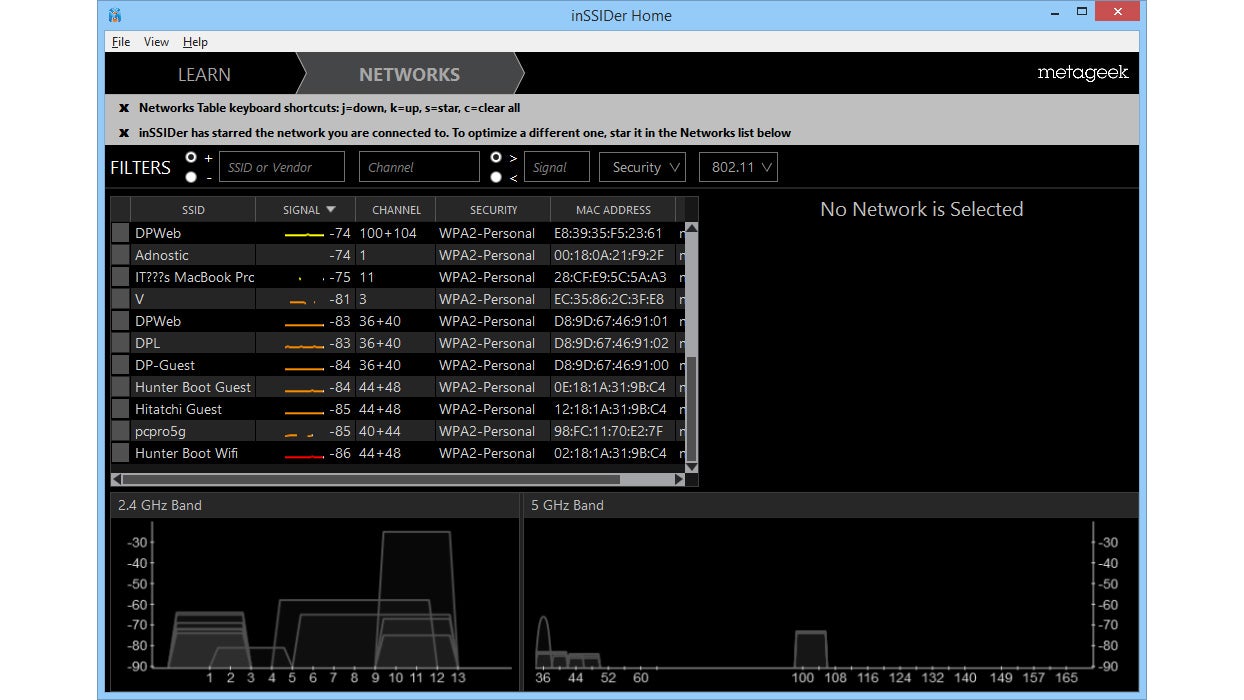
Run your chosen tool and let it gather information on nearby wireless networks. You can usually sort by channel, which gives you a better view of what’s going on.
For 2.4GHz networks, look at the most used channels. For example, you may find that most of your neighbours are using channel 1. Using the chart above you can pick an uncongested channel farthest from the one most used. In this example, channel 11 would be ideal, but channel 6 would also work.
There’s nothing to stop you using Channels 7, 8, 9, 10, 12 or 13, as these don’t overlap Channel 1. We don’t recommend that you do this, though. Part of owning a wireless network is being a good neighbour and picking a channel that doesn’t cause too much interference. In other words, look at the channel with the greatest concentration of wireless networks, then use our chart to pick an alternative channel of the same colour; this will make it easier for other people to add or configure their networks, too.
Note that in some areas, there are so many wireless networks using all kinds of channels that it’s impossible to choose a channel that doesn’t overlap any others. You may find, for example, that some routers around you are using channels 2, 3, 4 and 5, as well as 1. In this case, you’ll need to pick a channel that doesn’t overlap the most congested area, so channel 11 in this example. Ultimately, with so many wireless networks around, you may just have to pick the channel that gives you the best result, regardless of the consequences for other people.
For 5GHz networks, overlap’s not a problem, but general congestion could be. Note down which channels are the busiest: you should avoid using these channels on your home network.
READ NEXT: Best external hard drive: The best portable and desktop drives
Configure your router
Now you understand which other networks might be interfering with your router, it’s time to reconfigure it, to improve speed. Tweaking the settings can make a massive improvement in both speed and reliability. As you’ll be changing wireless settings it might make more sense to connect your computer to your router via an Ethernet cable, so that you don’t experience any dropouts. The navigation below will let you select the type of router you have – dual-band and 802.11ac router owners should follow the instructions for both 2.4GHz and 5GHz network.
How to configure a 2.4GHz wireless router
STEP 1 – Connect to the management page
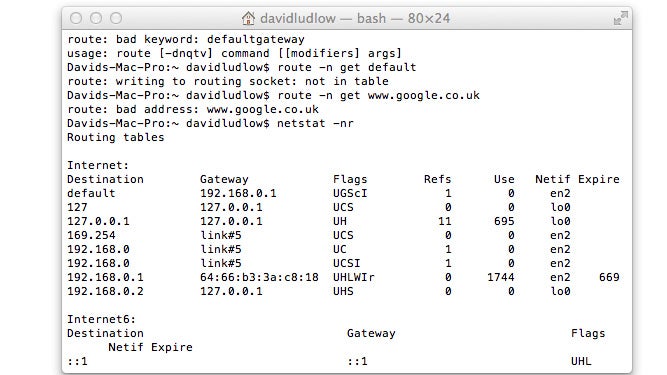
Connect to the web-based management page by opening a web browser and typing in your router’s IP address. This should be written in the manual that came with the router, but you can find the address simply enough from your computer.
In Windows get up a Command Prompt from the Start menu and type ipconfig. Note down the Gateway address, as this is your router’s IP address. If you’ve got a Mac, get up Terminal and type, netstat -nr. You’ll get a long list of results, but the Gateway address listed next to default is the one that you want.
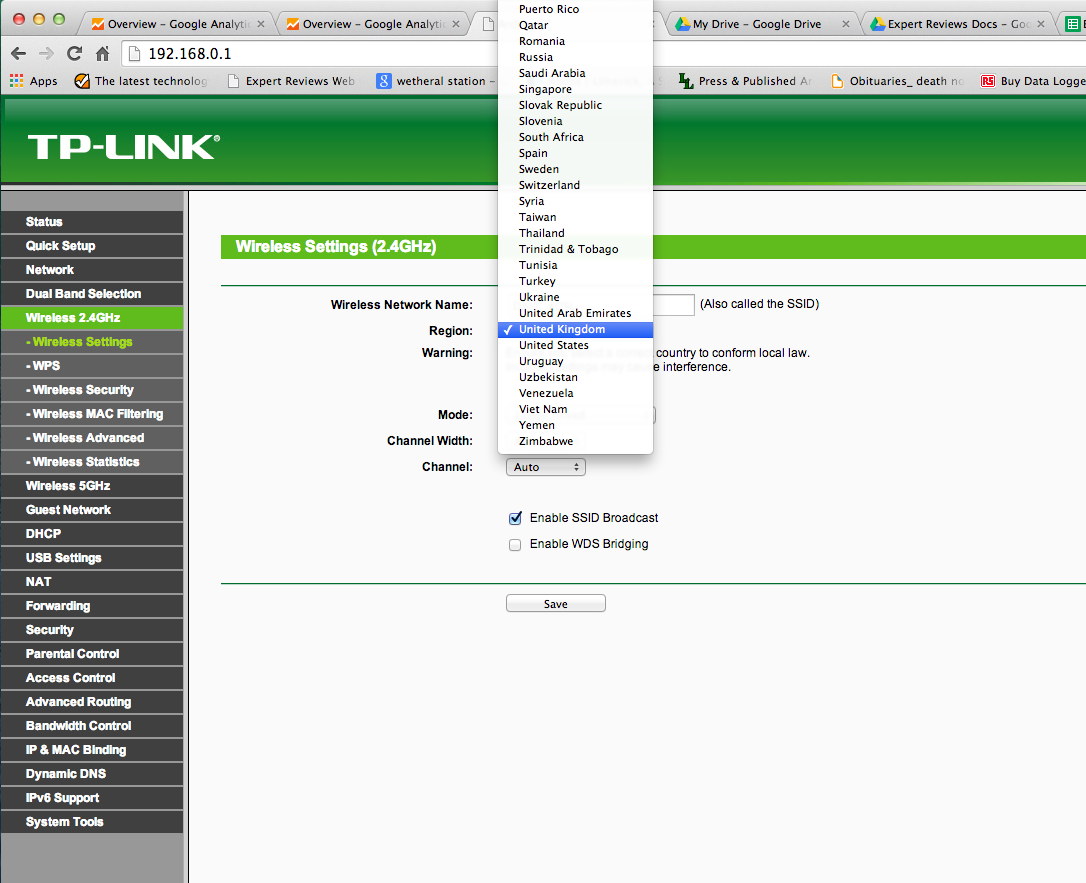
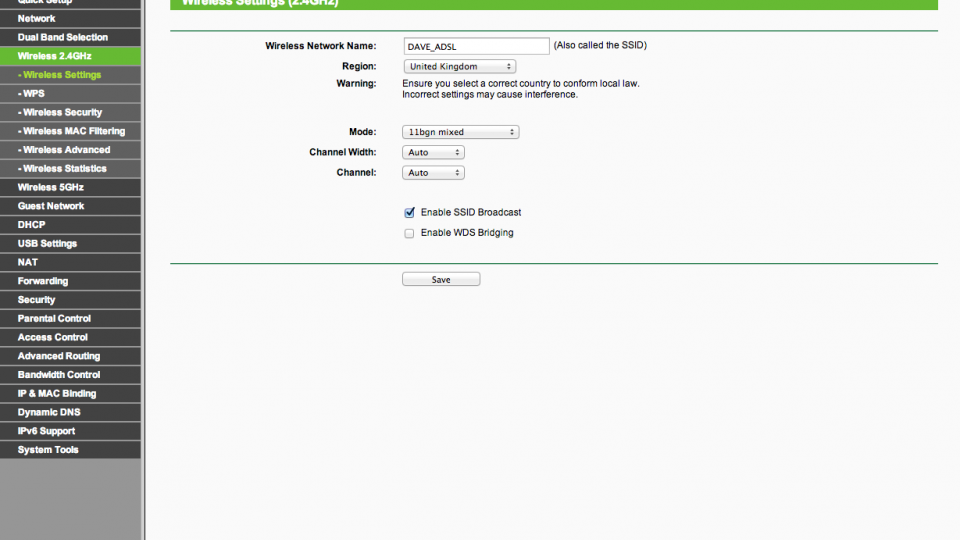
STEP 2 – Set the region
We’ll start with 2.4GHz networks, which are the most common. Find the wireless settings in your router. Depending on the manufacturer, the settings we’ll tell you to change may be in a few different places, and your router may have an Advanced section with more settings in it. First, make sure that the Region is set correctly. If it’s set to a different region, you won’t be able to use channels 12 and 13 in the UK
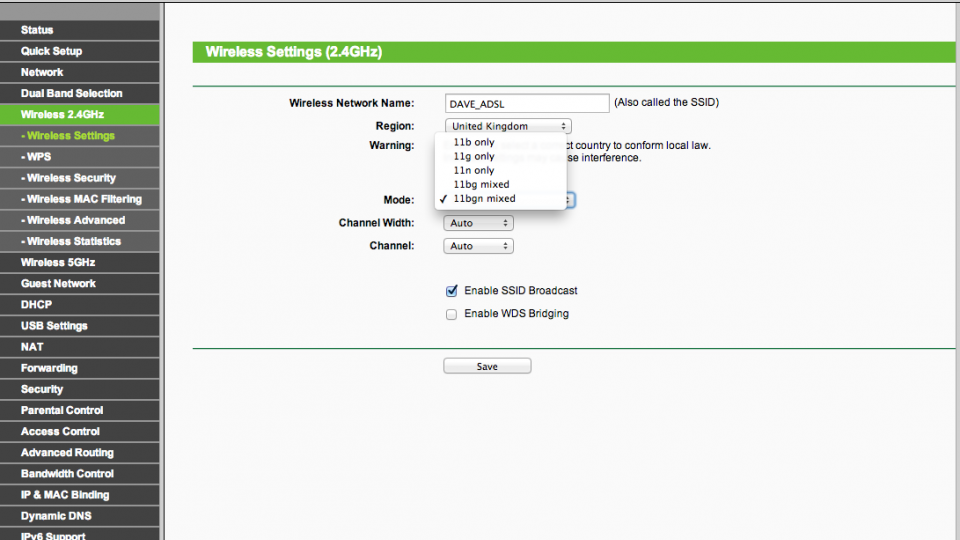
STEP 3 – Set the operating mode
Most routers will let you set the operating mode. This defines which wireless standards can connect to your router. For example, you can force it so that only 802.11n devices can connect. If all of your devices use the fastest speed the router offers, set it to the highest mode. If you’ve got some older legacy devices, make sure that you set a mixed mode that includes the fastest speed the router supports. For example, 802.11n routers should be set to support 802.11n, 802.11g and 802.11b.
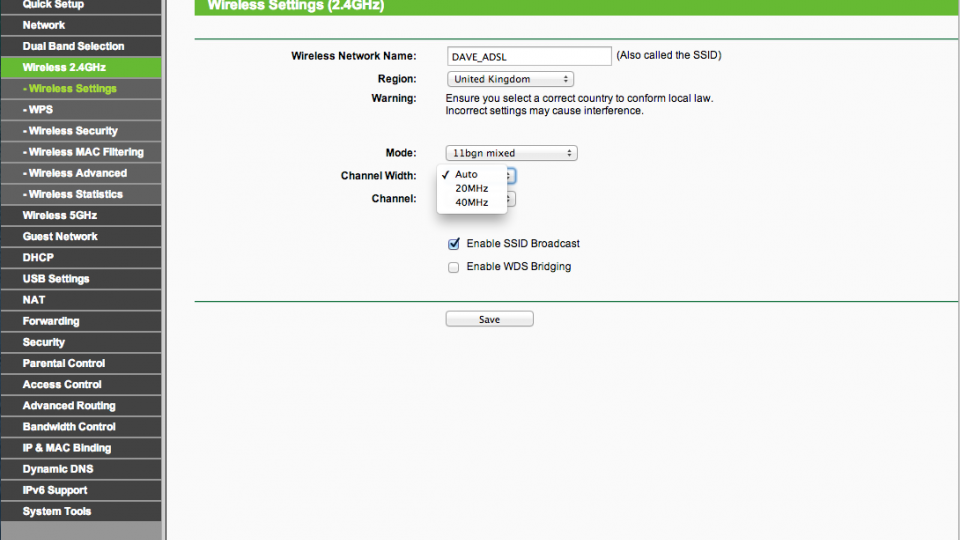
STEP 4 – Disable channel bonding
Next, you need to look at how many channels your router is using. To increase the speed, many routers use channel bonding, which uses two wireless channels simultaneously to double theoretical throughput. In the congested 2.4GHz space, this causes interference and can reduce performance, which is why we recommend setting your router to use a single channel: if you live in an uncongested area, you can always experiment by turning on dual-channel mode later.

The setting varies by router type and model, so you may need to check your router’s manual. For 802.11g networks, look for a channel-bonding selector, or change the max speed from 125Mbits/sec or 108Mbits/sec to half these values. For 802.11n routers, you may see a channel bonding option, but you’re more likely to see a speed setting. If the router is set to 270Mbits/sec or 300Mbits/sec (or higher), drop the setting down to half these values.
With 802.11ac routers, the 2.4GHz part actually uses 802.11n. You may find the same settings as above, but some routers have a Channel Width setting, which should be set to 20MHz, down from 40MHz. Finally, some routers have an Auto setting for this mode, but we recommend manually selecting the best mode to get initial stability, then experimenting by turning Auto on later.
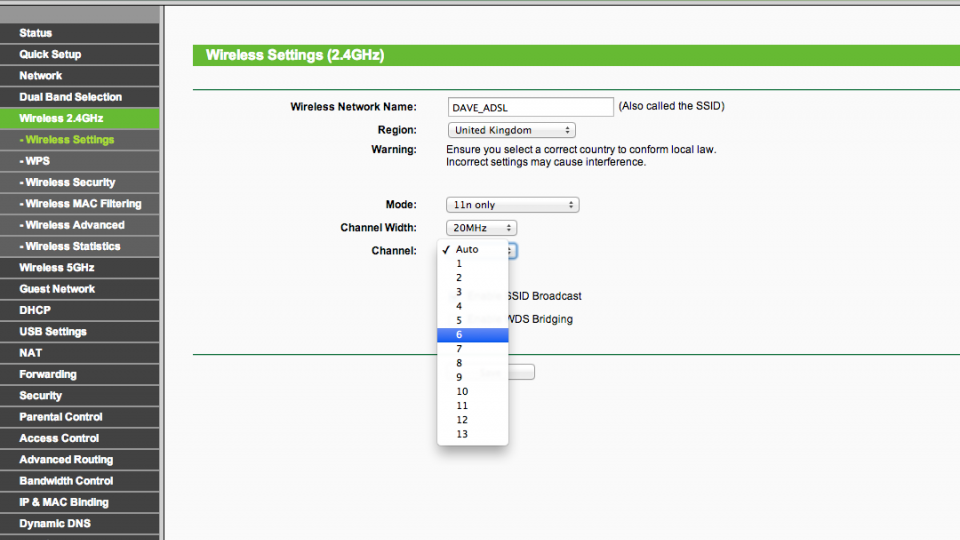
STEP 5 – Change your router’s channel
You now need to change the channel that your router runs on. Using the information you noted down from the Wi-Fi scanner and the overlap chart, select the least congested channel, with no overlap to other channels (where possible). Save your settings and the new settings will be applied. Again, some routers have an Auto setting for this mode, but we’ve generally found that manually selecting a channel works the best.
STEP 6 – Test our your settings
You can now try out your new settings. Walk around your house to see if wireless range and signal strength have improved. You may want to test your broadband speed again. If things have improved, you can go back into your router’s settings and try turning on some of the Auto settings. You may want to try channel bonding to increase speed, but we don’t recommend it as we’ve always found it causes problems. If things haven’t improved or have become worse, you should go back into your router’s settings and try a new channel, using the information you collected before to pick the next least-congested one.
How to configure a 5GHz Wi-Fi router
5GHz networks are similar to 2.4GHz networks to deal with, but there are a few more options. If you’ve got an 802.11n router that supports both 2.4GHz and 5GHz networks, you may find that it only supports one at a time, forcing you to make a choice. Most likely, you’ll need to choose 2.4GHz network for compatibility and range, so you shouldn’t need the advice here. With 802.11ac routers and some 802.11n routers, you can run both networks simultaneously, so the 5GHz network has to be configured properly. We’ll assume that you’ve logged on to your router already using the steps on the previous page.


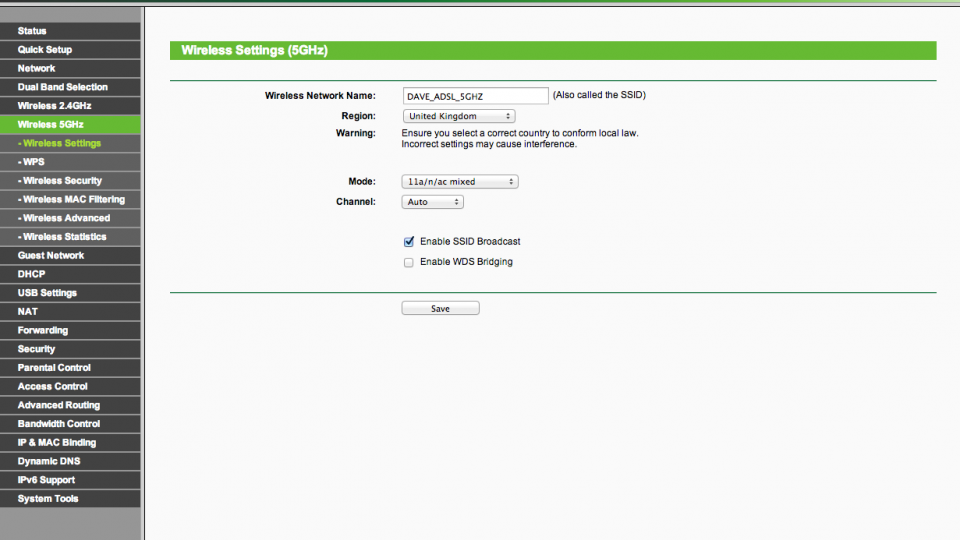
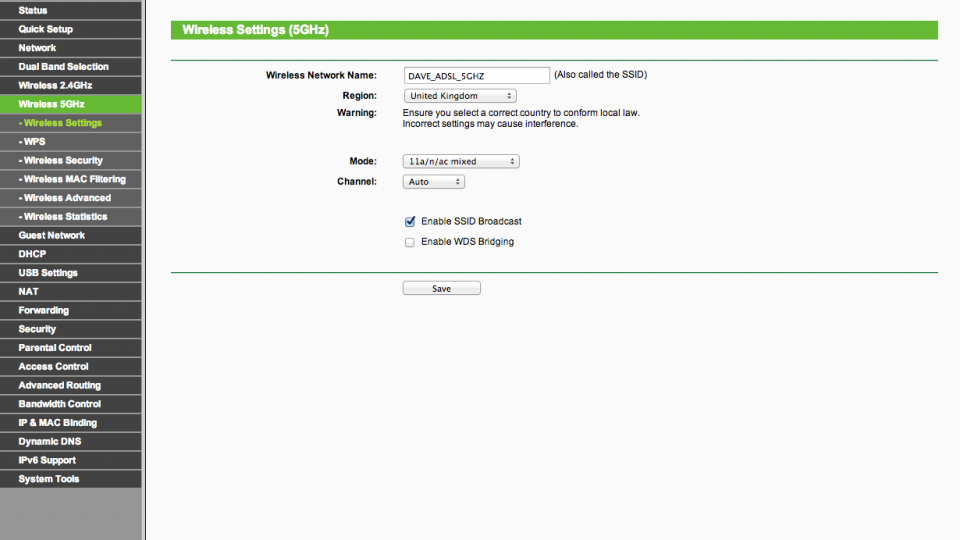
STEP 1 – Check network name
Check the name of your 5GHz network and make sure it’s different to the name for your 2.4GHz network – perhaps append _5GHZ to the other network’s name. We’ve seen some routers that use the same name for both networks, but this means you’ve got no control over which frequency band your devices are connecting to. It’s fine to leave the security settings the same for both routers.
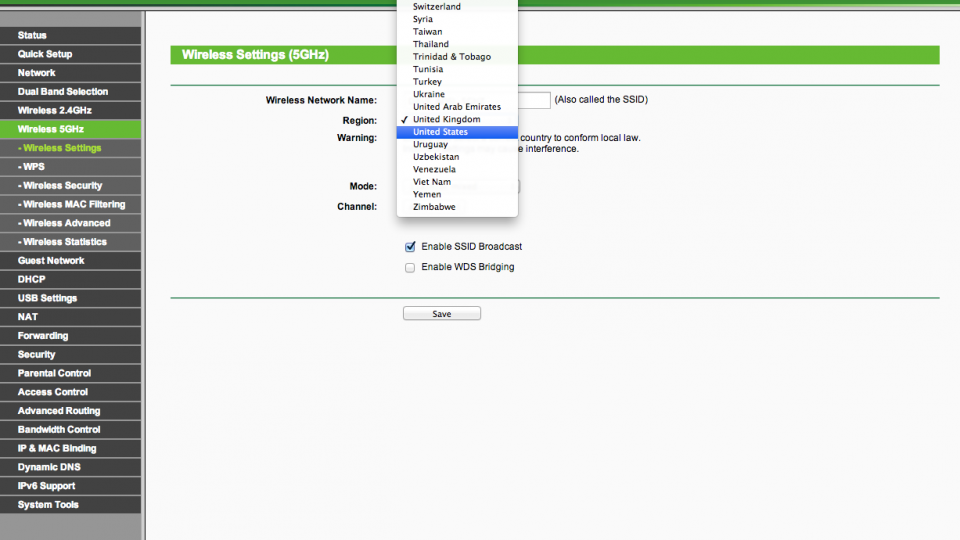
STEP 2 – Set region
It’s less of an issue with 5GHz networks, but make sure that you’ve got the region set correctly to the UK. If your router has come set with a different country by default, you’ll get a reduced range of wireless channels to select.
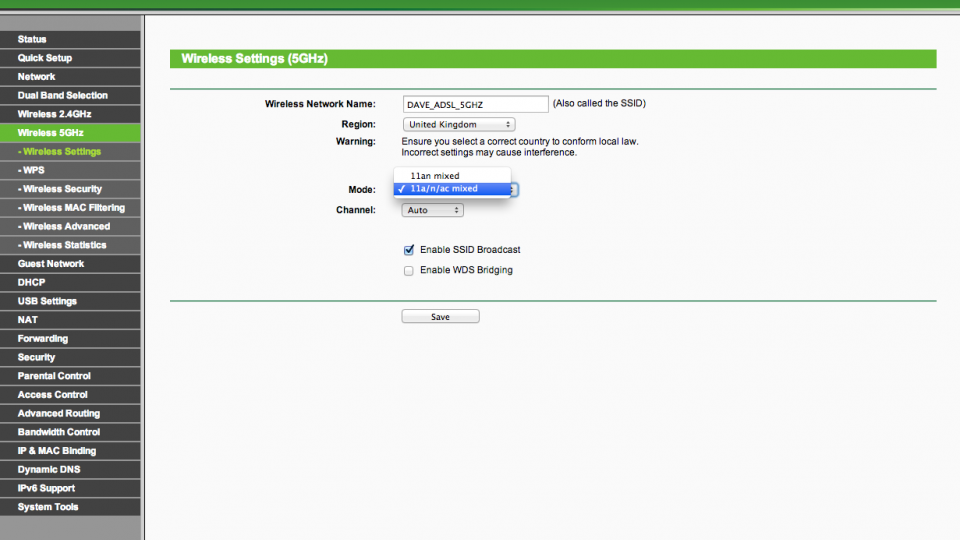
STEP 3 – Set the operating mode
You can set the wireless mode of your router to only support certain standards. If all of your devices support the fastest speed of the router, such as 802.11ac, set the router to use this mode only (not all routers support this). If you’ve got older devices that can connect, set a mixed mode that supports the router’s fastest standard. For example, an 802.11ac router should be set for a mixed mode that supports 802.11ac, 802.11n and 802.11a. You can usually step-down the router to 802.11n speeds only, which can be helpful if you don’t have any 802.11ac devices and are having connection problems. Remember to go back to 802.11ac settings if you buy any devices that support this standard, though.
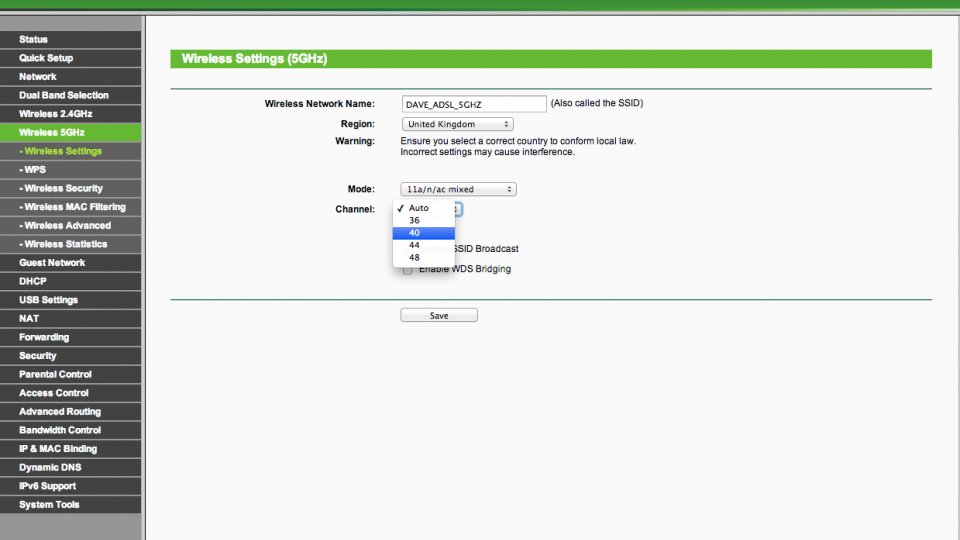
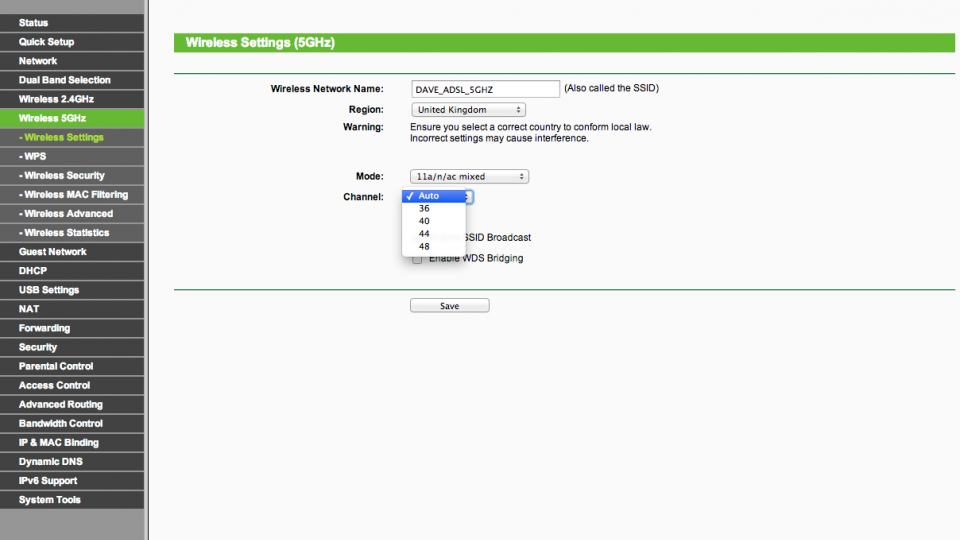
STEP 4 – Change your router’s channel
You can now select a channel to use, using the information that you gathered earlier. You may find that your router has an auto mode, but pick a dedicated channel for the time being, as you can always change this later when everything’s working properly.
Most 802.11ac routers won’t let you disable channel bonding, as the routers are much smarter with how they use the available spectrum. If you’ve got an 802.11n router that supports 5GHz, you will have the option to disable channel bonding. This option may be a speed setting. For example, you can choose to reduce the speed of the router from 300Mbits/sec or 270Mbits/sec to 150Mbits/sec. However, as the 5GHz spectrum is less congested and doesn’t have overlapping channels, you should leave channel bonding on. Only disable it if you’re having reliability issues and changing the channel didn’t work.
STEP 5 – Test your settings
You can now test out your new settings. Try moving around your home to find out if the range has improved. You may want to try running a broadband speedtest to see if things have improved there, too. If you’re still suffering from problems, trying changing the wireless channel again and disable channel bonding if available. You can always change the settings back, re-enabling modes later. Don’t forget, though, 5GHz networks have less range than 2.4GHz ones, so you won’t get as good a coverage from these networks.
How to extend Wi-Fi range
While the steps we’ve show you above will help improve and stabilise a wireless signal, there’s only so much repositioning a router and tweaking settings can do for the range. Ultimately, with a wireless technology, there’s a physical limit to how far the signal will propagate before you either can’t connect or speeds become too slow.
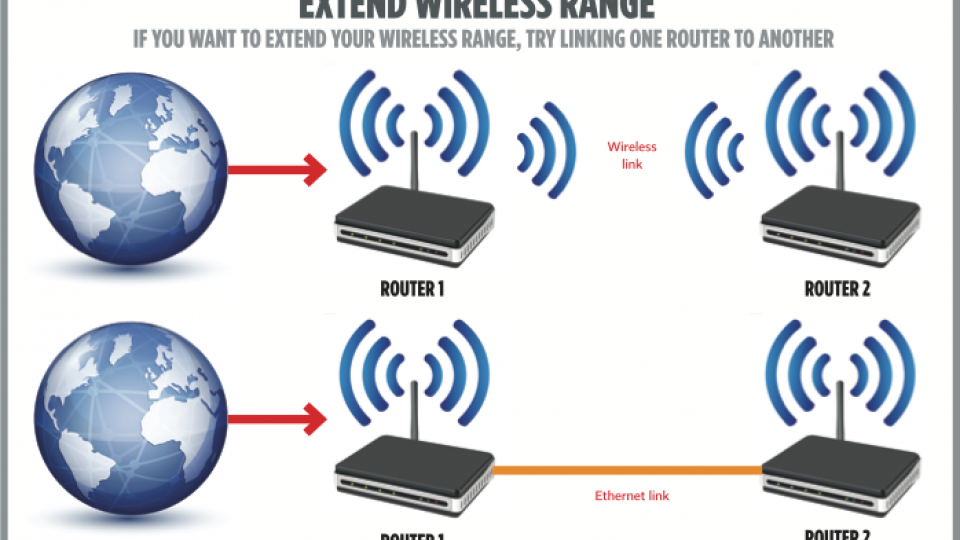
If it’s poor range you’re suffering from, you need a scheme to improve this, providing you with a strong wireless signal everywhere. There are two ways (and three types of products) to do this, as you can see from the diagram below. We’ll look at each in turn.
Wireless range extender
Using a wireless range extender is one of the easiest ways to improve range. These products repeat your existing wireless signal, giving you better Wi-Fi range without having to use any physical cabling. For the best results, you have to place the extender halfway between the existing router and the area you get poor reception in.
There are two types of product that you can use. First, many routers support the Wireless Distribution System (WDS). This allows you to create a single wireless network in your home, with great range. It can work in two modes. First is wireless bridging, which creates a point-to-point link and doesn’t allow wireless clients to connect. This mode is useful in businesses, such as for joining two separate buildings together on the same network. The second mode is wireless repeating, where the wireless signal is repeated and wireless clients can join. Unfortunately, in our experience, WDS is a real pain to set up, particularly between different router manufacturers.

An alternative is to use a dedicated wireless range extender. During set-up, you connect the extender to your existing wireless network, as though it were just another wireless devices. You then create a new wireless network on the extender, following our advice on how to set up a network. It means you end up with two wireless networks: one original one and one that you use when the main network is out of range. When you’re connected to the new network your data is transmitted to the range extender, then repacked and transmitted over the existing wireless network.
The beauty of this system is that a wireless range extender will work with any router and is far easier to configure than WDS. However, you end up with two wireless networks, so it’s important to make sure, particularly for 2.4GHz networks, that the new network doesn’t overlap or interfere with the old network.
A secondary problem is that you don’t have one contiguous wireless network. If you were downloading a file on a laptop, for example, in your lounge on the main network, then moved outside and joined the new wireless network, the connection would be interrupted. You’d then have to resume or restart the download.
Speed can be an issue with these types of products, as you’ve got two wireless connections. Latency, which is the time it takes for a request to be sent and the reply to be received, can also increase. Latency is important as it dictates how responsive things feel. A high latency wireless network means clicking on a link on a website, for example, takes a while to send the request and receive the reply, making it appear to take a while to load the next page.
For these reasons, wireless range extenders are best for fixed devices that don’t currently have very good internet access, or for general web browsing.
READ NEXT: Best Wi-Fi extenders: Improve coverage and enjoy faster download speeds
Wireless access points
A better way to extend wireless range is to use a dedicated wireless access point or a secondary router, connected to your first router via a physical wired network. This resolves latency and speed problems. Using this method you use the same network name and security key on your new access point as on your existing router. It gives you one seamless wireless network, with devices just attaching to the wireless access point with the strongest signal. For the best results, you should use different channels on each access point, so there’s no interference.
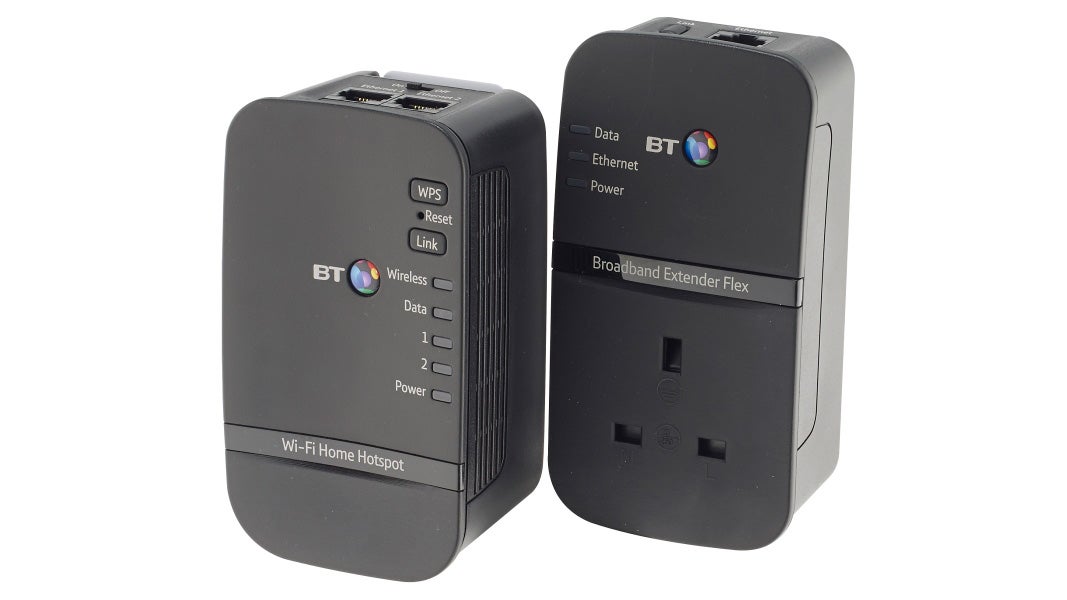
A simple way of extending range is to use a HomePlug wireless access point. This plugs into a mains socket where you need to extend your wireless network to. You need a second, normal HomePlug adaptor connected to your router via Ethernet. Communication between your main router and the new access point takes place over your home’s power cables.
Probably the best way of extending your wireless network is to buy a new router and connect it to your old router via a physical Ethernet cable. This will guarantee you better speeds, plus you can use the new router’s Ethernet switch to connect more devices physically. Running an Ethernet cable isn’t always easy, so you can alternatively two regular HomePlug adaptors: one connected to the new router, one connected to the old one.

This method can be a good way of reusing kit. For example, you can buy a new router to replace the old one, giving you better performance generally. The second router can then be put to work extending wireless range. In all cases, using an access point requires roughly the same steps. We’ll show you how to use two routers together, as that’s potentially the most complicated. We’ll assume that your primary router is connected to your broadband connection and that the internet is working properly. You should also follow the advice above to help work out which channel’s best for your networks.
How to use two routers to extend wireless range
Using two routers is often the best solution to poor wireless, giving you a seamless and quick way to extend Wi-Fi range. If you’ve gone down the HomePlug wireless access point route, the instructions here are similar, but check your product’s manual for full instructions and how to configure it.
READ NEXT: Best PC speakers 2018: The best desktop speakers to buy for gaming and music
STEP 1 – Connect to your primary router
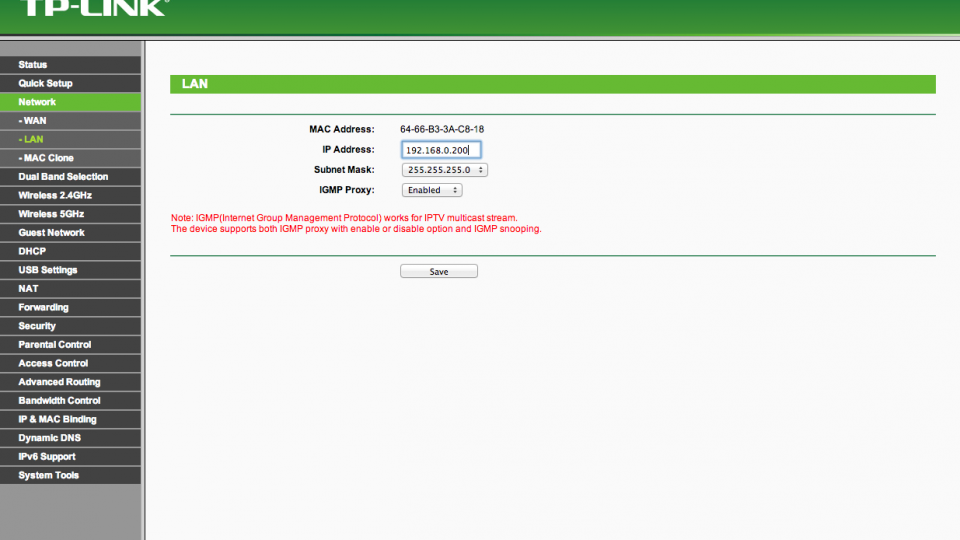
Connect to your primary router’s (the one connected to broadband) web-based management page and navigate to the DHCP settings, which are most likely under the LAN settings. DHCP is the protocol that deals with network addresses for connecting devices, as each one must have its own unique IP address. An IP address is made up of four numbers separated by full stops, such as 192.168.0.2.
The DHCP server information will tell you the first address that is handed out, such as 192.168.0.2. It will then either tell you the last address, such as 192.168.0.100, or the number of addresses it hands out. For the latter, you add the number of addresses to the last number of the starting address to get the end address. If the number of addresses was 100 and the starting address was 192.168.0.2 the last address would be 192.168.0.102.
You need to note down an IP address that falls outside of this range and is not the same as your router’s IP address. This means keeping the first three numbers the same, such as 192.168.0, and picking the final number, which can be between 1 and 254. In both of our examples above, 192.168.0.200 would do the job.

Step 2 – Configure the new router
Next turn on your new router, but don’t connect it in any way to your existing router. Instead, plug a computer into the new router via Ethernet and visit its web management page.
Look out for the router’s IP address setting. This must be for the LAN interface, not the WAN interface, which is for the internet: the two addresses are separate and not related. Change the router’s IP address to the one that you found was safe in Step 1 of this guide (192.168.0.200 in our example). Your router may restart. If it does, you’ll need to connect to its web-based management page again, this time typing the router’s new IP address into your browser.
If your computer won’t connect, it’s possible that it’s still holding on to an old IP address, so you’ll need to make it refresh its settings. The easiest way to do that is to unplug the Ethernet cable from your computer and plug-it in again. Once you’re connected to your router again, find the DHCP page and select Disable. Click Save to apply the changes. You’ll most likely be disconnected from the router, but that’s fine for now.
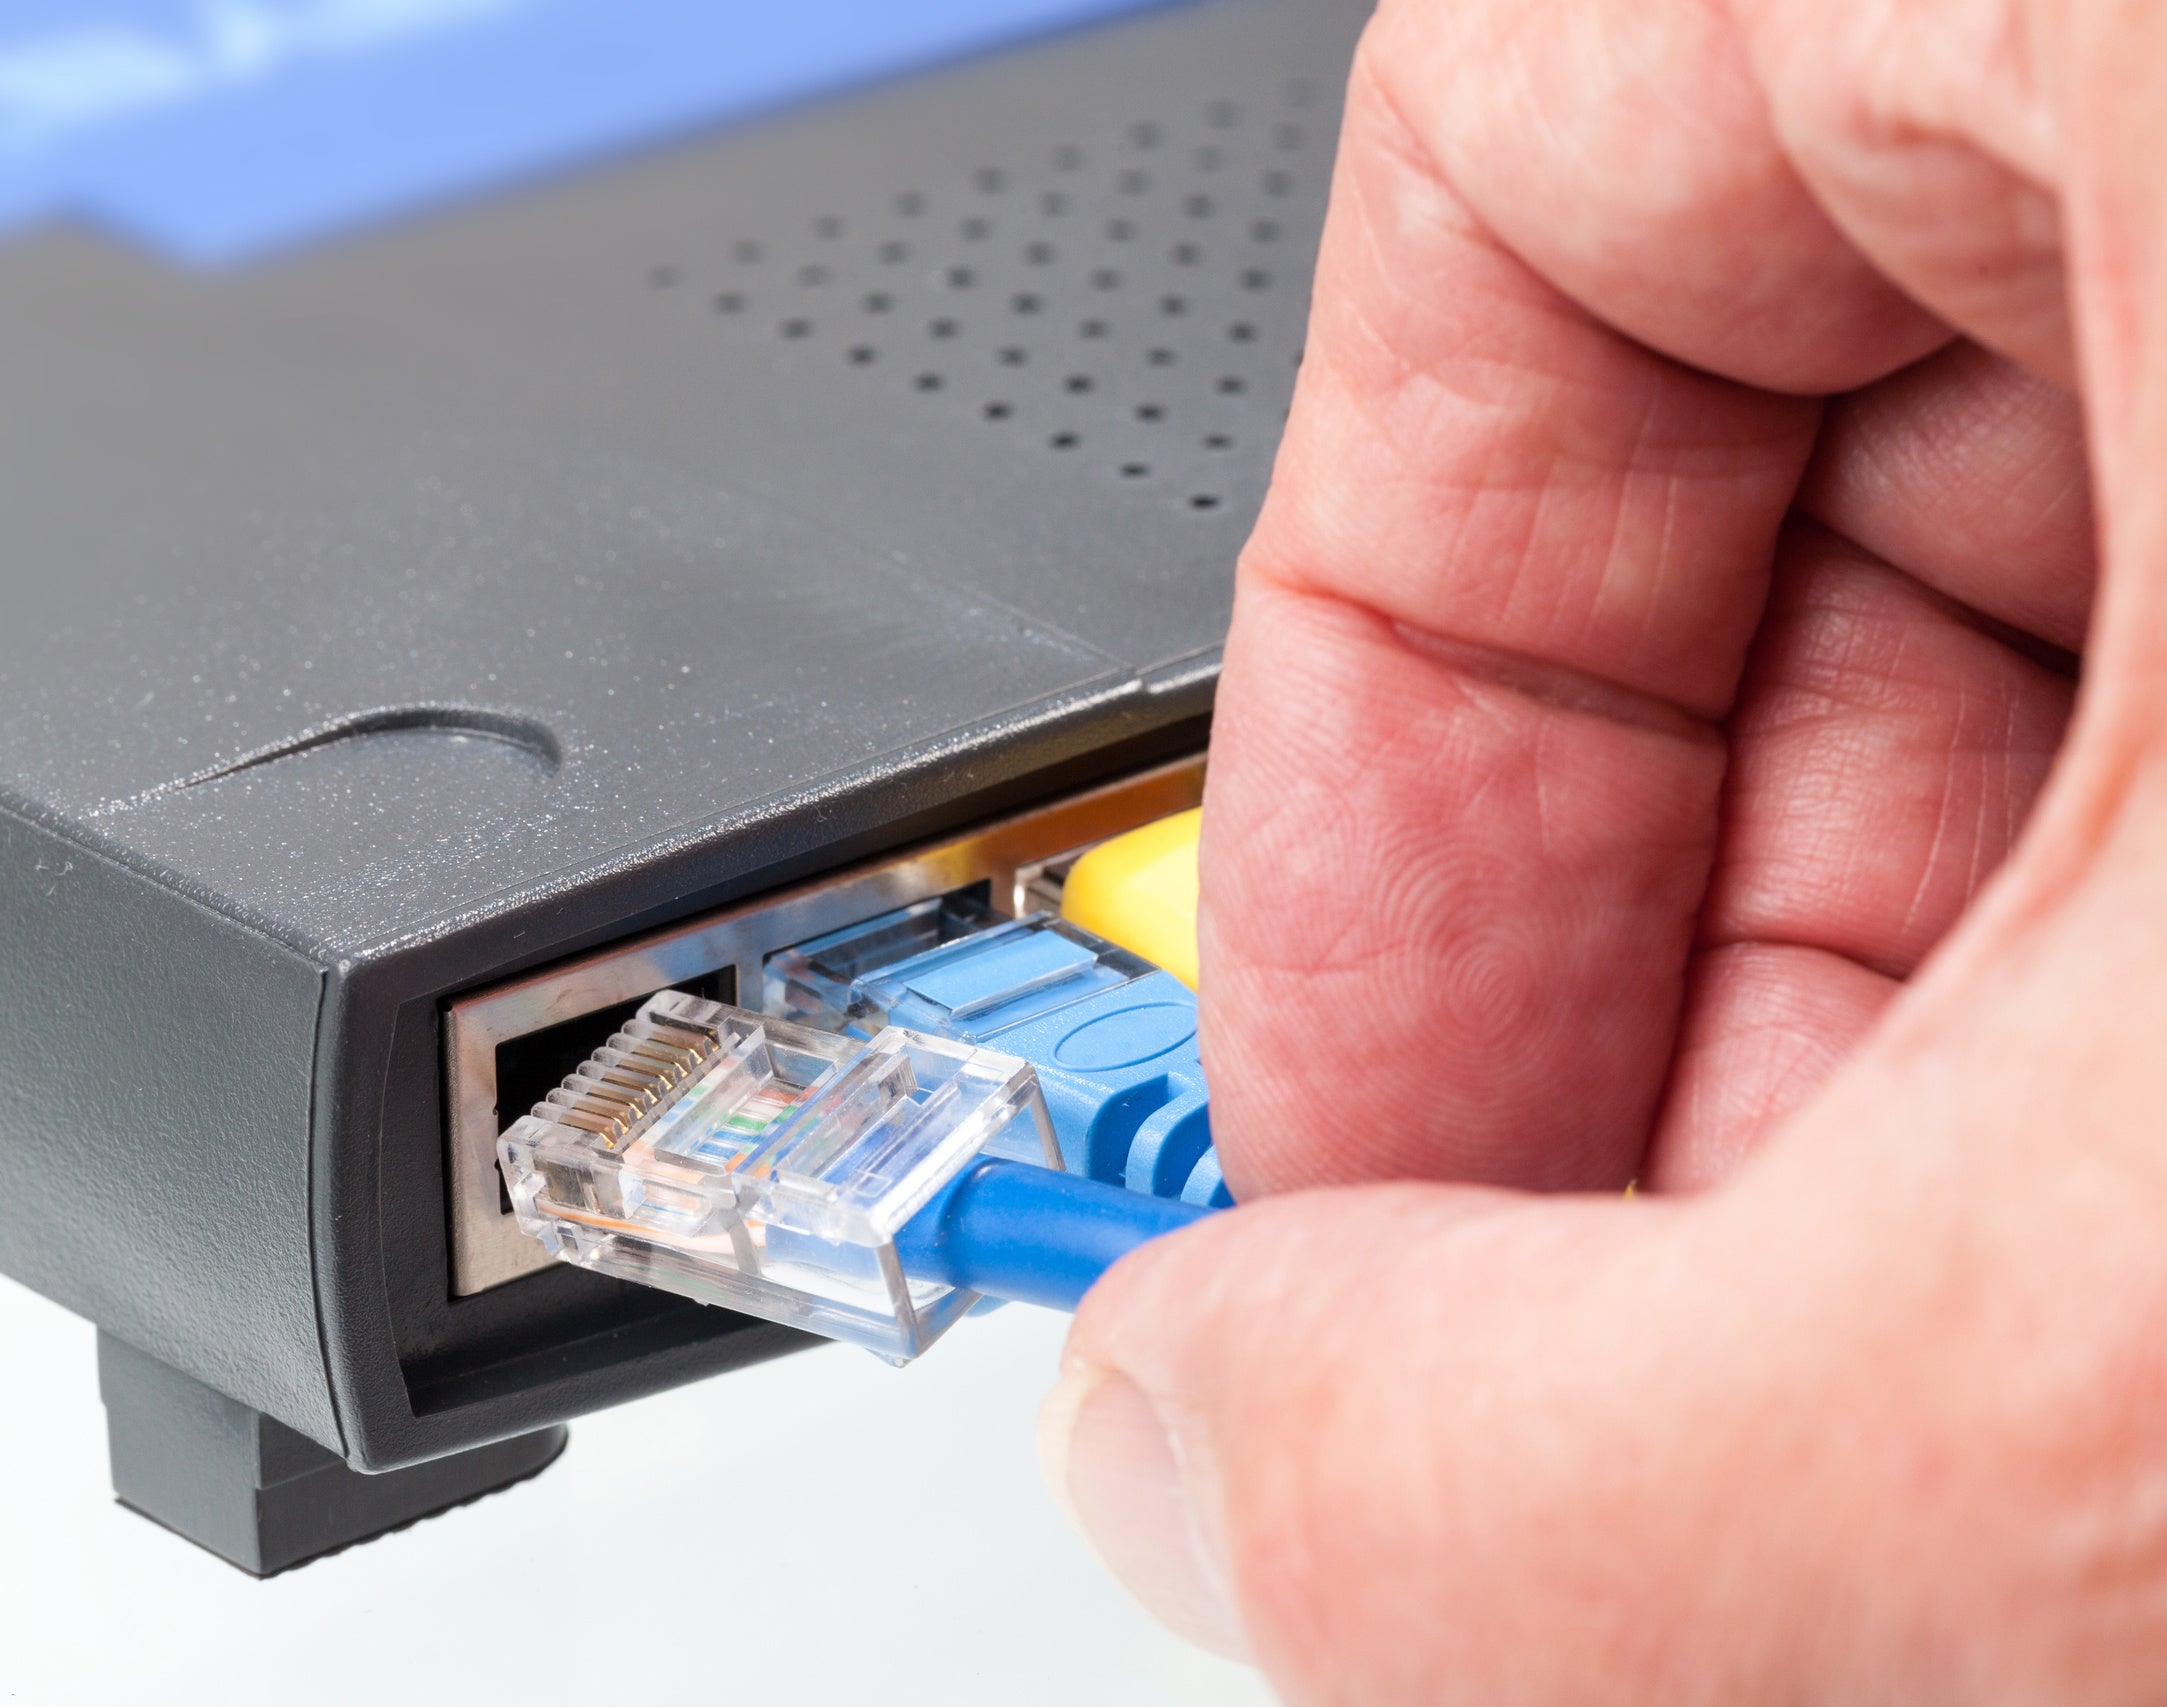
STEP 3 – Connect the two routers together
Disconnect your computer from your new router, as it’s time to connect it to your broadband router. You can either do this step using an Ethernet cable, or you can use HomePlug between them: both do the same job. Plug one end of an Ethernet cable into a spare Ethernet port on your broadband-connected router. Plug the other end into a spare Ethernet port on your new router: not the WAN port, as this will not work.
If you’re using HomePlug, you’ll need two Ethernet cables: one from the new router to a HomePlug adaptor, and one from a HomePlug adaptor to the old internet-connected router.
STEP 4 – Configure both routers to use the same Wi-Fi network
Connect wirelessly to your home network, as you would normally. Get up a browser and type in your new router’s IP address to access its web-based management. Go to the wireless settings and input the same network name and security settings as for your existing wireless network. Make sure you pick a new channel that doesn’t overlap with the existing network’s channel (this is for both 2.4GHz and 5GHz networks) and that you’ve configured both routers to use optimal settings, as per our 2.4GHz and 5GHz guides. Save the settings. You’ve now got one big wireless network, with excellent range and throughputs.