How secure is my password? | How to create a safe password
We check your password security, and show how to make safe passwords with your own free password manager
Two-factor authentication
A simple way to dramatically increase the security of any given account is to enable two-factor authentication. If a service you value highly uses two-factor authentication, you should enable it as soon as possible.
Two-factor authentication requires two steps in order for you to log in, your usual password plus a second one-off code. The second code is usually texted to your phone on request, so anyone wanting to log into your account would need both your password and your mobile.
For convenience you can set most accounts to only require two-step authentication the first time you log in from a new device. The service will remember the device or PC and you won’t be hassled with two-step again.
This makes your accounts very secure to hackers who are trying to compromise your account from afar (say after getting a haul of passwords from a compromised service) but less useful if the attack originates from your own home or a stolen mobile phone. If your problems are more local, you can usually request two-step authentication for every log in.
There are also specialised smartphone apps that are used for authentication, such as Google Authenticator. These apps generate one-use codes that can be used to access your account and adds an extra verification step. Again, these codes don’t protect against your phone being stolen. Despite having Google branding, Authenticator can be used with any service that supports it. For instance, Dashlane supports Google Authenticator and can be enabled through “Tools>Preferences>Security>Two-factor
How to make your own password manager with KeePass
The advantage of using Dashlane is that such companies use extremely complex security systems to prevent breaches. However, the sheer concentration of data held by these firms means they will always be a tempting target. While it’s unlikely actual passwords will be stolen, more serious hacks could lead to a password management service being taken offline, which means you won’t be able to access your passwords.
Instead, why not hide all your passwords in a more innocuous service such as cloud sync software including OneDrive, SugarSync, Dropbox or Google Drive, too.
KeePass is a simple and lightweight piece of database software with a few extra features that make it suitable for password storage. Its password database remains encrypted unless you enter a master password, which you can choose yourself. If you forget the master password, your data will be unreadable, so even if your OneDrive account was to be compromised, a hacker would struggle to unlock your database.
How to use KeePass in the cloud
Go to keepass.info/download.html and download the Portable edition of KeePass Professional Edition. On the webpage, this is the fourth download choice, in the bottom right. Download the .Zip file

Open the .Zip file and click Extract all files. Click Browse and navigate to your cloud folder (C:\OneDrive, C:\Dropbox etc) and extract KeePass into a new folder called KeePass
Run KeePass and click the “New” button on the top-left. Navigate to KeePass folder and click Save. This is where your password database will be stored, and it will synchronise across your computers each time you modify it

Set a strong master password and use the “Estimated quality” bar to gauge how secure it is. You’ll need this password every time you want to access your password database

On the next screen, you can add a database title and description if you want, or you can leave everything blank and hit OK. You’ll be taken back to the main KeePass window
The area on the left will display various categories of passwords, making it easier to find the password you want. You can add your own categories by right-clicking in this area and clicking “Add group”
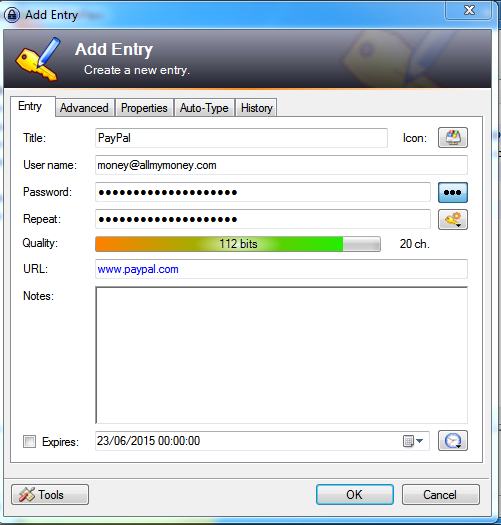
Add a new password by clicking the icon with a yellow key and green arrow next to the save button
Enter the name of the service, the username and the password. If you want to use KeePass’ autotype feature, enter the domain on which you use this username and password combination. For instance, http://paypal.com for your PayPal password.
By default, the Auto-Type feature can be activated by pressing Ctrl+Alt+A, but this can be changed under Tools>Options>Integration
Use a USB stick instead
If you’d prefer not to store your password database in the cloud, you could install KeePass on your local hard disk or on a USB storage device. For added security, you can protect it with encryption. We’d recommend Veracrypt for this.
Download VeraCrypt from veracrypt.codeplex.com and run the installer. Once done, open the program and select Create Volume and select “Encrypt and non-system partition/drive”. Leave the next screen on its default settings and click next, and on the screen after that select the location of the USB drive you want to encrypt – make absolutely sure that you’re encrypting the right device by checking the drive letter Click next again and enter the size of the volume and then enter a password, which you’ll need to remember in order to access your KeePass data. Any data on the USB disk will be lost, so make sure there’s nothing on it that you need. Once you’re done, simply follow the instructions above but extract the .zip file to your USB drive instead.
Whenever you want to access your drive, you’ll need to run VeraCrypt and select “Select Device”. Select your encrypted drive and press OK. Then click Mount and enter the password you selected. You’ll now be able to access this drive as normal.